Glassworking User Manual
Use this manual to quote measured glass, draw and approve custom sheets, prepare
production, plan component demand, manufacture and deliver, and obtain reports
and cutting exports. It covers all five addons in vertical-glass-working on
Odoo 18 Community. Setup and access administration are in the
Administrator Manual.
Screenshots show real Odoo screens and generated report pages using synthetic Glassworks Training records and English labels. The illustrated user has combined permissions so every workflow can be shown. Your menus and buttons depend on your assigned roles, installed addons, and company. References and record numbers are illustrative.
Contents
- Navigation and quantity conventions
- Quote rectangular glass and apply perimeter pricing
- Create and link a glass drawing
- Choose shapes and add fabrications
- Move fabrications and use placement helpers
- Specify material and edge finishes
- Print, approve, and revise drawings
- Copy drawings, reuse templates, and archive
- Manufacture measured panes and approved sheets
- Plan component demand and work centers
- Complete partial production and recover canceled work
- Deliver and invoice measured glass
- Manufacturing and planning reports
- ASC, XLSX, and component worklists
- Common problems and corrections
1. Navigation and quantity conventions
1.1 Where to work
| Task | Entry point | Addon |
|---|---|---|
| Quotation/order and rectangular measurements | Sales → Orders → Quotations / Sales Orders | Measurements |
| Drawing authoring and approved evidence | Quotation-line drawing actions or Glass Configurator → Configurations | Configurator |
| Shape selection | Draft Browse Shapes, or Glass Configurator → Shapes | Configurator |
| Manufacturing and work orders | Manufacturing → Operations | Standard Odoo with measurement/drawing extensions |
| Component-demand planning | Manufacturing → Production Planning → Component Planning | Planning |
| Planning groups and windows | Manufacturing → Production Planning → Planning Groups | Planning |
| Planning analysis | Manufacturing → Production Planning → Planning Group Report | Planning |
| Filtered customer manufacturing reports | Manufacturing → Reporting → Manufacturing Reports | Manufacturing Reports |
| Cutting files and component worklists | MO buttons and MO/WO Actions/Print menus | Maver Export |
| Deliveries | Inventory → Operations → Transfers, or the order's Delivery button | Measurements |
| Invoices | Sales invoice action or Invoicing → Customers → Invoices | Measurements |
Use the search bar, Filters, Group By, and Favorites to find your work. The list's optional-column selector exposes extra measurement fields where offered. On smaller screens, Odoo collapses buttons into its action menu and displays order lines as cards. Desktop screenshots show the same records and workflow states.
1.2 Pieces are not always the quantity
| Term | Meaning |
|---|---|
| Pieces / Number of Sheets | Physical panes to make or handle |
| Quantity / Demand | Native Odoo quantity in the displayed UoM, such as m² or Units |
| Height / Width | Cut dimensions entered in millimeters |
| Area per piece | Height × width ÷ 1,000,000 for rectangular measurements |
| Perimeter | Length of the four rectangular edges, in meters |
| Raw-material requirement | Native component demand defined by the BoM |
| Approved drawing | Preserved numbered revision and PDF; a current draft can differ from the last approval |
For five 400 × 500 mm panes, Pieces = 5 and Quantity = 1.00 m². Each
pane is 0.20 m² and has 1.80 m perimeter, giving 9.00 m in total. Entering 5
in an m² quantity field means 5 m², not five panes.
For an enabled Unit-category measured product, one Unit is one piece and one Dozen is twelve. Only the administrator can determine the intended UoM setup. Do not change product units to work around a quantity error.
Drawings support four outlines and cutouts. The separate measurement fields describe rectangular height/width: they do not automatically become the configurator's net area, curved outline, or machine instructions. Drawing edits do not change the quotation's product, quantity, or price.
2. Quote rectangular glass and apply perimeter pricing
2.1 Enter a measured quotation
- Open Sales → Orders → Quotations and click New, or open a draft quotation.
- Select the customer, pricelist, and other commercial terms.
- Add the finished-glass product. Choose the correct variant and UoM.
- Enter Pieces, Height (mm), and Width (mm). Use a separate line for each size or specification.
- Review the native Quantity and calculated measurements. Product/BoM selection may supply reference defaults; replace them with the requested cut size.
- Save. Correct any incomplete-size warning or whole-piece validation error.
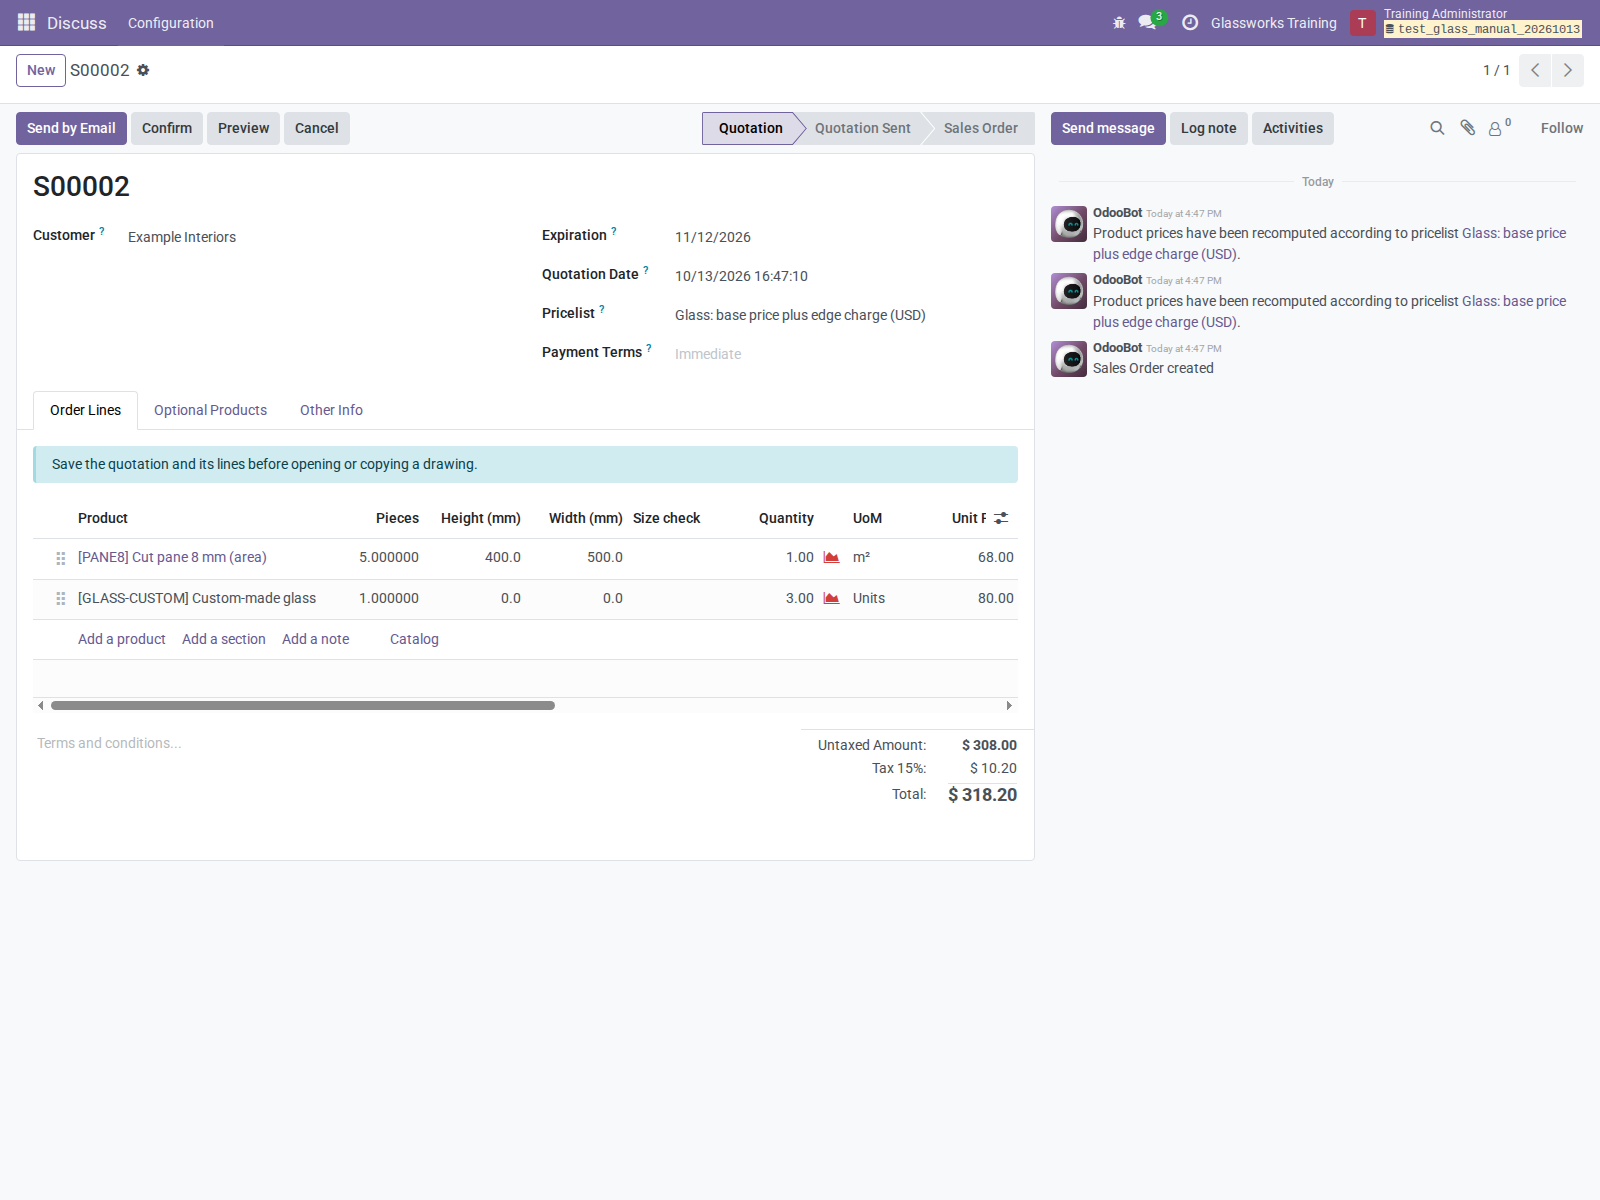
Figure U1. Five 400 × 500 mm panes use 1.00 m². A separate Unit line owns the custom drawing workflow.
Open the order line's form for Cut dimensions and Calculated measurements. The list shows pieces, height, width, and an incomplete-size badge. Dimensions, geometric area, and perimeter are optional hidden columns.
Measurements appear automatically for Surface products or Unit variants with the measurement exception enabled, and for lines retaining existing dimensions. Ordinary unsupported-category products use their normal Odoo quantity behavior.
Height and width must both be positive for a measured commercial cut. A half-entered size can show a warning while editing, but must be corrected for the saved measured specification. The combined Dimensions label sorts the smaller dimension first. Keep Height and Width in the required orientation for directional glass instead of using that label as an orientation instruction.
2.2 Review perimeter pricing
- Check that the quotation uses the administrator's formula pricelist.
- Review total perimeter after changing pieces or dimensions.
- Use Update Prices and review every affected line, discounts, and taxes.
- Save and send the quotation through the normal Sales procedure.
The formula rule's per-meter amount and selected variant attribute per-meter amounts are added together. Both apply only to a formula rule with nonzero perimeter and positive quantity; fixed-price and percentage-price rules do not receive this charge.
Example: five 400 × 500 mm panes have 9 m perimeter. At 2/m, the additional charge is 18 before discounts and taxes. If the native formula price is 50/m² and sales quantity is 1 m², the resulting unit price is 68/m². The charge is inside the product unit price, not a separate edge-processing line. It does not create or schedule manufacturing work.
Changing sales Quantity recalculates Pieces. Do not enter arbitrary area quantities that cannot represent whole panes at the product's rounding. Ask the administrator to review UoM rounding rather than forcing a conversion.
2.3 Send, confirm, and print
- Review quantities, dimensions, prices, dates, and delivery addresses.
- Use normal Send by Email / quotation-printing actions as appropriate.
- Confirm only after commercial agreement. Confirmed cut dimensions are read-only in the UI.
- Use the configured Odoo manufacturing/procurement/delivery workflow.
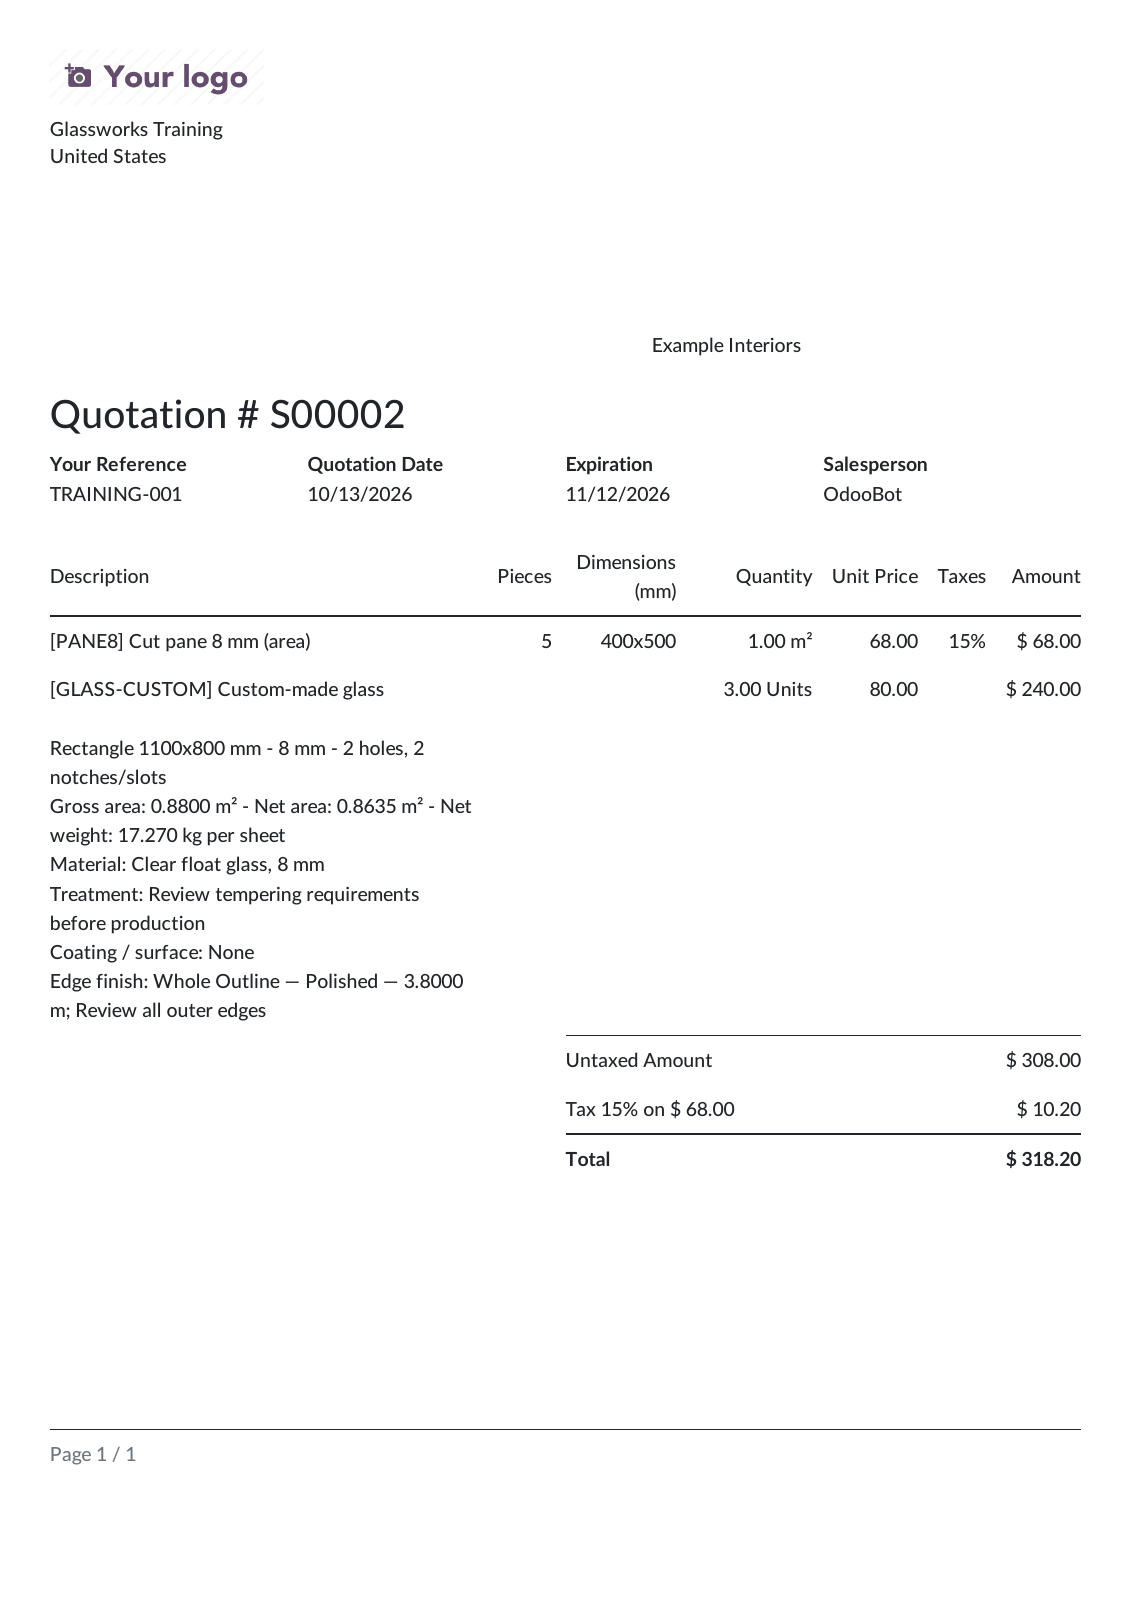
Figure U2. The quotation report includes measurement columns when measured lines are present; ordinary lines have blank measurement cells.
For a size change after confirmation, follow your organization's order-change procedure and review linked demand, price, production, and deliveries. A drawing revision alone does not update those native quantities or orders.
3. Create and link a glass drawing
3.1 Start from a quotation line
- Create/open the quotation and add a regular product line.
- Save the quotation and line first. Unsaved lines hide drawing buttons and show saving guidance. Sections and notes cannot own drawings.
- Click Configure Glass on the saved line. In the embedded line form, the equivalent action is Open Glass Configuration.
- If the line already owns a drawing, it opens that drawing, including an archived one. Otherwise a new configuration form opens.
- Review Product, company where shown, and Number of Sheets.
- Enter the outline dimensions, thickness, date, and optional profile, then Save.
- Use Open Sale Order to return to the owning quotation when permitted.
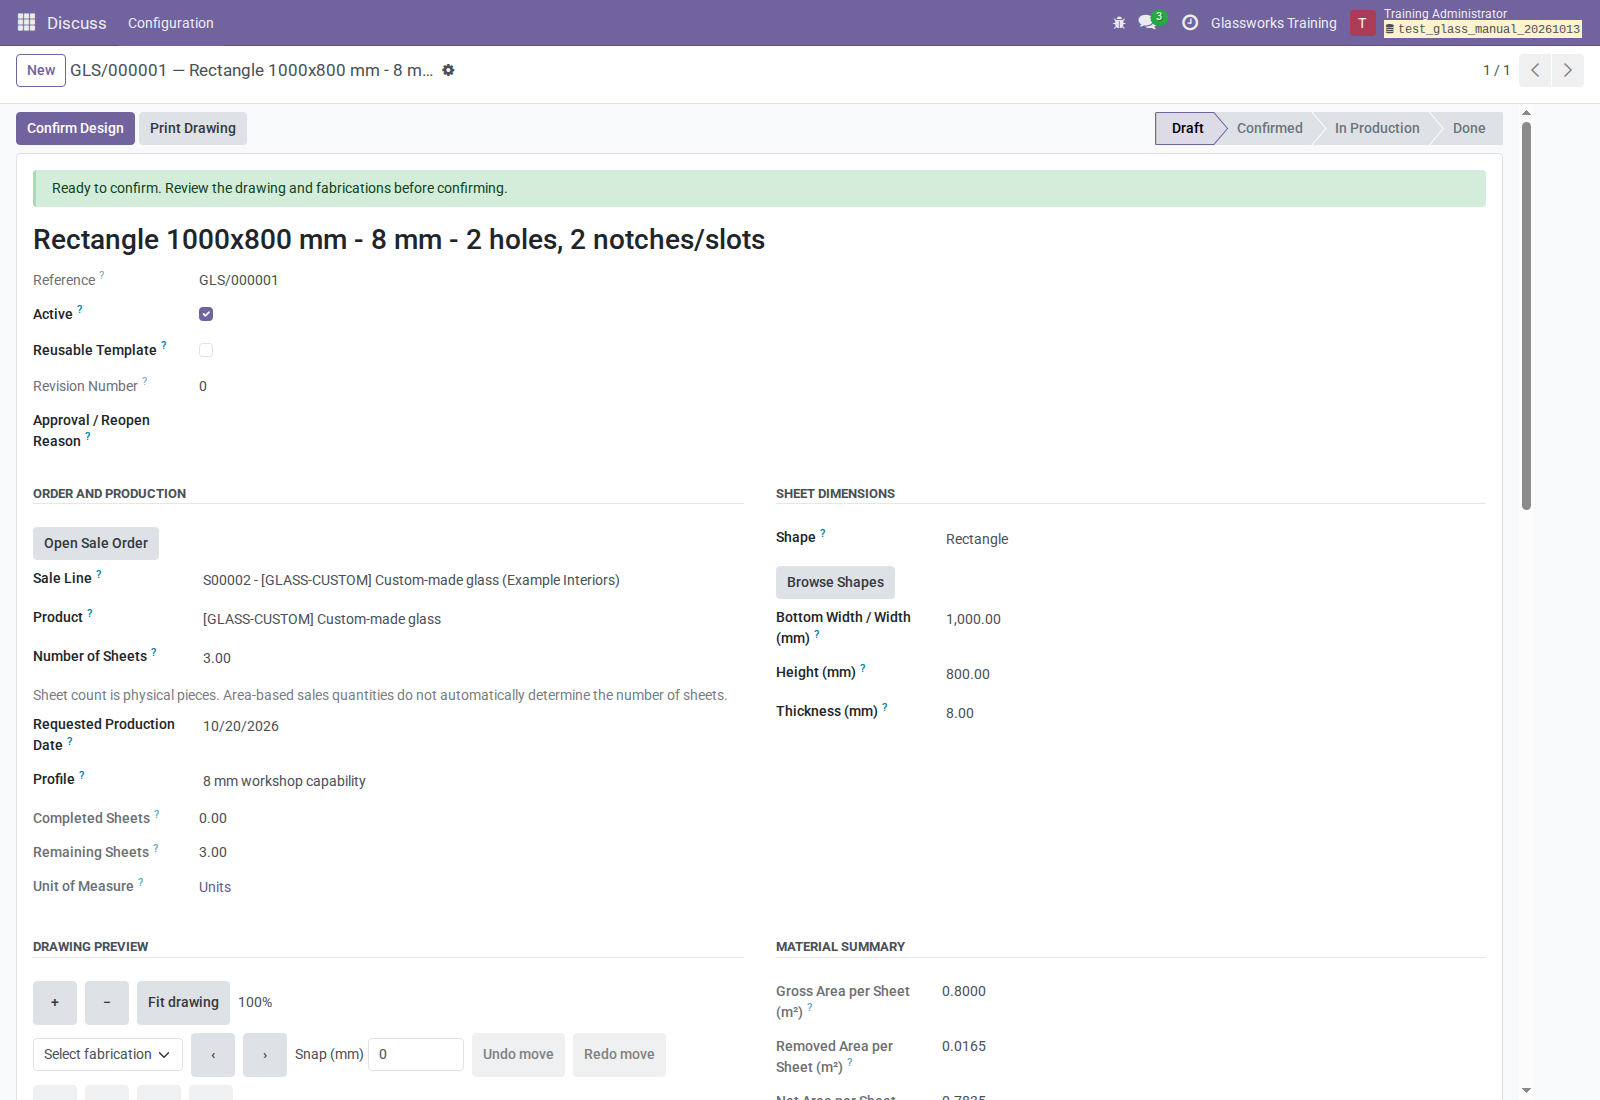
Figure U3. The configuration retains the line's product and an explicit physical sheet count.
A Unit-category line converts its quantity to physical Units without rounding, and the result must be a positive whole count. An area-based line does not tell the configurator how many sheets to draw: enter the count explicitly. A new area-based drawing otherwise starts at one sheet.
The configurator can retain area-based and service sales products for drawings. Approval is distinct from direct-production eligibility. Do not substitute a different product merely to make a drawing approvable.
Opening/copying from a canceled order is blocked. Configuration work needs write access to the destination line and access to its company/product.
3.2 Start standalone
- Open Glass Configurator → Configurations → New.
- Select the product, company where shown, and Number of Sheets.
- Complete the dimensions. Defaults are Rectangle, 8 mm, and one sheet.
- Leave Sale Line empty for a standalone design, or choose a saved, writable same-company product line that does not already own a drawing.
- Check product and count after linking. Selecting a line updates company/product, but does not automatically reconcile physical count.
- Save to receive a Reference such as
GLS/000001.
If the default Product is empty, select an accessible product; the seeded Custom-made glass may not be shared with your company. Link the intended sale line before approval: a drawing with approval/manufacturing history cannot later detach or move to a different line.
4. Choose shapes and add fabrications
4.1 Select the outline
Choose Shape, or save the draft and click Browse Shapes → Use This Shape. Opening Shapes directly lets you inspect the catalog, but does not create a drawing.
| Shape | Enter in mm | Example |
|---|---|---|
| Rectangle | Width and Height | 1000 × 800 |
| Circle | Diameter | 800 |
| Ellipse | Width and Height | 1000 × 700 |
| Trapezoid | Bottom Width, Top Width, Height | 1000 bottom, 600 top, 800 height |
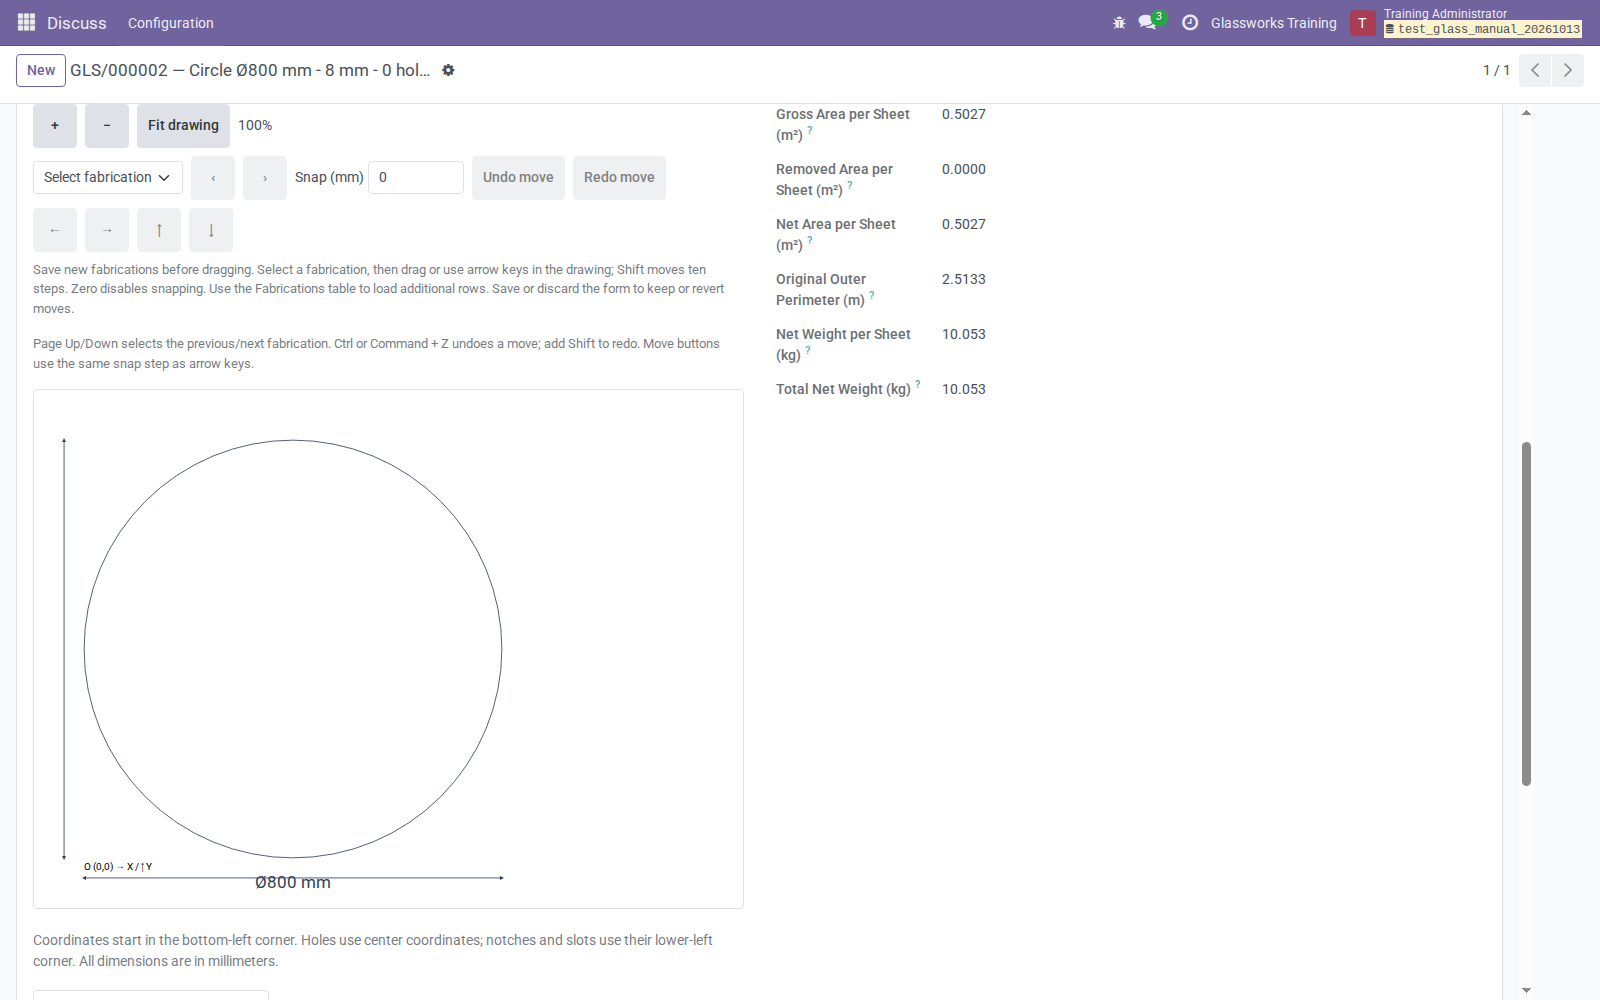
Figure U4. Circle outline; the bounding box is its diameter in both directions.
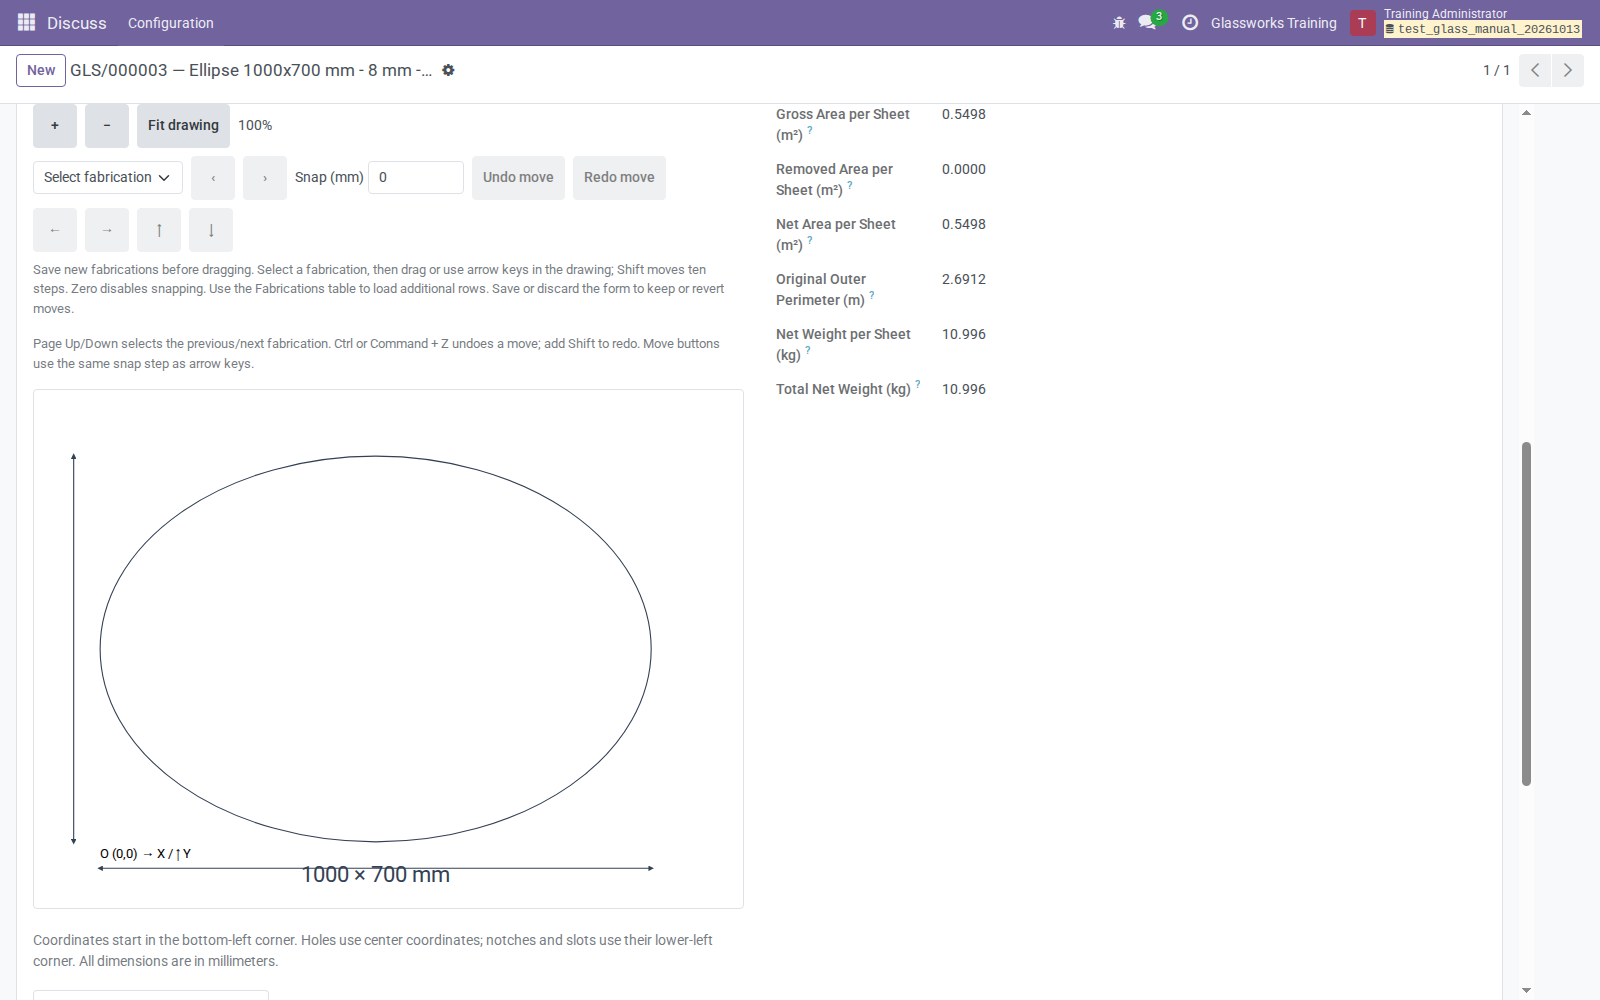
Figure U5. Ellipse outline with separate width and height.
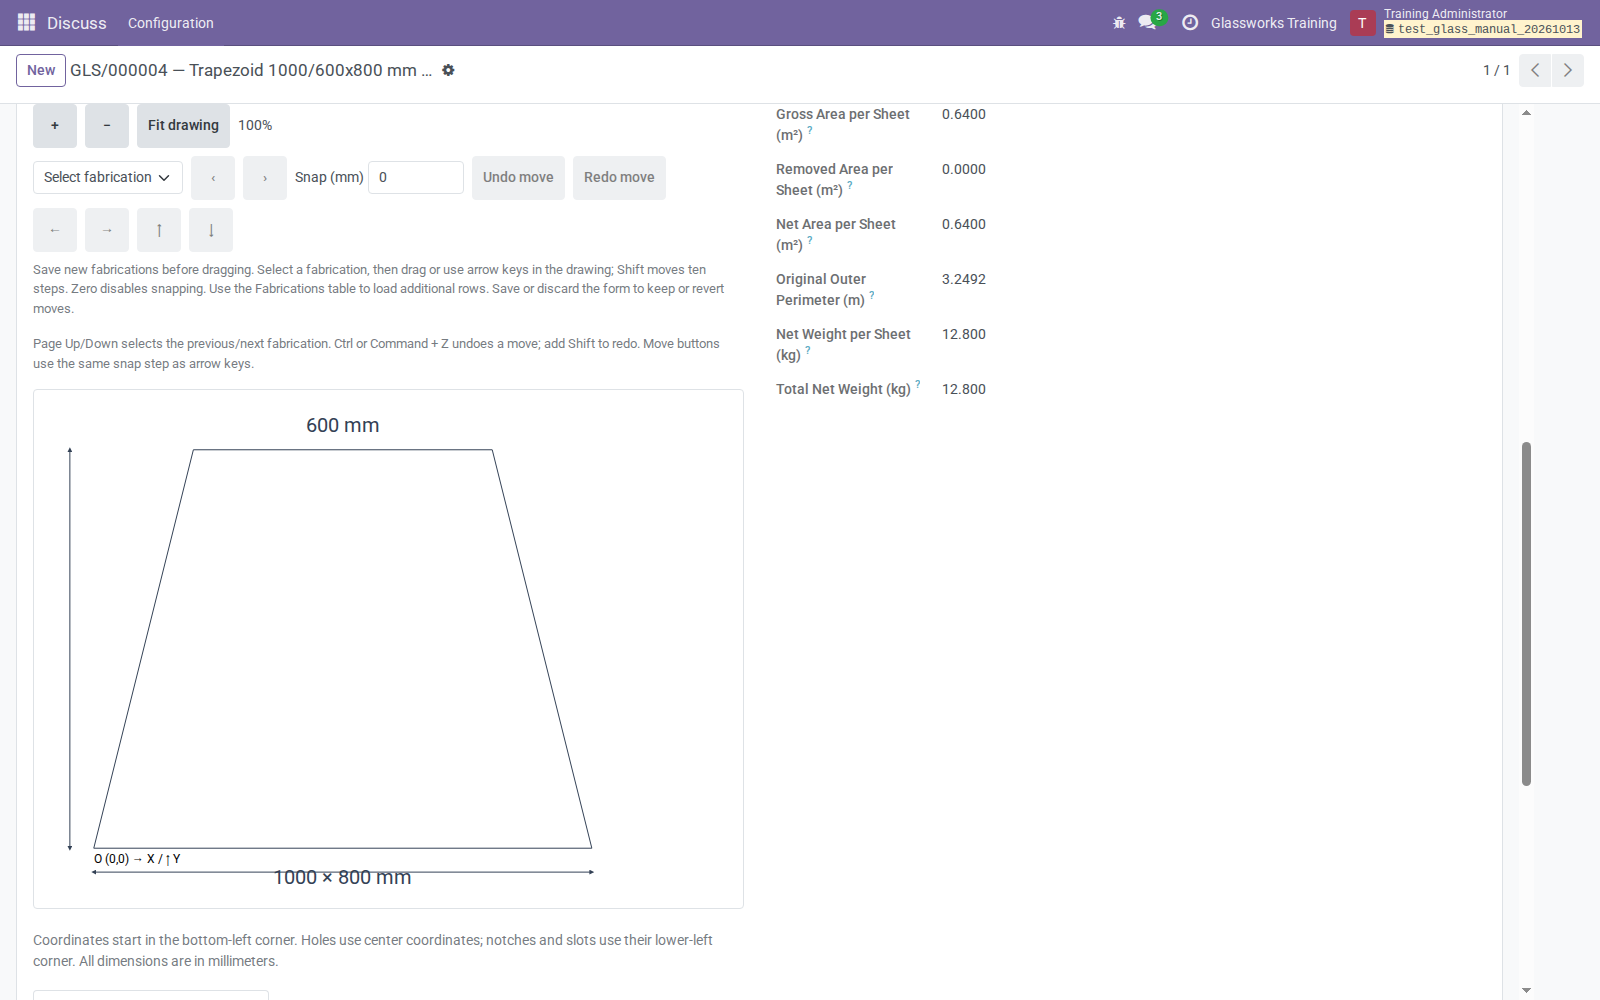
Figure U6. The supported trapezoid has a centered top and symmetric sides.
Required dimensions and thickness must be positive. A trapezoid's top width must be positive and no wider than its bottom. Sheet count must be a positive whole number. Catalog images do not define new geometry. Arbitrary polygons, asymmetric trapezoids, rotated cuts, and CAD import are not provided.
4.2 Add holes, notches, and slots
- Open the Fabrications tab and click Add a line.
- Choose the fabrication type.
- Enter X/Y and its dimensions using the conventions below.
- Add a Note describing the intended cut.
- Repeat, and reorder rows with their handles if needed.
- Save before selecting/dragging newly created rows in the drawing.
| Fabrication | X/Y identify | Size | Position rule |
|---|---|---|---|
| Hole | Center | Diameter | Whole circle must fit inside/on the outline |
| Notch | Lower-left corner | Width and Height | Must touch the outer outline |
| Slot | Lower-left corner | Width and Height | Used for an interior rectangular cut |
All coordinates start at the bottom-left of the sheet's bounding box; X increases rightward and Y upward. For a circle/ellipse/trapezoid, being inside the bounding box alone does not guarantee a cut fits inside the actual outline.
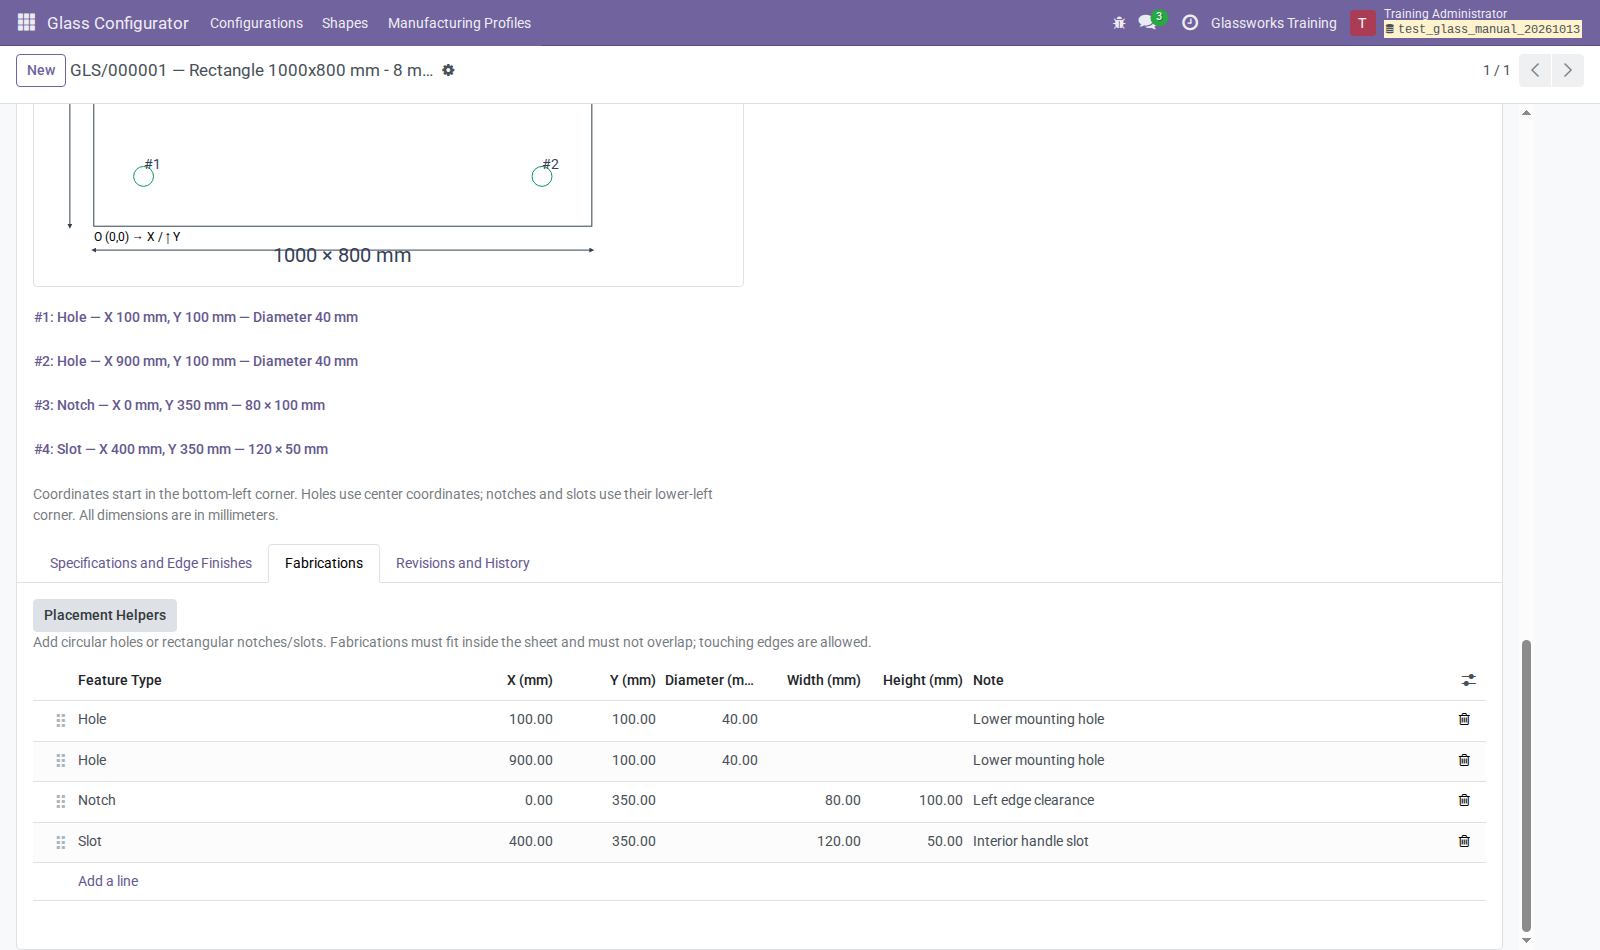
Figure U7. Numerical cut inputs and notes determine the drawing.
The training rectangle is 1000 × 800 × 8 mm with three sheets:
| Row | Type | X | Y | Size |
|---|---|---|---|---|
| 1 | Hole | 100 | 100 | Diameter 40 |
| 2 | Hole | 900 | 100 | Diameter 40 |
| 3 | Notch | 0 | 350 | Width 80, height 100 |
| 4 | Slot | 400 | 350 | Width 120, height 50 |
Numbers in the drawing follow the fabrication order. Review the matching details below the preview and the exact values in the table.
4.3 Correct validation feedback
Cuts must fit inside/on the outline, cannot overlap, and must leave positive net glass area. Touching boundaries is allowed. A notch placed wholly inside the sheet should be changed to a Slot or moved to the outline.
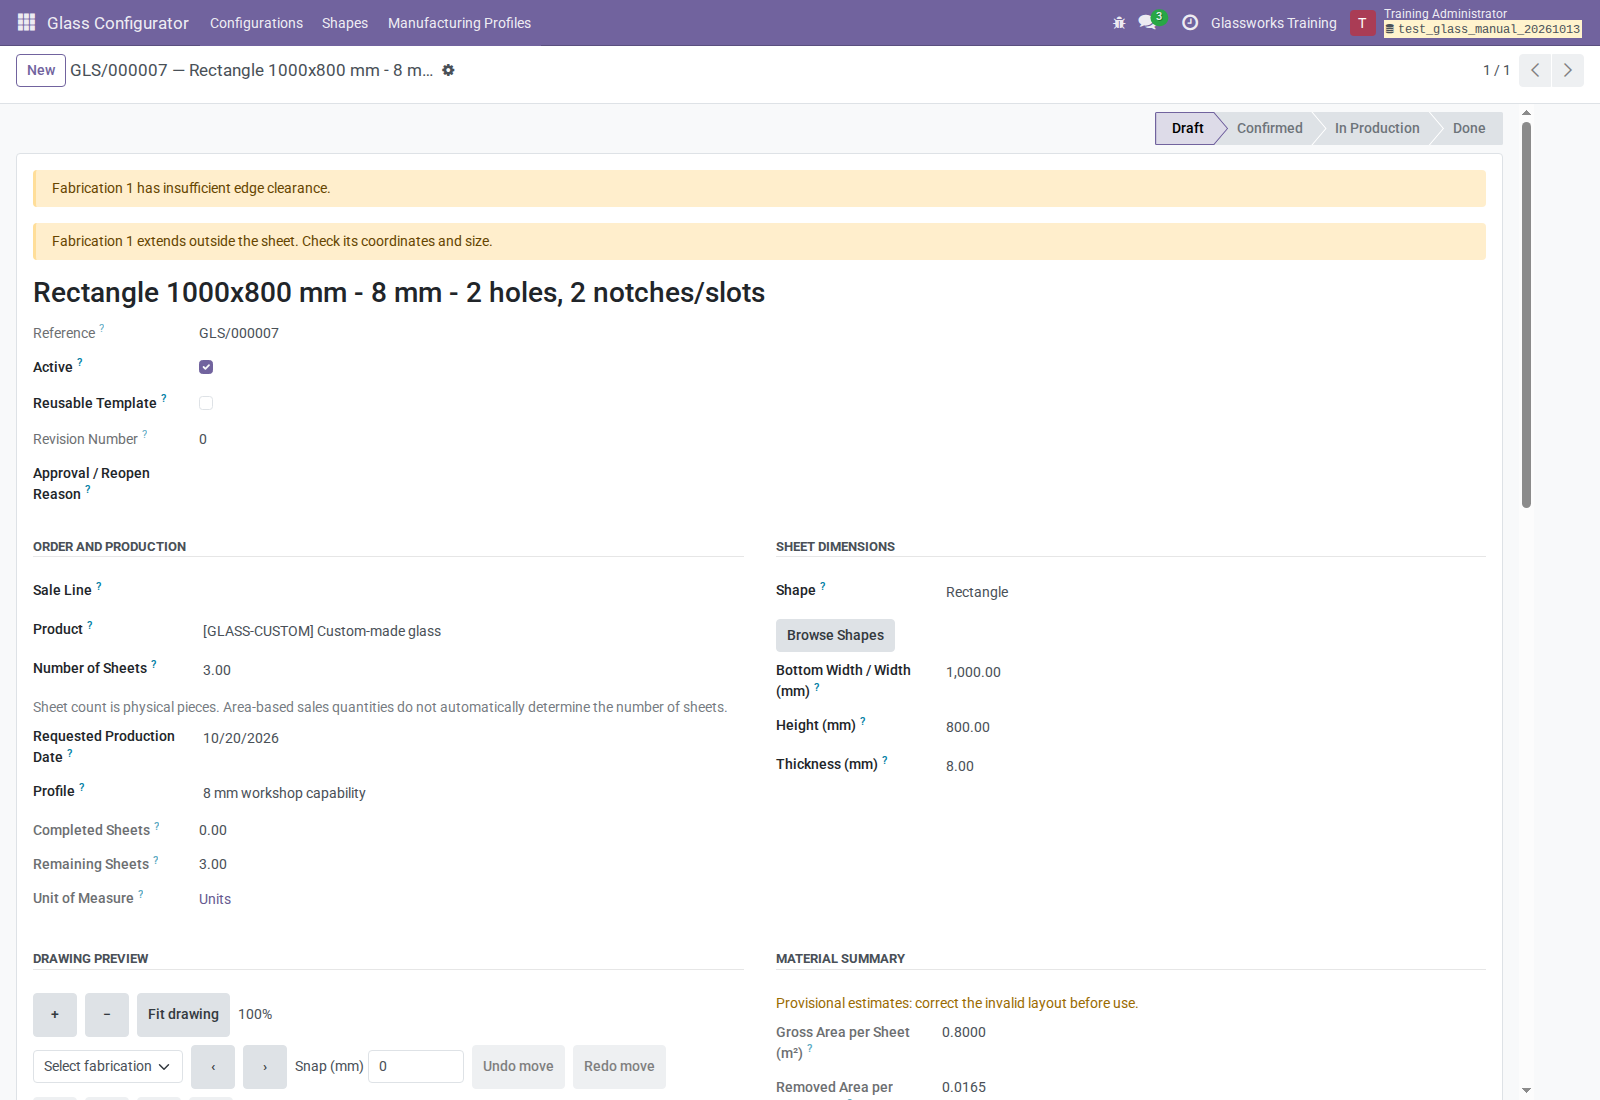
Figure U8. An invalid draft remains editable but cannot be approved or printed.
- Read the warning above the form and inspect red fabrication markers.
- Correct type, coordinates, sizes, overlaps, or edge finishes.
- Save and confirm that the valid-layout message returns.
- Review any separate sales/profile warning before approval or dispatch.
Drafts with outside/overlapping cuts can be retained for correction. Negative or nonfinite inputs, nonpositive cut sizes, and invalid sheet counts are rejected on save. Invalid-layout areas/weights are provisional estimates.
5. Move fabrications and use placement helpers
5.1 Interactive editor
The editor moves saved fabrications currently loaded by the Fabrications table; creation/resizing is numerical in the table.
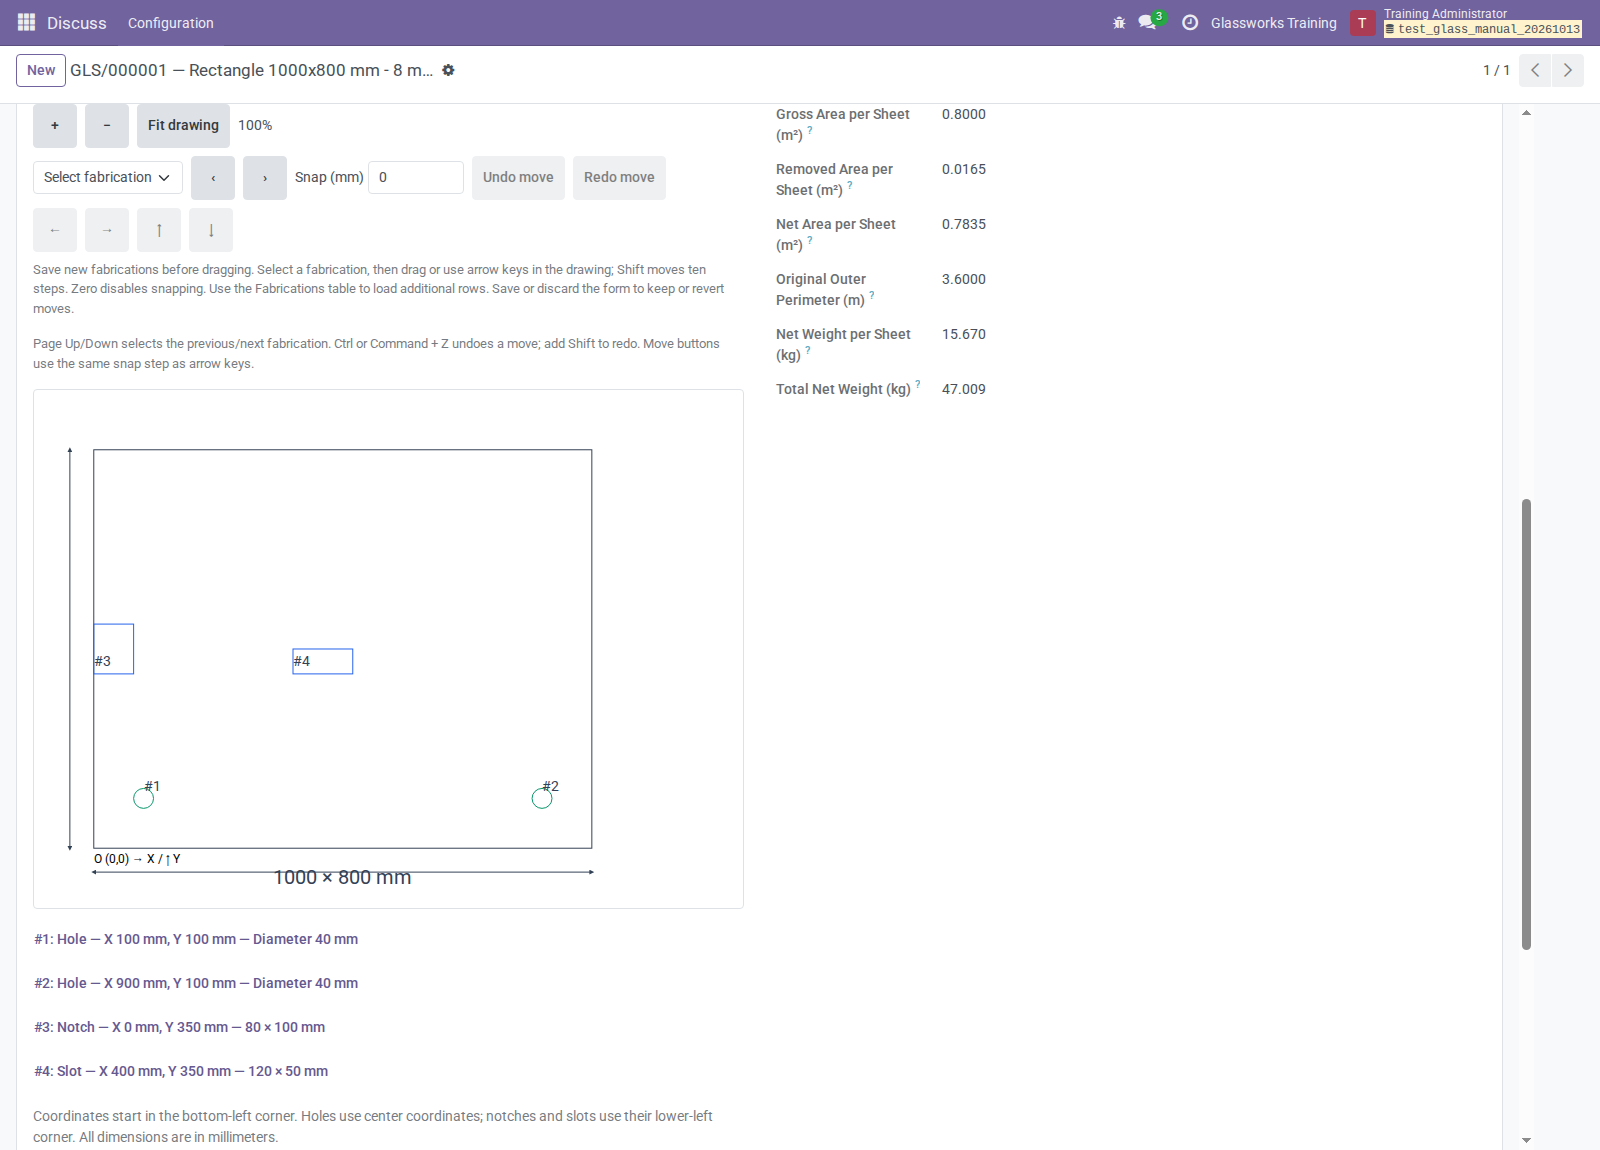
Figure U9. Select a numbered anchor or fabrication and use the movement controls.
- Save the draft and fabrication rows.
- Select a cut from Select fabrication, its numbered drawing anchor, or the matching details below the drawing.
- Drag a hole by its center or a rectangular cut by its lower-left position. On touch screens, use dragging or the directional move buttons.
- Set Snap (mm) to the grid step. Zero disables snapping; key/button moves then use a 1 mm step. Grid snapping rounds absolute coordinates.
- Review feedback and click the form's Save to persist, or Discard to restore the saved form.
| Control | Effect |
|---|---|
| Left/Right/Up/Down buttons | Move the selected fabrication by the grid step |
| Arrow keys with drawing focus | Same positional movement |
| Shift + arrow | Ten movement steps |
| Previous / Next fabrication | Cycle saved loaded fabrication rows |
| Page Up / Page Down | Previous/next selection with drawing focus |
| Undo move / Redo move | Undo/redo buffered positional moves |
| Ctrl/Command + Z | Undo with drawing focus |
| Ctrl/Command + Shift + Z | Redo with drawing focus |
| + / − | Zoom presentation |
| Fit drawing | Reset the zoom to fit |
Undo/redo applies only to drawing position moves. Numeric/type/size/outline edits or a change in loaded rows can reset positional history. Use the form's Save / Discard deliberately; zoom changes presentation only and remains available on locked drawings. Scroll inside a zoomed drawing when needed.
For large tables, use Fabrications pagination to load the relevant rows. The selector does not represent every unloaded fabrication. Selecting/moving cuts on another page requires loading that page first.
5.2 Numeric placement helpers
- Save the draft and its cuts.
- Open Fabrications → Placement Helpers.
- Select the fabrication by coordinates/dimensions/note.
- Choose the operation and any count/offsets.
- Click Apply, then inspect the refreshed drawing and validation.
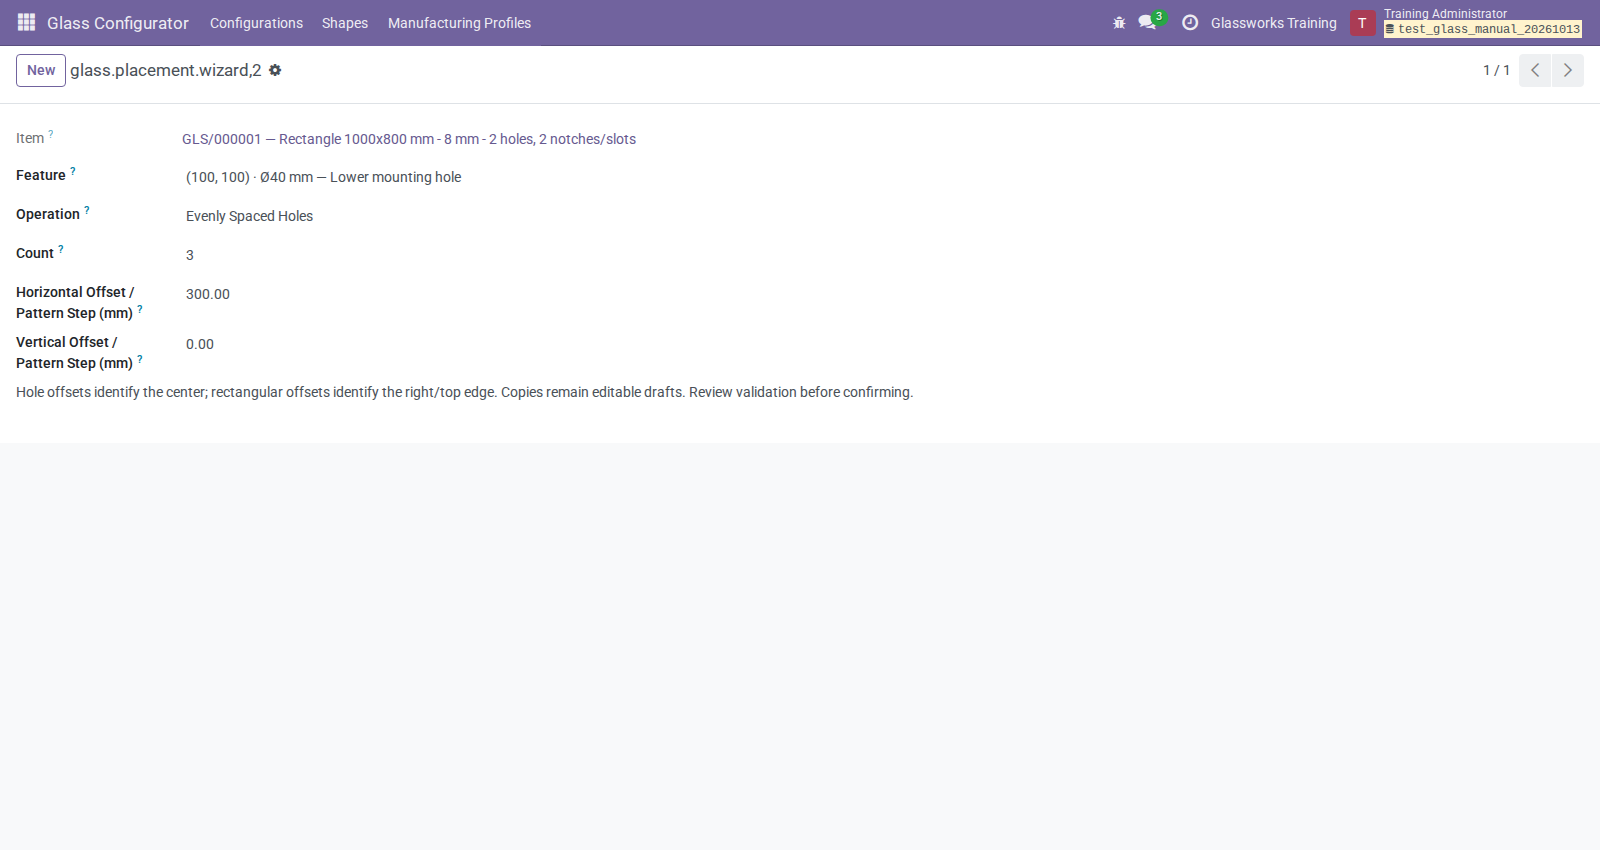
Figure U10. A three-position horizontal pattern uses a 300 mm step. This dialog illustrates the settings before Apply.
| Operation | Inputs and result |
|---|---|
| Center | Moves the selected cut to the bounding-box center |
| Mirror Horizontally | Reflects its position left/right; does not create a copy |
| Mirror Vertically | Reflects its position bottom/top; does not create a copy |
| Place from Opposite Edges | Enter distances from the right/top bounding edges; hole distances locate the center, rectangle distances locate its right/top edges |
| Duplicate | Creates one copy at Horizontal/Vertical Offset from the source |
| Evenly Spaced Holes | Select a hole; enter X/Y steps and total positions 2–100, including the original |
For a hole at (100,100), Count 3 with X step 300 and Y step 0 gives positions (100,100), (400,100), and (700,100). Do not use zero steps that create overlapping copies. Center/mirror/bounding-edge placement can be invalid for a curved outline, trapezoid, or notch; review the result.
Helpers change saved records. The drawing's positional Undo move does not undo them. Correct numeric coordinates or remove unwanted copies while still in draft.
6. Specify material and edge finishes
- On a draft, open Specifications and Edge Finishes.
- Enter Material Specification, Treatment Specification, and Coating / Surface Specification as needed.
- Add one Whole Outline finishing instruction, or selected individual straight-edge rows on a rectangle/trapezoid.
- Enter Finishing Instruction, optional Note, and review Length per Sheet (m).
- Save and review the drawing and all manufacturing instructions together.
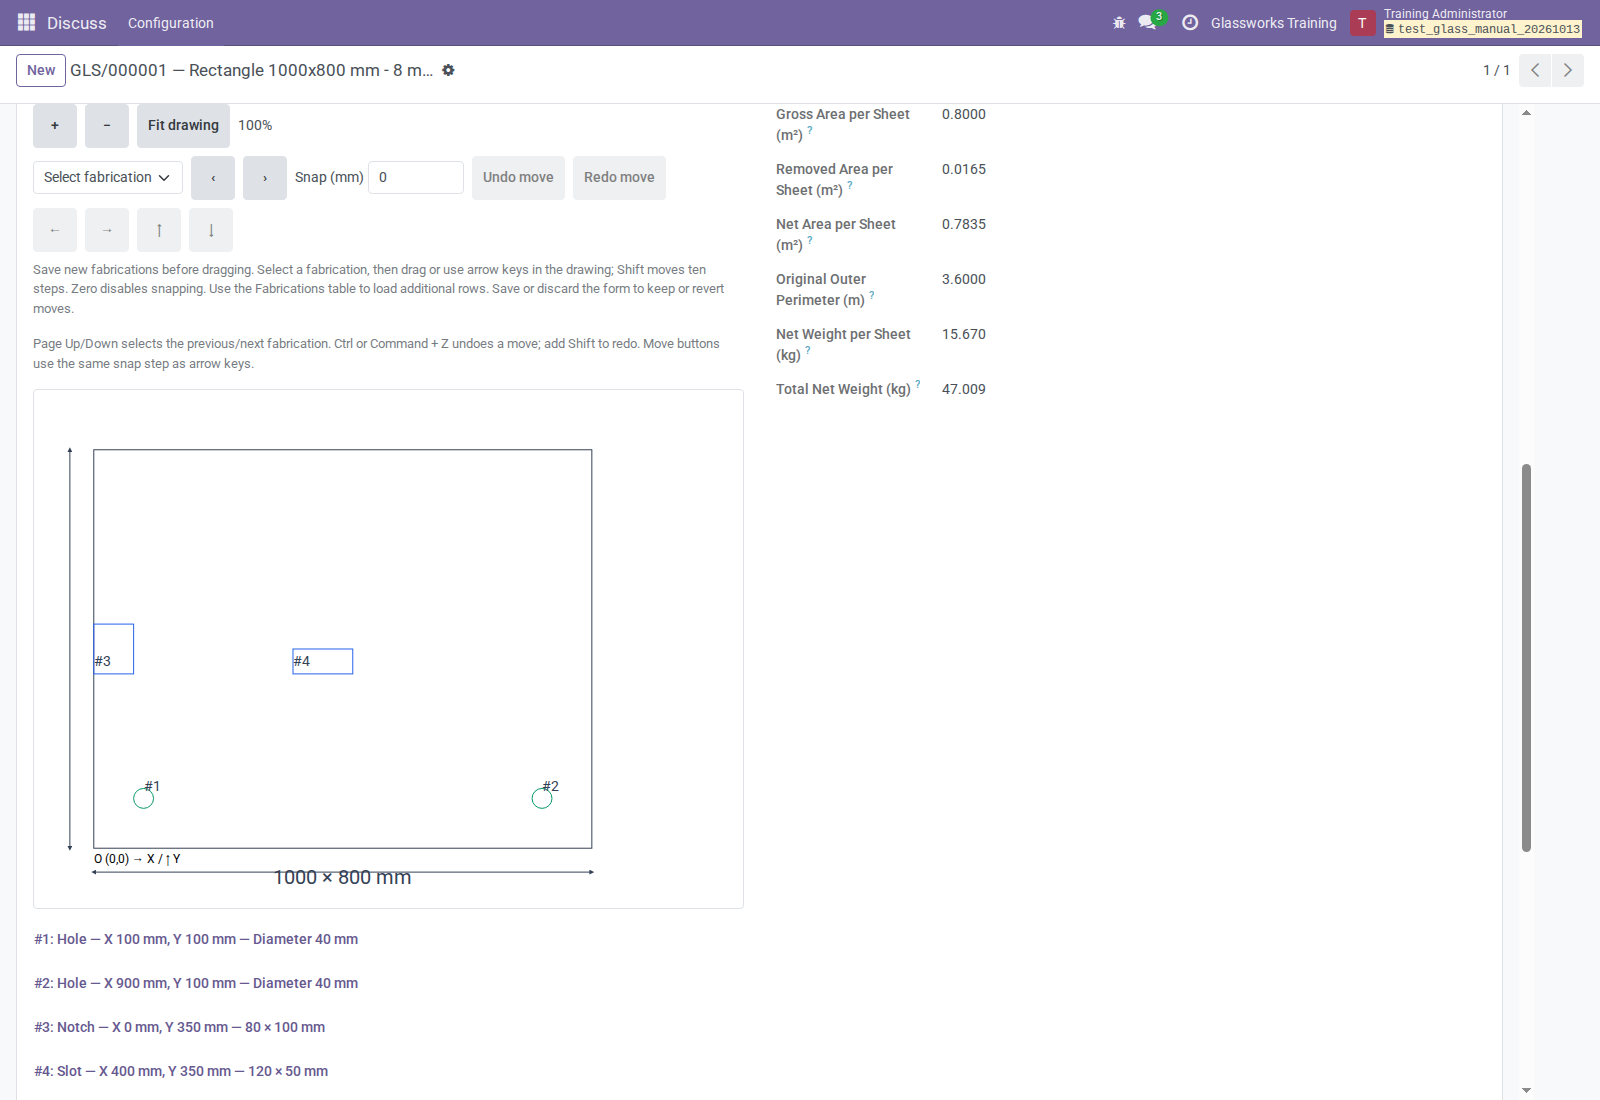
Figure U11. Descriptive instructions and computed original-outline lengths.
Do not repeat an edge or mix Whole Outline with individual edges. Curved sheets support Whole Outline only. Finishing lengths follow the original outline: they do not deduct notches or add hole/slot boundaries. Ellipse lengths are approximate. Instructions are retained in the quotation's managed description, approval snapshot, and PDF, but do not change the product, density, price, BoM, routes, or work-center operations.
6.1 Interpret material summary
| Summary | Meaning |
|---|---|
| Gross Area per Sheet | Area before cuts |
| Removed Area per Sheet | Area removed by all fabrications |
| Net Area per Sheet | Gross less removed area |
| Original Outer Perimeter | Original outline; excludes cut boundaries/notch deductions |
| Net Weight per Sheet | Net area × thickness in meters × 2,500 kg/m³ |
| Total Net Weight | Per-sheet weight × Number of Sheets |
For the four-cut 1000 × 800 × 8 mm example, gross area is 0.8000 m², removed area approximately 0.0165 m², net area approximately 0.7835 m², and weight approximately 15.670 kg per sheet / 47.009 kg for three sheets. These are material estimates, not structural calculations or manufacturing tolerances.
6.2 Review a manufacturing profile
Select the administrator's company-specific Profile and read its feedback. It may limit sheet width/height, thickness, hole diameter, edge clearance, and fabrication spacing. Warning policy allows approval despite feedback. Block Confirmation and Dispatch prevents those actions and Print Drawing when its limits are violated. Boundary notches are exempt from hole/slot edge clearance. Ask the workshop/administrator to resolve inappropriate limits; do not ignore an unresolved capability warning.
7. Print, approve, and revise drawings
7.1 Print a draft
- Complete and validate the draft, including applicable blocking profile limits.
- Click Print Drawing.
- Review the outline, origin, numbered cuts, fabrication table, specifications, finishes, quantity, and material summary.
The output is marked DRAFT — NOT APPROVED FOR PRODUCTION. Printing a draft does not create an approved revision. Do not hand a draft print to production as approval evidence.
7.2 Confirm a design
- Resolve geometry errors and review sales/profile feedback.
- Confirm the sale-line ownership, product, sheet count, due date, and intended manufacturing instructions.
- Optionally enter Approval / Reopen Reason.
- Click Confirm Design. Odoo saves pending form changes before the action.
- Check the Confirmed status, revision number, and generated Drawing (PDF).
- Use Print Drawing to download the preserved approved PDF.
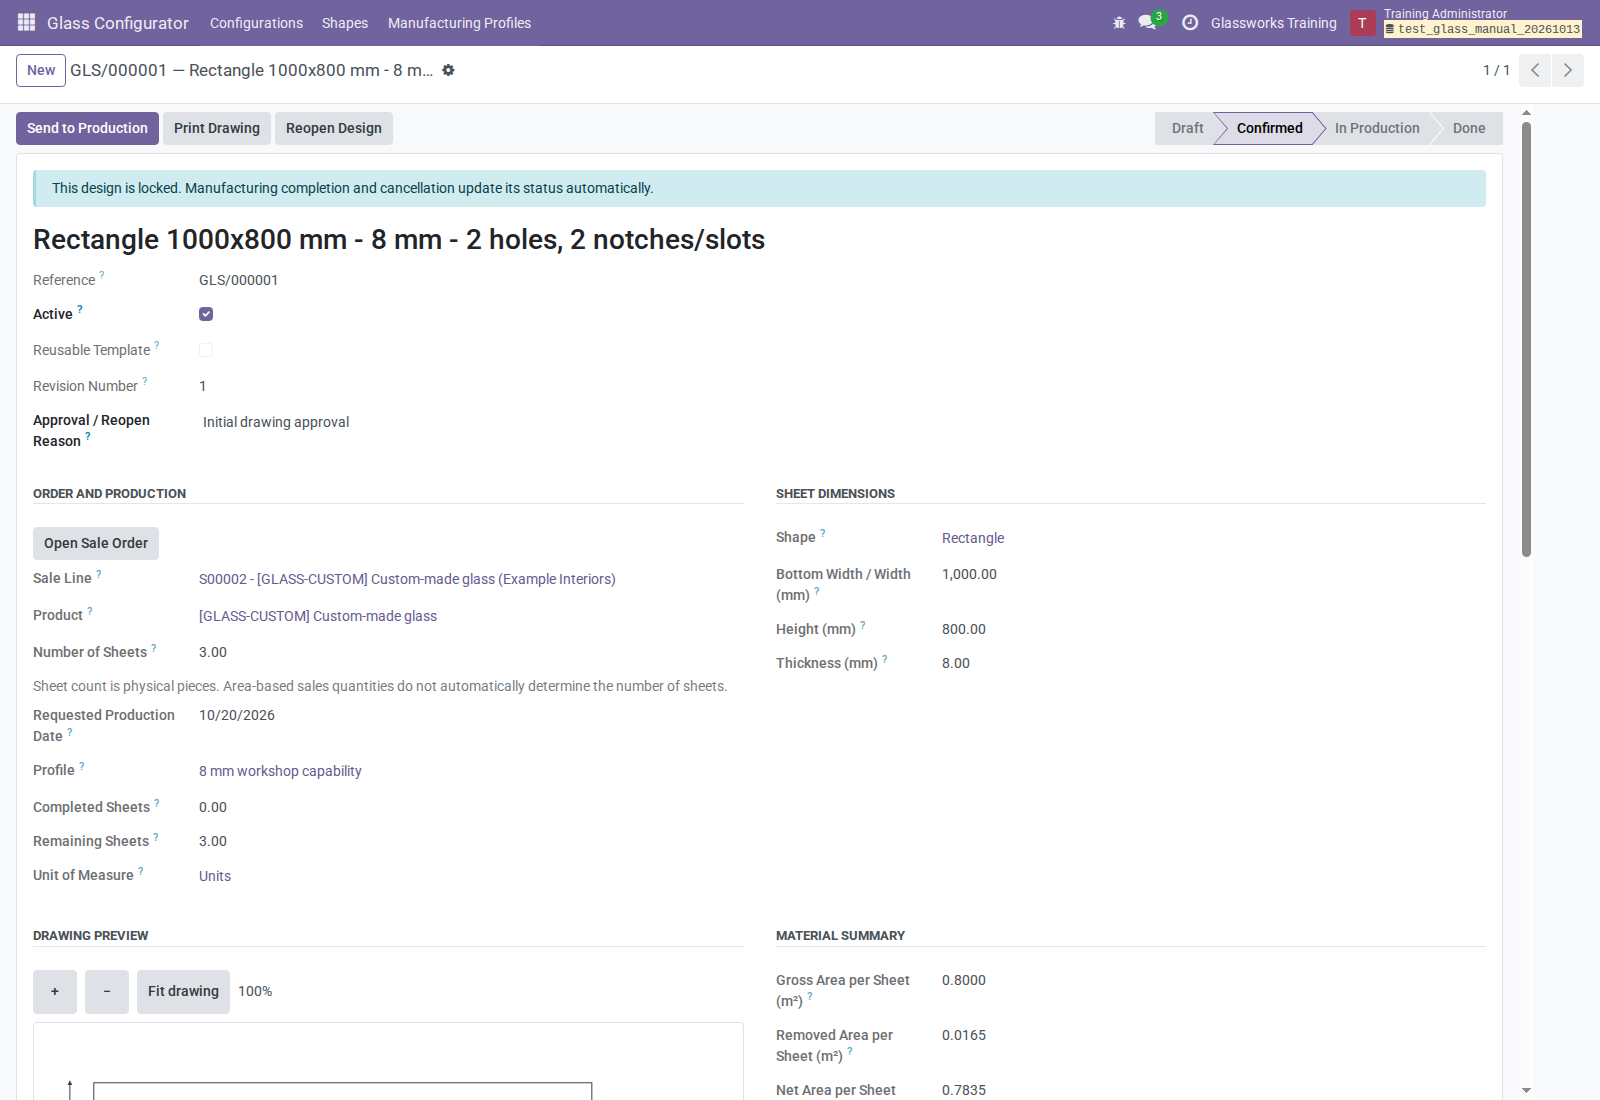
Figure U12. Confirmation locks the design and publishes an approved revision.
Approval stores a numbered snapshot, approver/date/reason, and protected PDF. It also refreshes the managed drawing description on the linked sale line while preserving other quotation prose and native product/quantity/price. It is an internal-user approval; no customer-portal approval workflow is supplied.
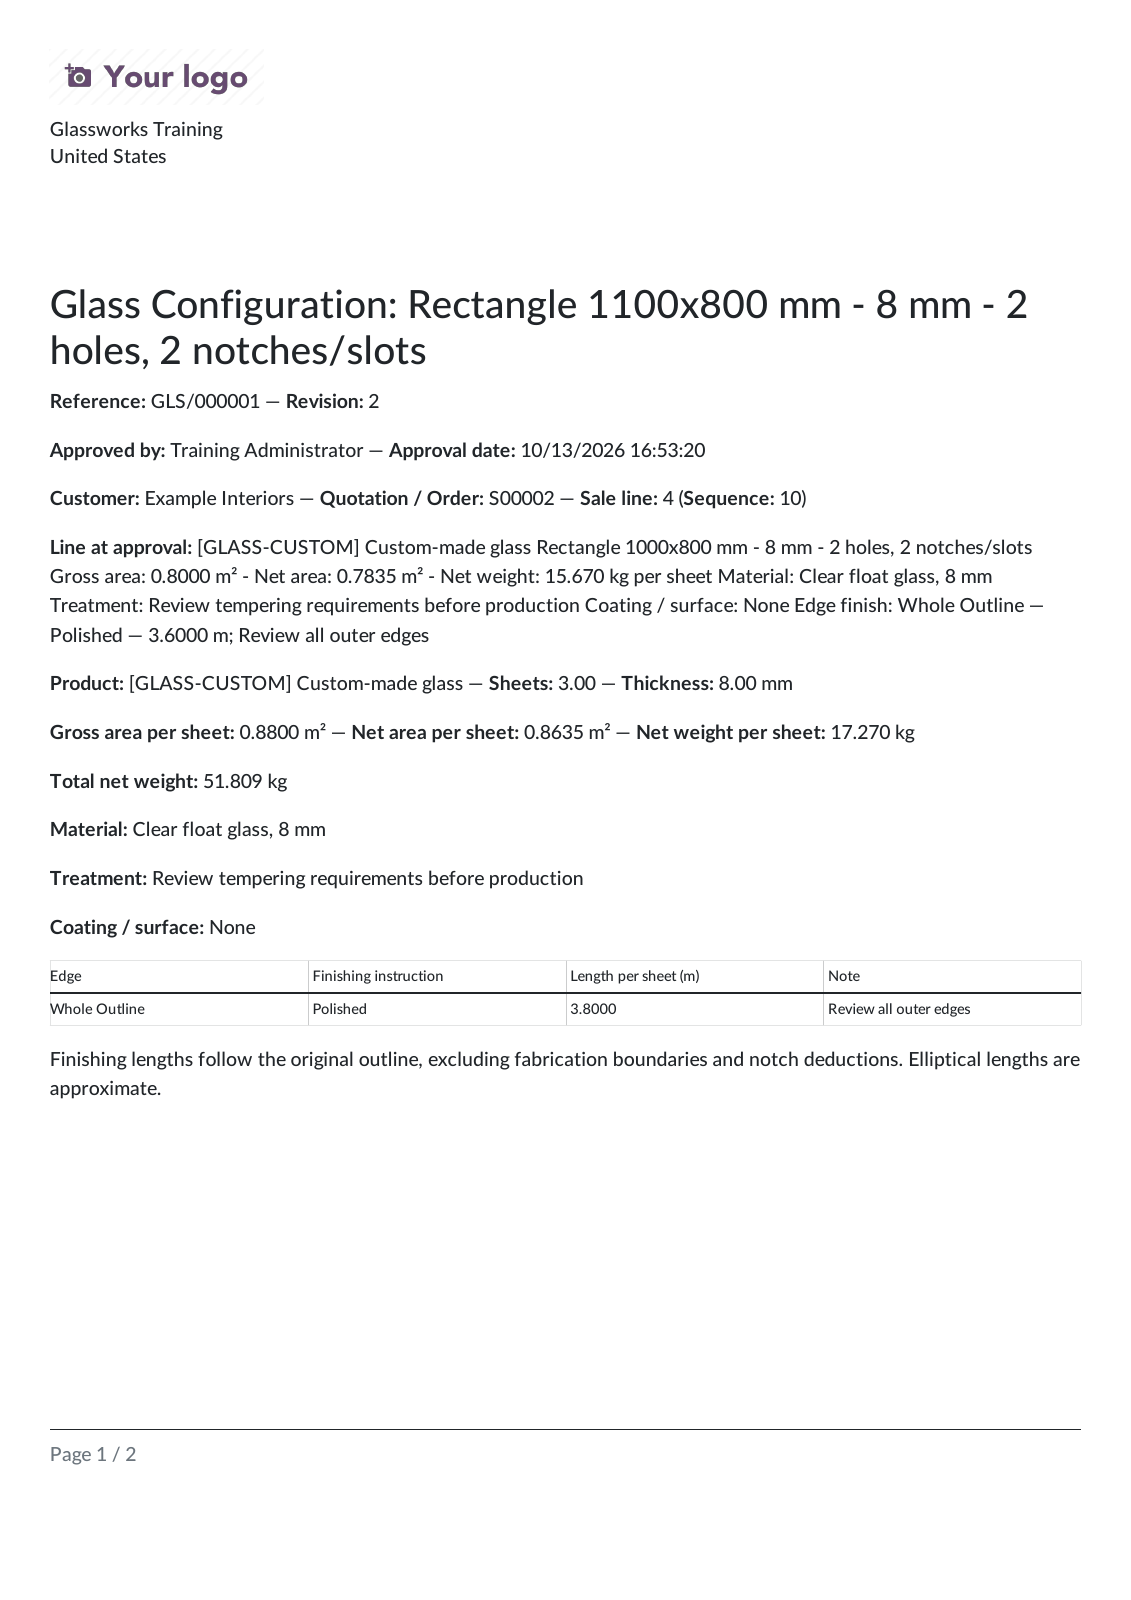
Figure U13. Approved R2 PDF after the example width revision, including frozen order identity and fabrication/finishing instructions.
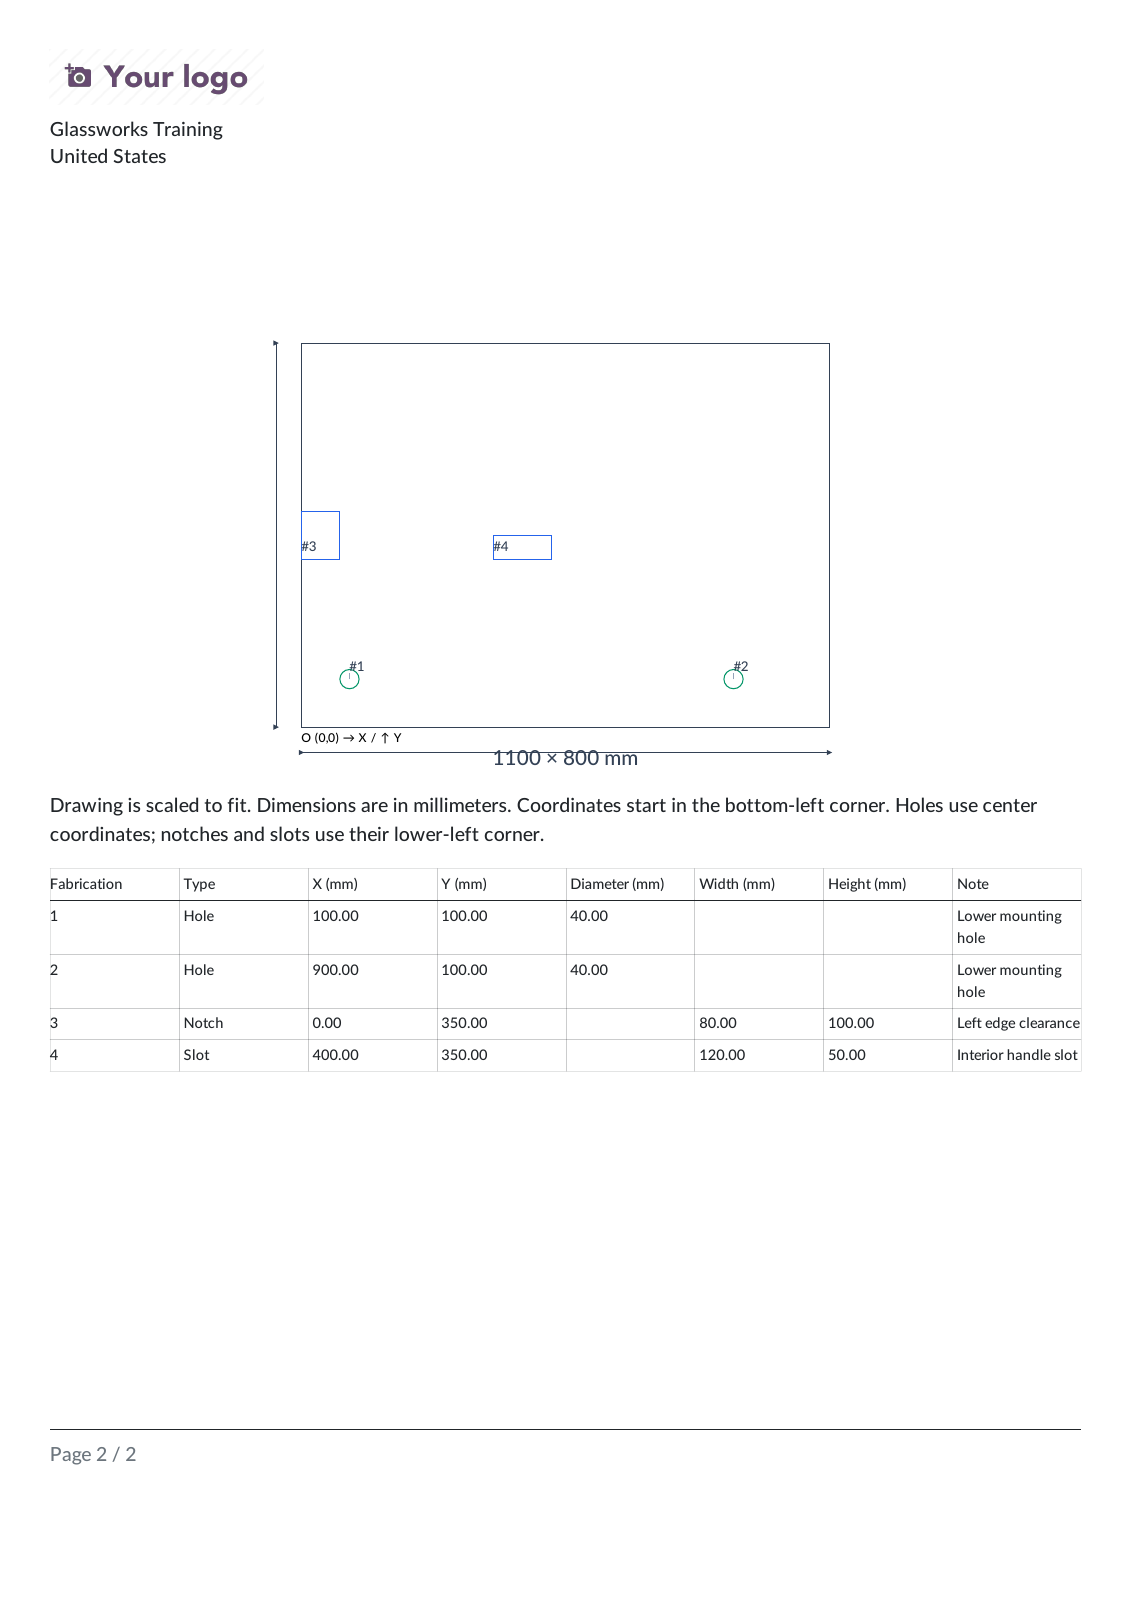
Page 2 of the same approved PDF: vector outline and complete numerical cuts.
PDFs retain vector outlines, numbered anchors, full fabrication details, and repeated table headers across pages. A later change to customer/order/line labels does not rewrite an already approved PDF. If PDF publication fails, the approval does not complete; report the issue to the administrator.
7.3 Retrieve current and past approvals from Sales
- Open the owning quotation/order line.
- Review Drawing Reference, Draft / Drawing Status, and Latest Approved Revision.
- Click Approved PDF to download the latest approval.
- Click Approved Drawings to select a historical revision.
- Use Open Approved PDF / Download Approved PDF, or open the revision to inspect its recorded preview, identity, approver, reason, and snapshot.
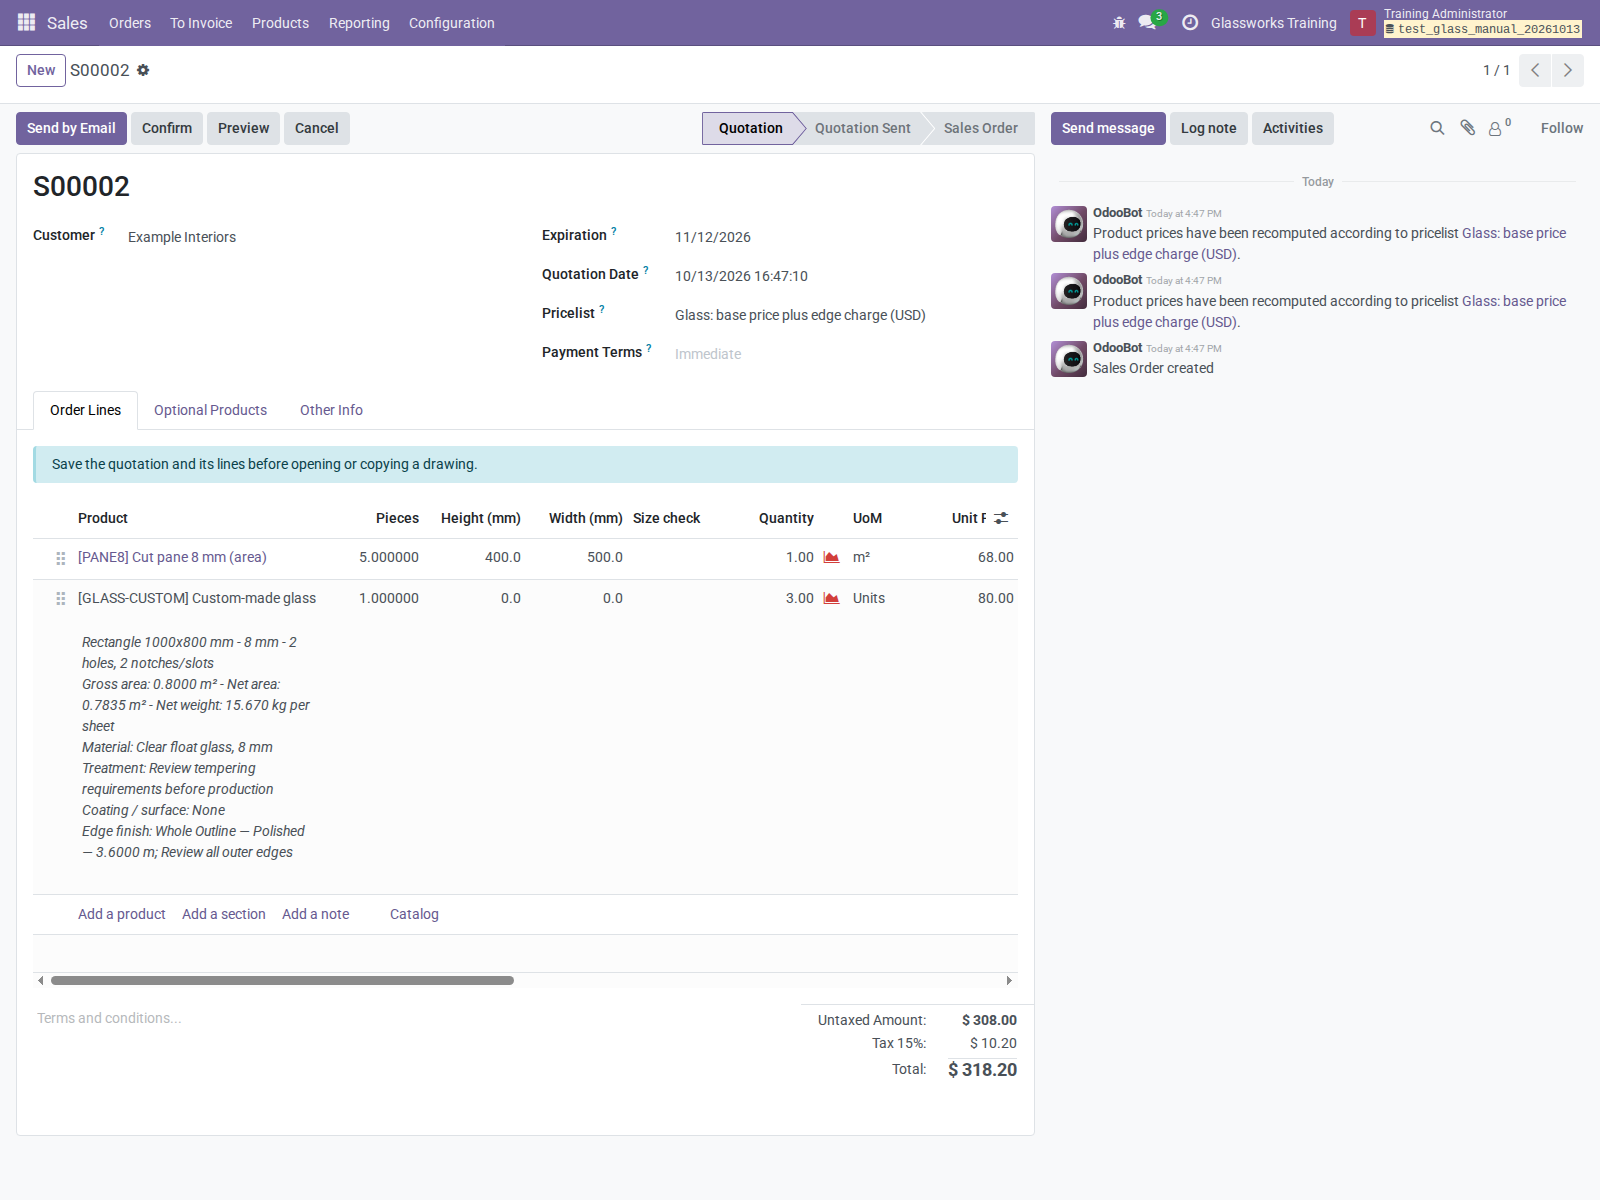
Figure U14. Sales lines expose current drawing status separately from approved evidence.
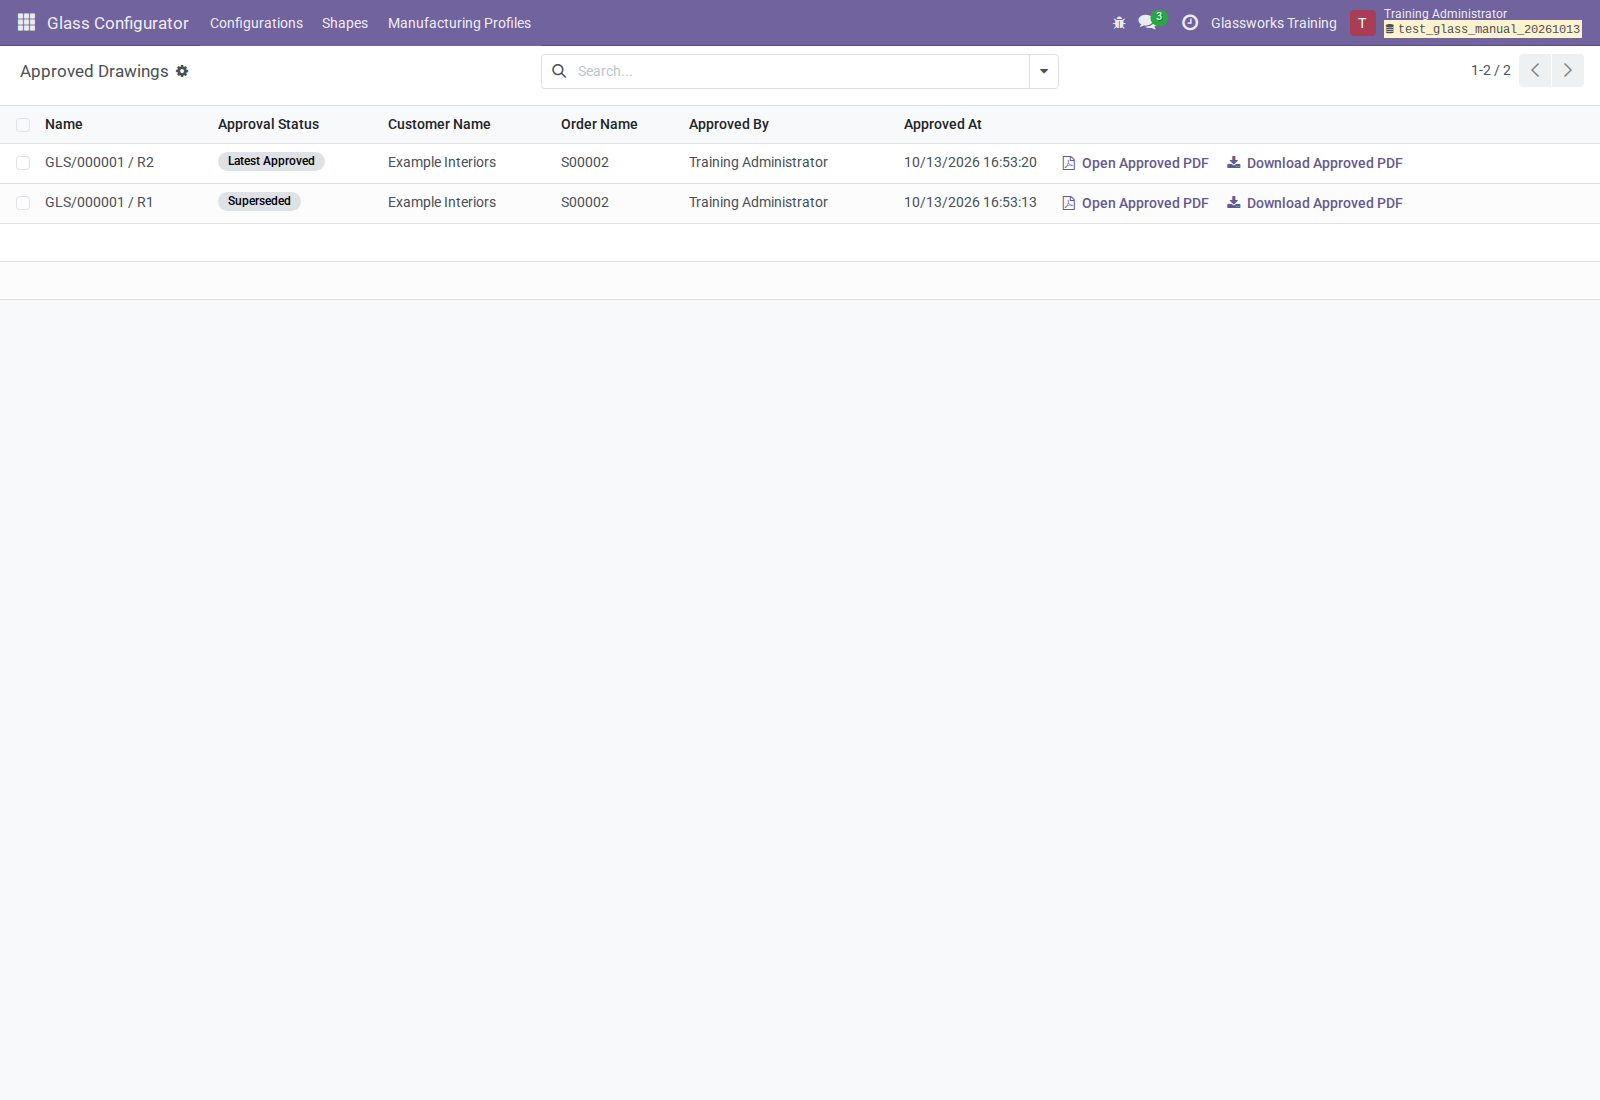
Figure U15. R1 remains available after R2 and is marked Superseded.
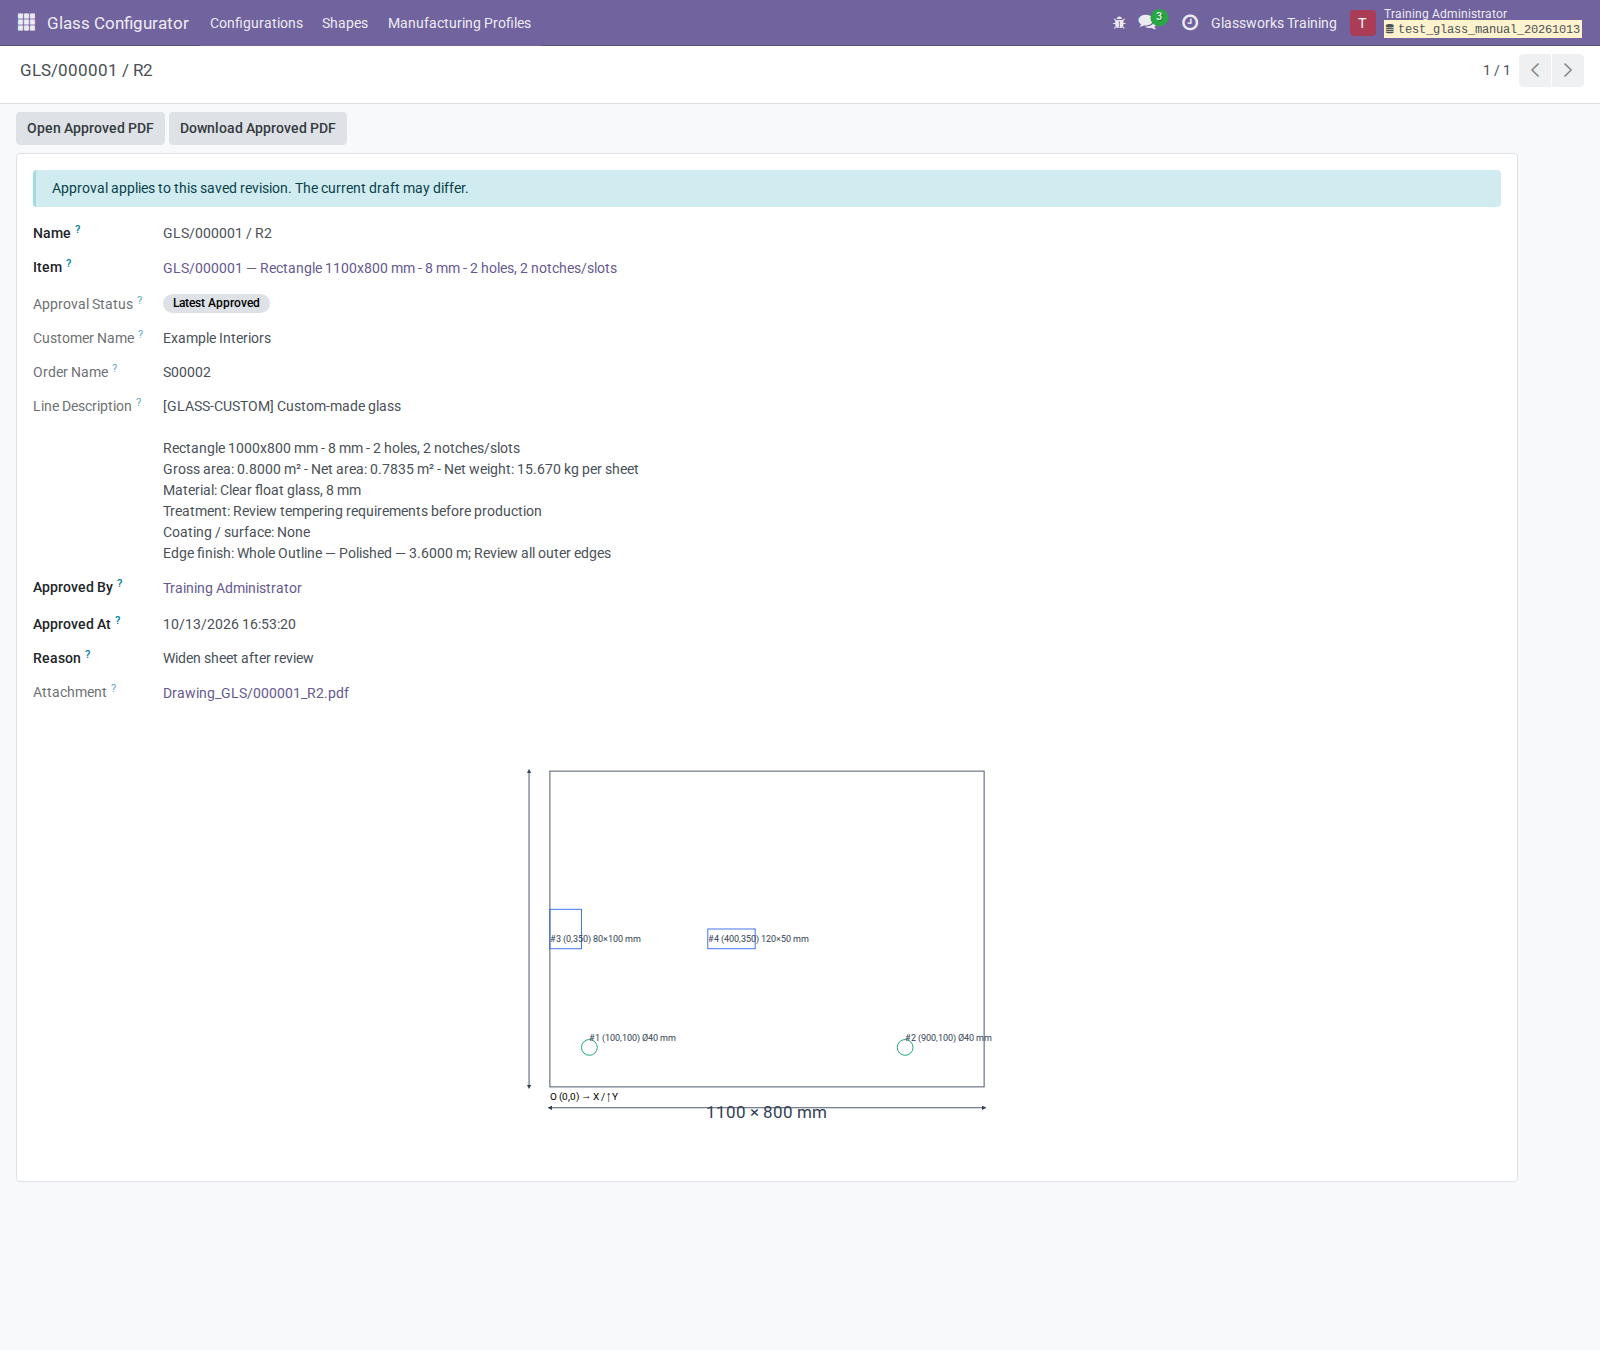
Figure U16. The revision preserves the identity and content of that approval.
7.4 Reopen and reapprove
- Open a Confirmed configuration.
- Enter an optional Approval / Reopen Reason and click Reopen Design.
- Edit the unlocked draft; review its Revisions and History tab.
- If the saved quotation's product or Unit count has changed, read the warning and use Use Quotation Product and Count on the draft when offered. Area-based sales retain the drawing's explicit physical count.
- Review the changed design and confirm again to publish the next revision.
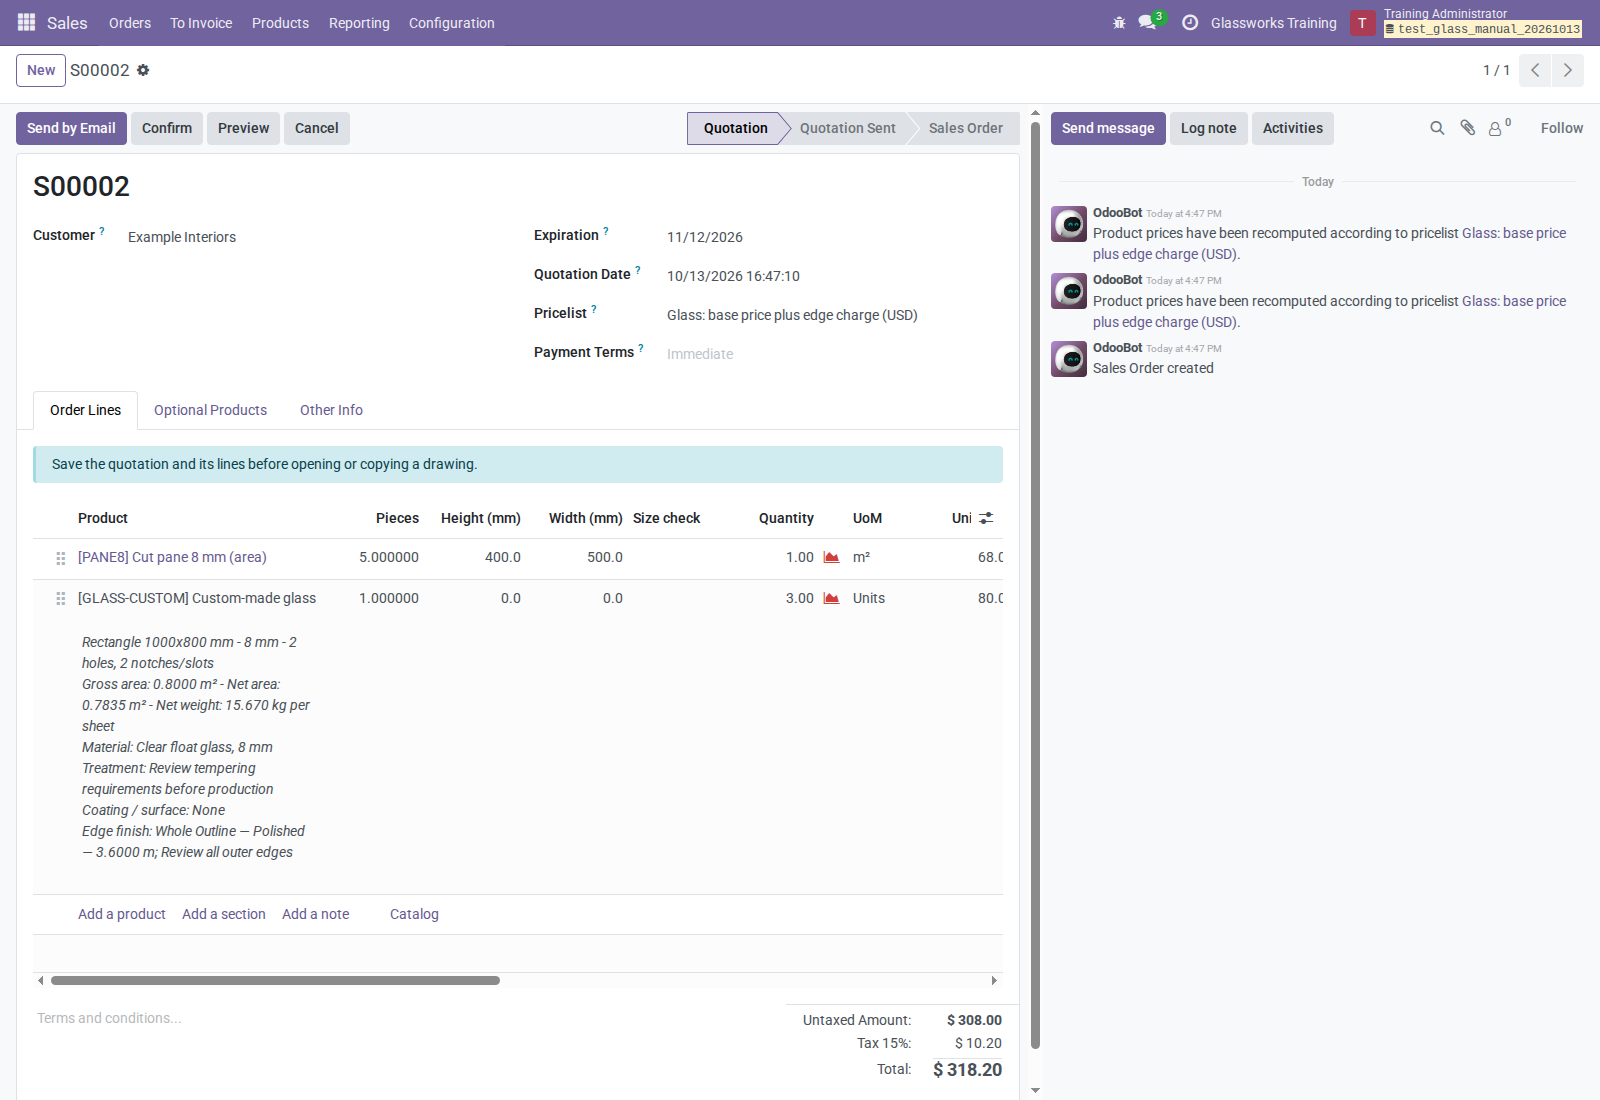
Figure U17. The line retains R1 while its current drawing is Draft.
The previous approval applies to its saved revision, not the new draft. Reopening records history and preserves old PDFs; reapproval increments the revision, not the reference. Quotation changes never silently overwrite the drawing.
A sales product/count mismatch may allow geometry approval but blocks dispatch. A canceled quotation blocks dispatch and cannot be used for reconciliation. In Production/Done drawings cannot reopen. Cancel unfinished MOs first; if any sheets are already completed, use the remainder workflow in Section 11.
8. Copy drawings, reuse templates, and archive
8.1 Copy onto another quotation line
- Create and save a destination regular product line with no drawing.
- Click Copy Drawing on that line.
- Select a same-company accessible Source Drawing by reference/description.
- Confirm Copy Drawing in the dialog.
- Review the new draft's product/company, count, geometry, fabrications, specifications, and finishes.
- Set its requested date and reason as appropriate, then approve independently.
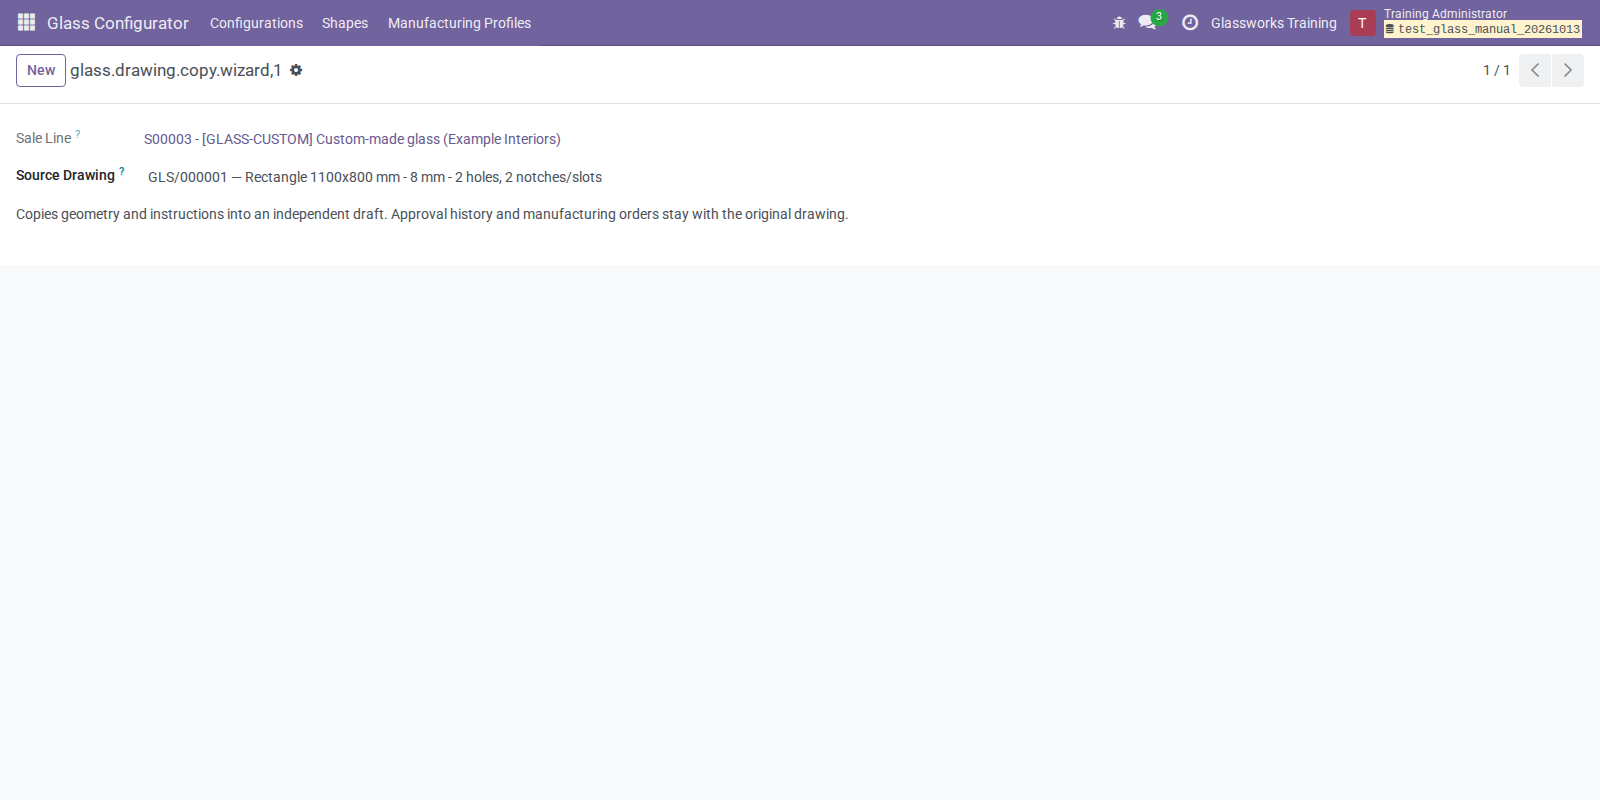
Figure U18. Explicit copying creates an independent drawing for the destination line.
The new drawing has a new reference and no approval or manufacturing history. Destination Unit lines provide converted physical Units; area-based lines retain the source's physical count, so review it. Requested date/reason are cleared.
Duplicating a quotation or line through Odoo's Duplicate action does not automatically copy its drawing. Save the copied line and use Copy Drawing. Its description may still contain the original drawing prose until the new drawing is confirmed. Do not assume that copied prose is approval evidence.
8.2 Use a reusable template
- On an appropriate draft, enable Reusable Template and Save.
- In Configurations, select the Reusable Templates filter and open the template.
- Click Use Template.
- Review the fresh standalone draft, choose its product/sale line, check sheet count, and enter its requested date.
- Complete any job-specific changes and confirm separately.
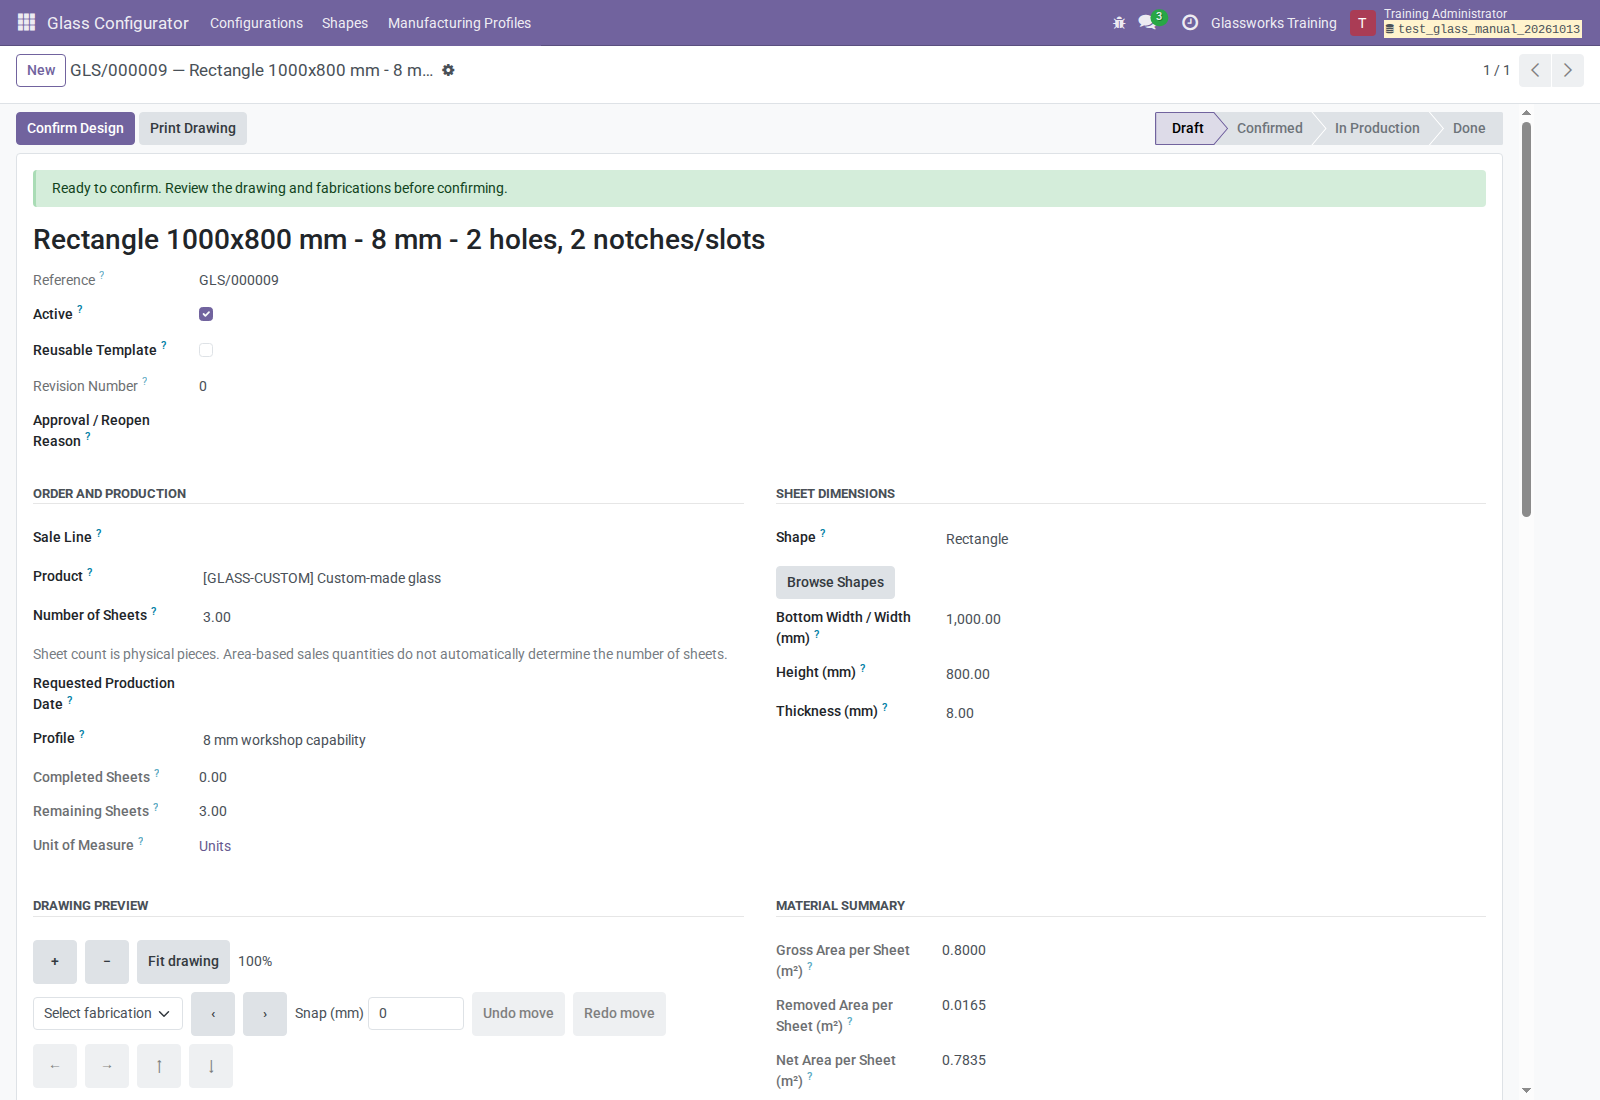
Figure U19. Reuse preserves design content and clears job ownership/history.
Template reuse clears sale ownership, approvals, production history, requested date, and reason. The template itself cannot dispatch: manufacture its working copy. Standard configuration duplication also creates an independent draft without original sale ownership or approval/production evidence.
8.3 Find and archive records
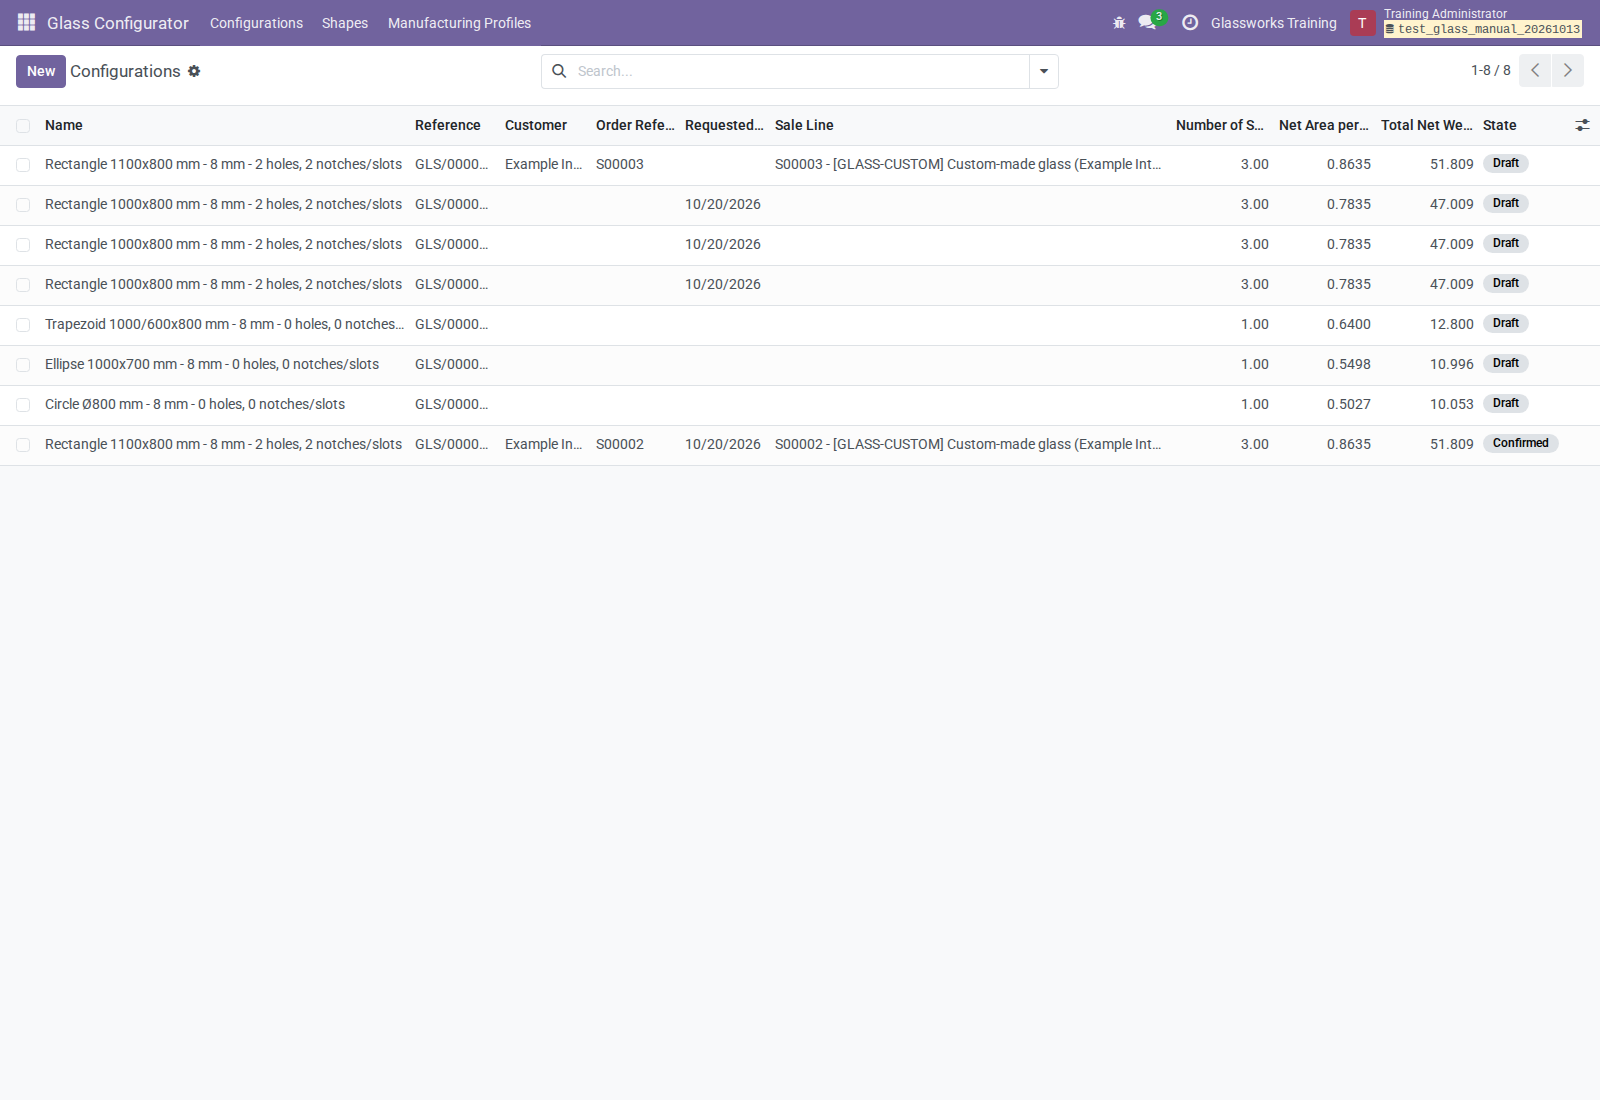
Figure U20. References, sales ownership, count, material summary, and status.
Use reference/description, customer, product, or sale-line searches. Filters include Draft, Ready for Production, In Production, Done, Production Cancelled, Reusable Templates, and Archived. Group by Status, Customer, or Shape. Ready for Production filters confirmed designs; it does not guarantee dispatch prerequisites are satisfied.
To archive, use the standard Archive action or disable Active. Use Archived to find and unarchive a record. Archiving does not cancel MOs, detach sale lines, or remove approval PDFs. An archived drawing still protects line/order deletion.
Delete only an unapproved draft without revision/manufacturing history. If a line/order cannot be deleted because it owns a drawing, remove an eligible draft first or retain/cancel the business record according to your procedure. Drawn lines cannot move to another order, and an order containing drawings cannot change company.
9. Manufacture measured panes and approved sheets
9.1 Measured rectangular pane production
For the measured path, use the native MO created by your configured Sales routes or create an authorized job manually in Manufacturing → Operations → Manufacturing Orders.
- Select the finished product and correct BoM.
- Review native output Quantity/UoM, dimensions, planned pieces, deadline, and Origin.
- Review every component's demand/UoM and its own geometry where present.
- Confirm the MO and check raw availability/reservations.
- Process its Work Orders with the intended work centers and native quantities.
- Record actual input consumption, produced quantity, scrap/by-products, and complete the MO through the normal Odoo buttons.
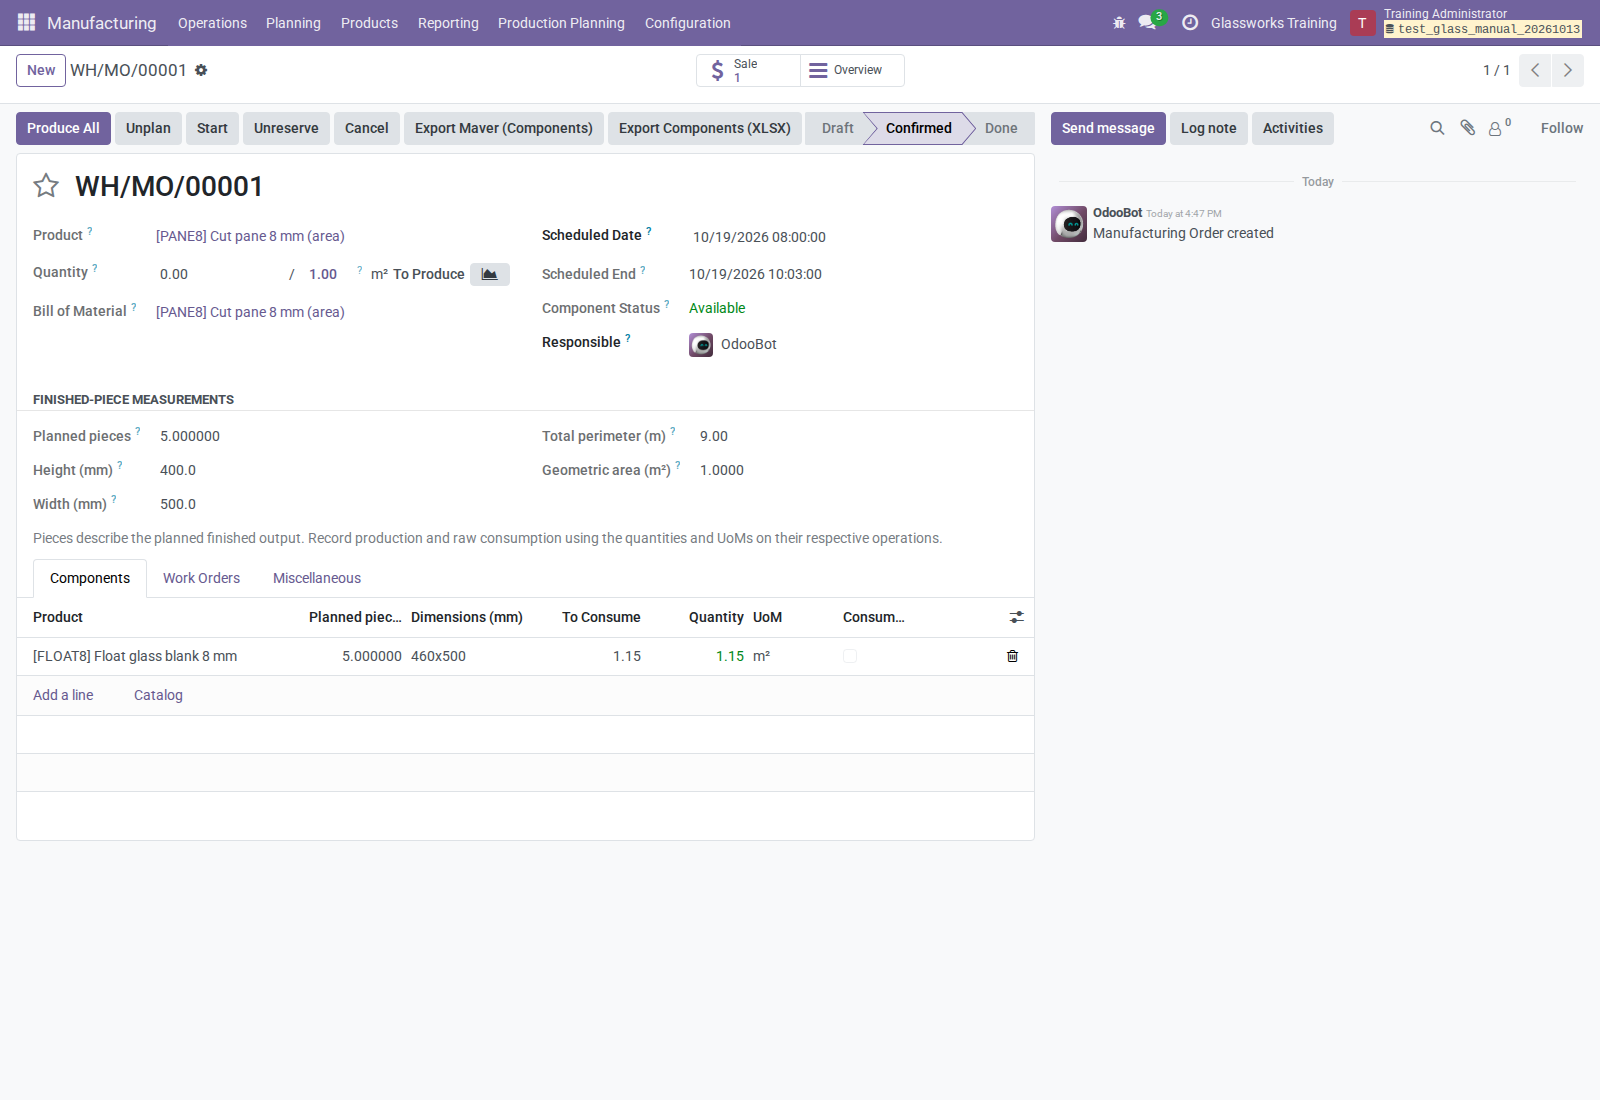
Figure U21. Native production quantity remains in m²; pieces describe the cut panes.
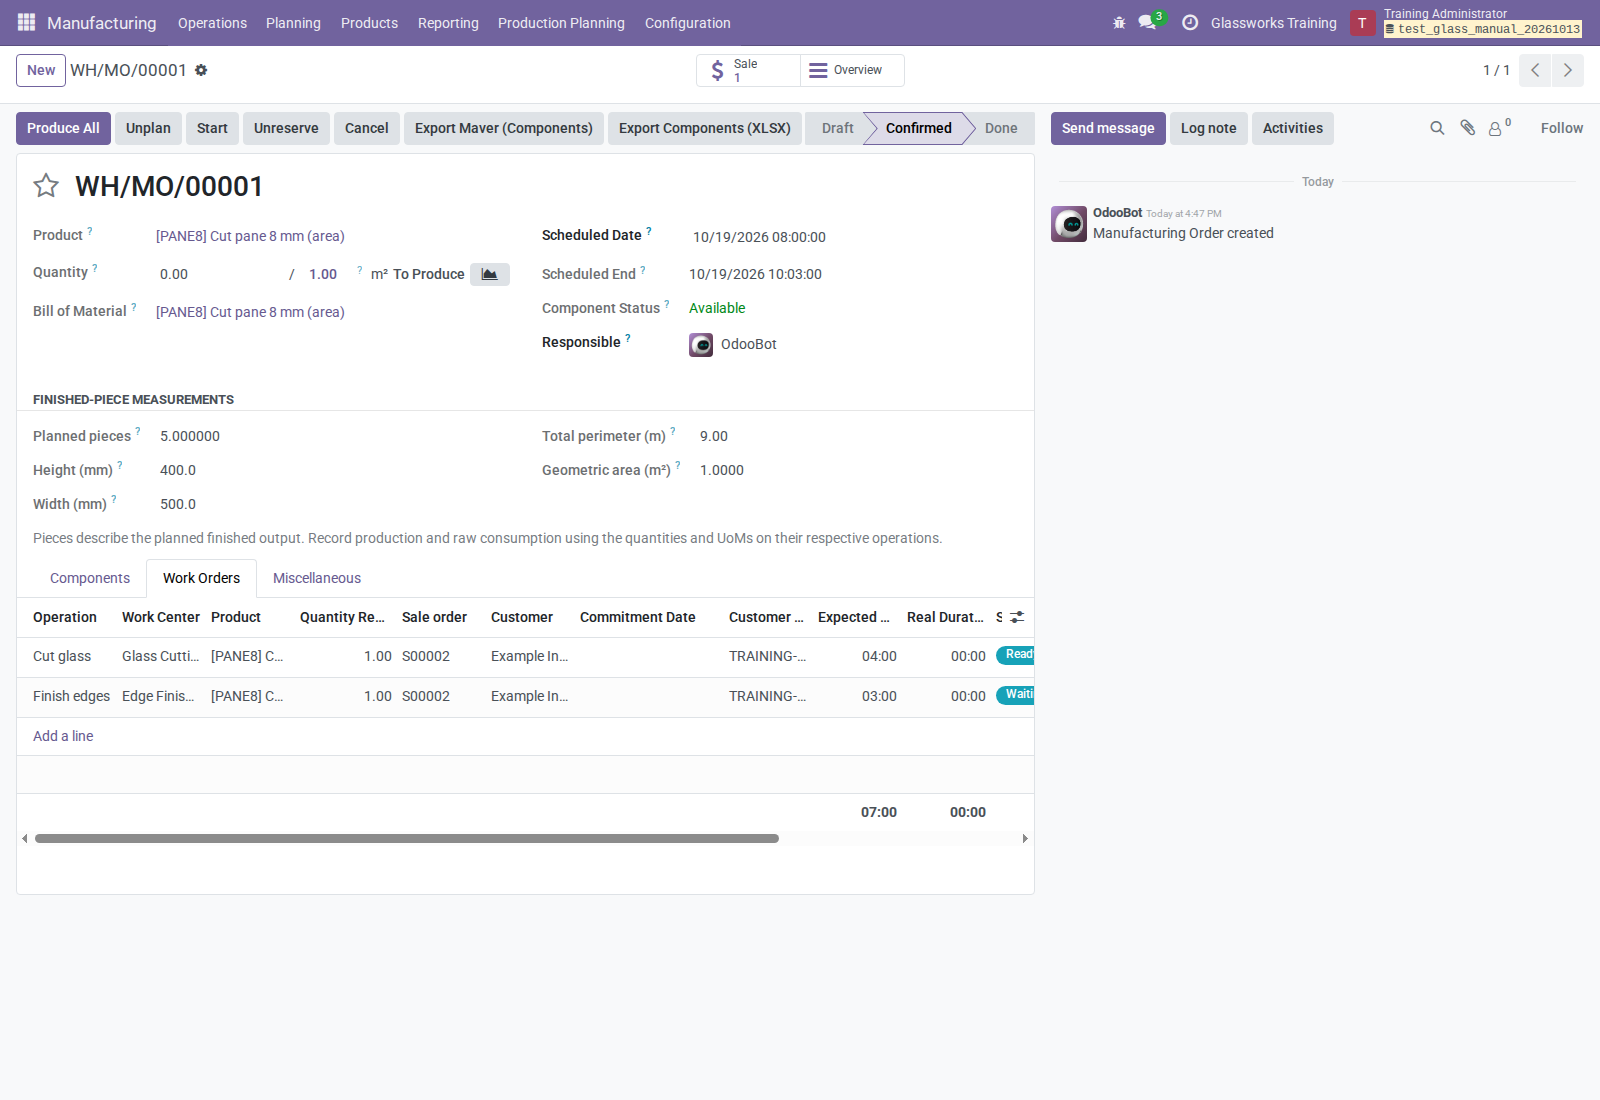
Figure U22. Cutting and finishing duration follows the native operation setup.
For five 400 × 500 mm panes, the example MO produces 1.00 m² and consumes 1.15 m² from a BoM producing 0.20 m² from 0.23 m². The component example is a separate 460 × 500 mm input blank; it is not the finished pane's geometry. If your raw consumption is only known as area, it may have no piece geometry.
The 0.15 m² difference is a configured allowance. It does not automatically create scrap, return offcuts, or optimize nesting. Use native Odoo records for actual consumption and scrap/by-products. Planned pieces and stock/manufacturing counts are read-only informational fields; enter operational quantities in their displayed UoM.
9.2 Dispatch an approved configurator sheet
- With Manufacturing access, open a Confirmed, non-template drawing.
- Check that its product is stockable and uses exact standard Units.
- Resolve canceled-quotation, product/count, and blocking-profile issues.
- Click Send to Production.
- Review the created draft MO's quantity, deadline, selected BoM, components, and operations. Confirm it and process normal Manufacturing work.
- Use the drawing's Manufacturing button for current/historical MOs.
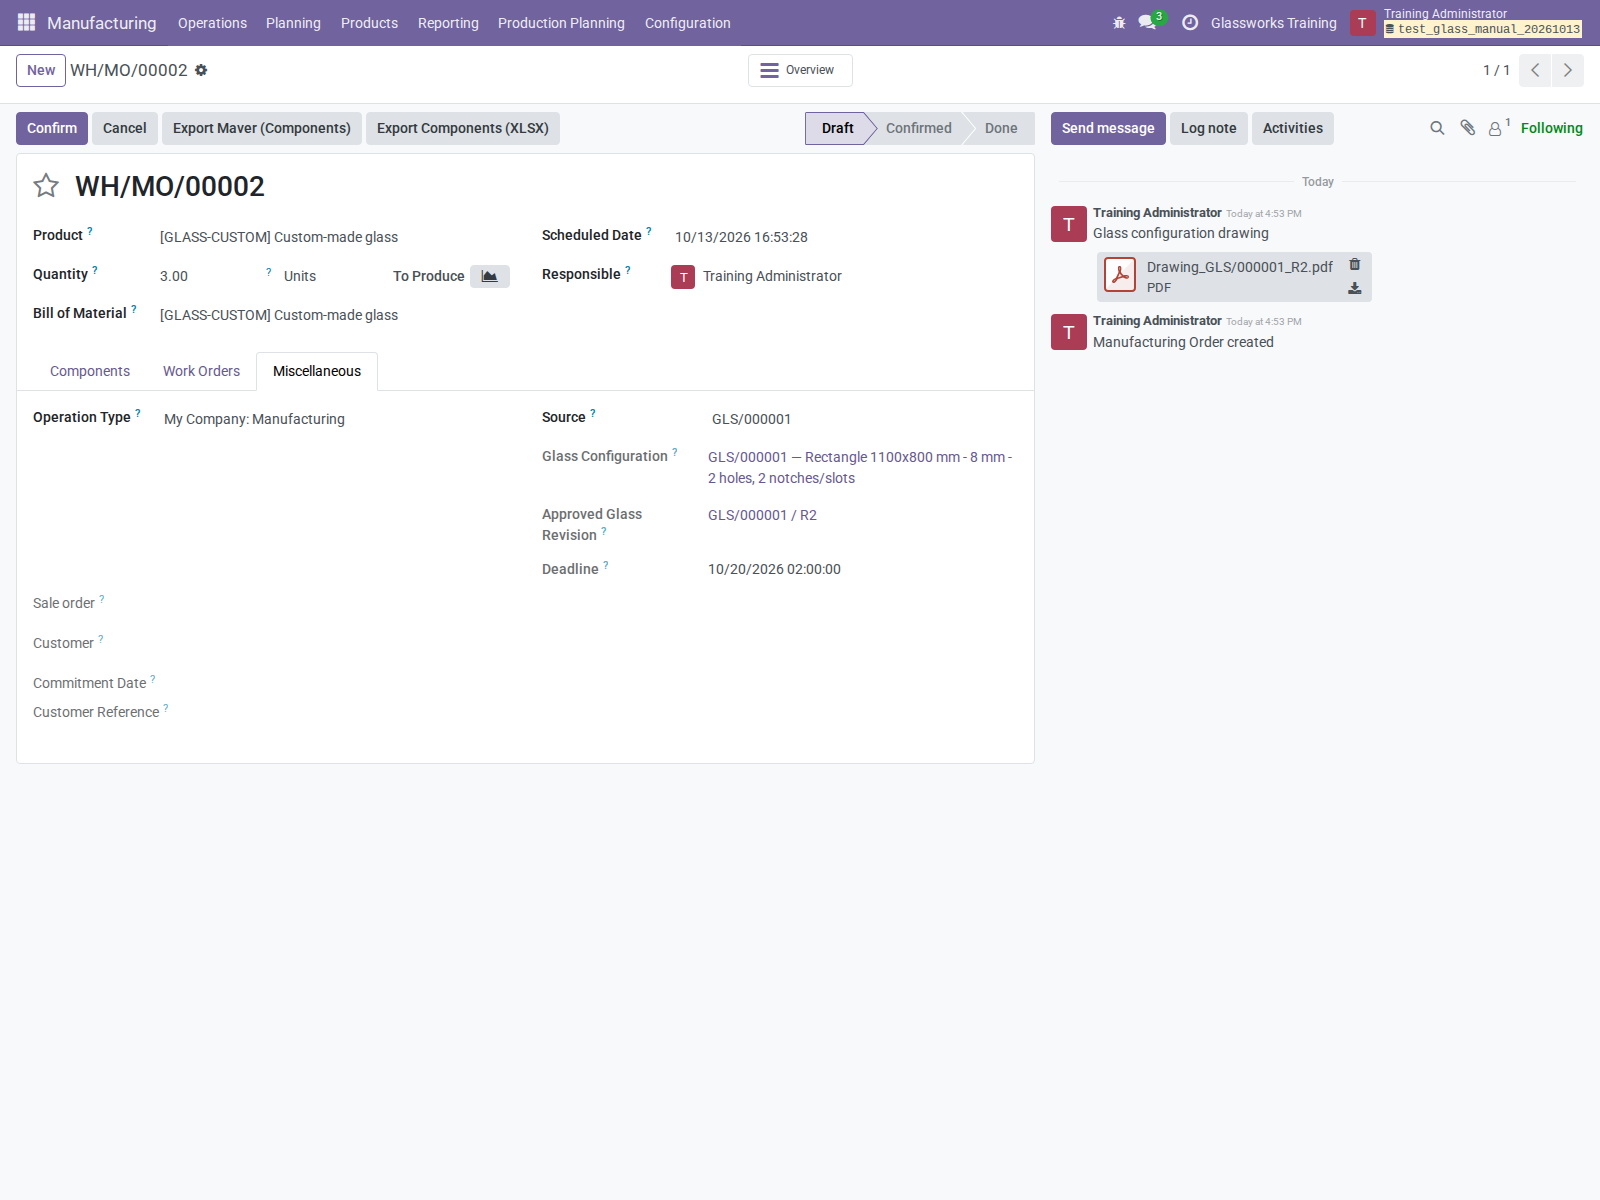
Figure U23. The MO's Miscellaneous tab links the configuration and approved revision; the approved PDF is attached in chatter.
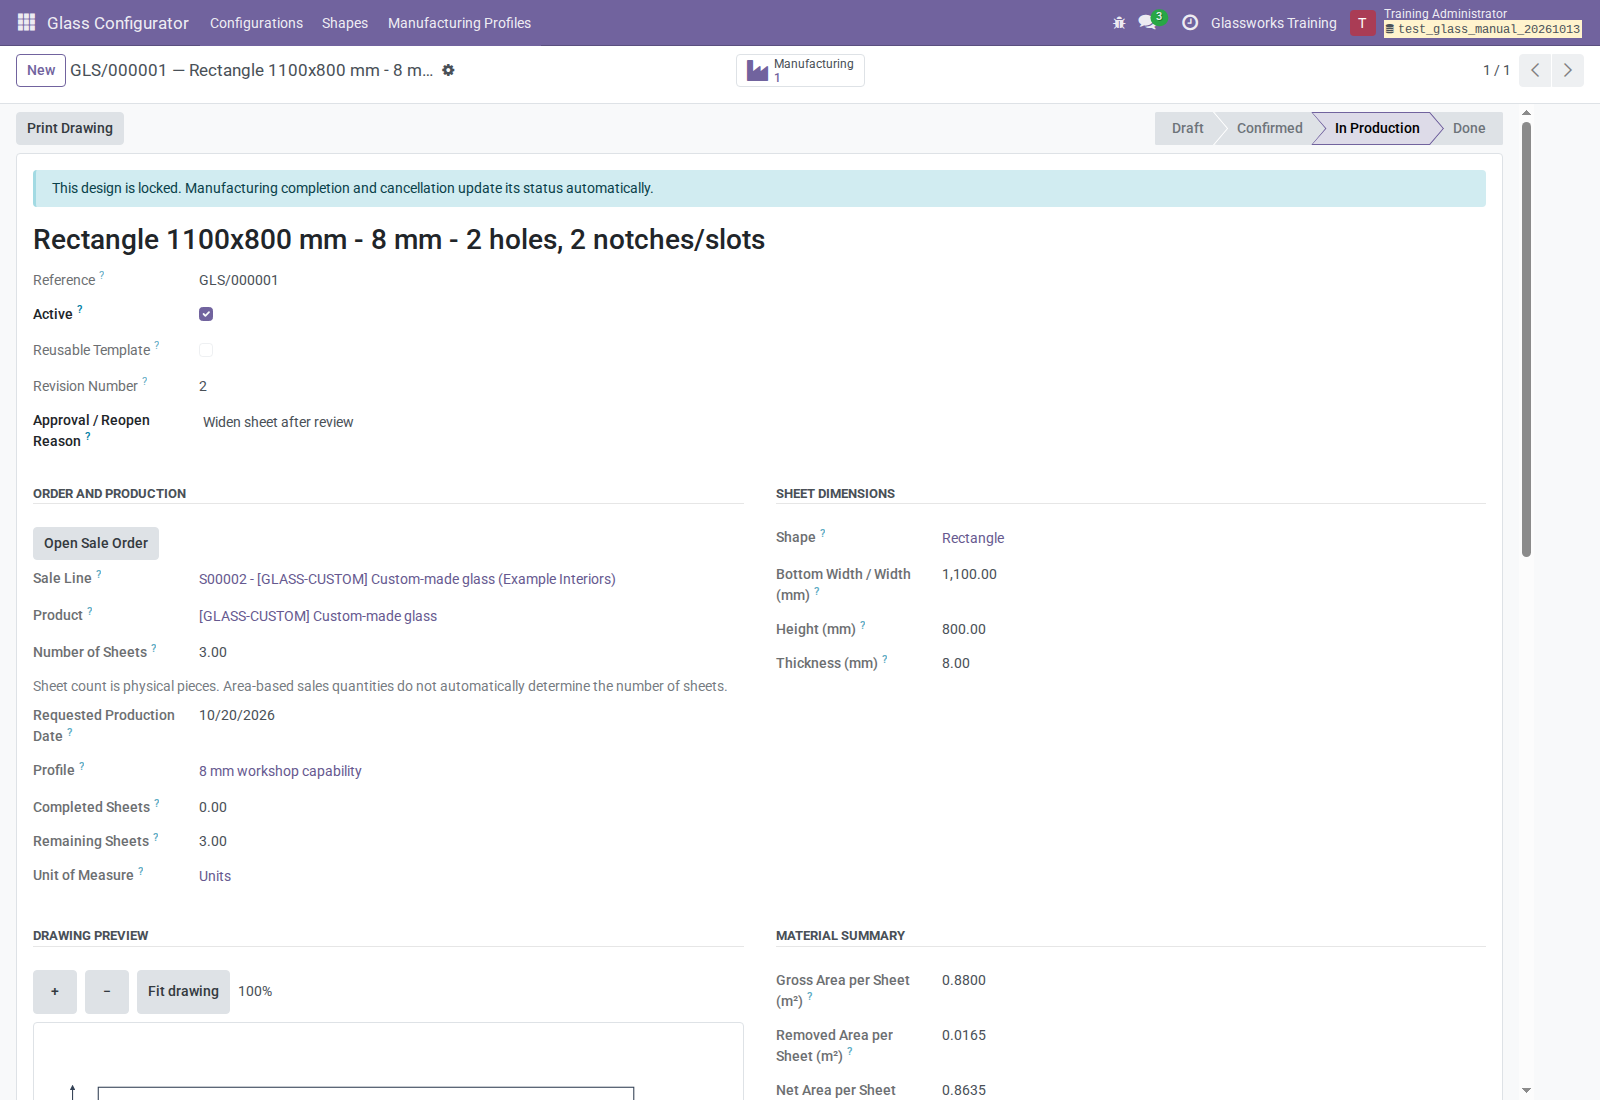
Figure U24. Dispatch sets In Production even when the new MO is still draft.
Dispatch uses the physical sheet count, not the drawing's net area. Requested Production Date becomes the MO deadline. It creates/opens the MO but does not complete it, build a cutting layout, or generate a BoM from the drawing. Ensure the actual product/BoM matches the job. Sales-only users cannot dispatch.
Area-based/service drawings can be approved but cannot use direct manufacturing. Use the organization's planned production process for those products; their geometry is not automatically transferred into measured component demand.
10. Plan component demand and work centers
10.1 Review unassigned demand
- Open Manufacturing → Production Planning → Component Planning.
- Review the default Without Planning Group filter and Component grouping.
- Filter by component, customer, MO, first work order, deadline, or planning group.
- Remove Without Planning Group to see already assigned demand.
- Check native Demand/UoM and select the intended open component moves.
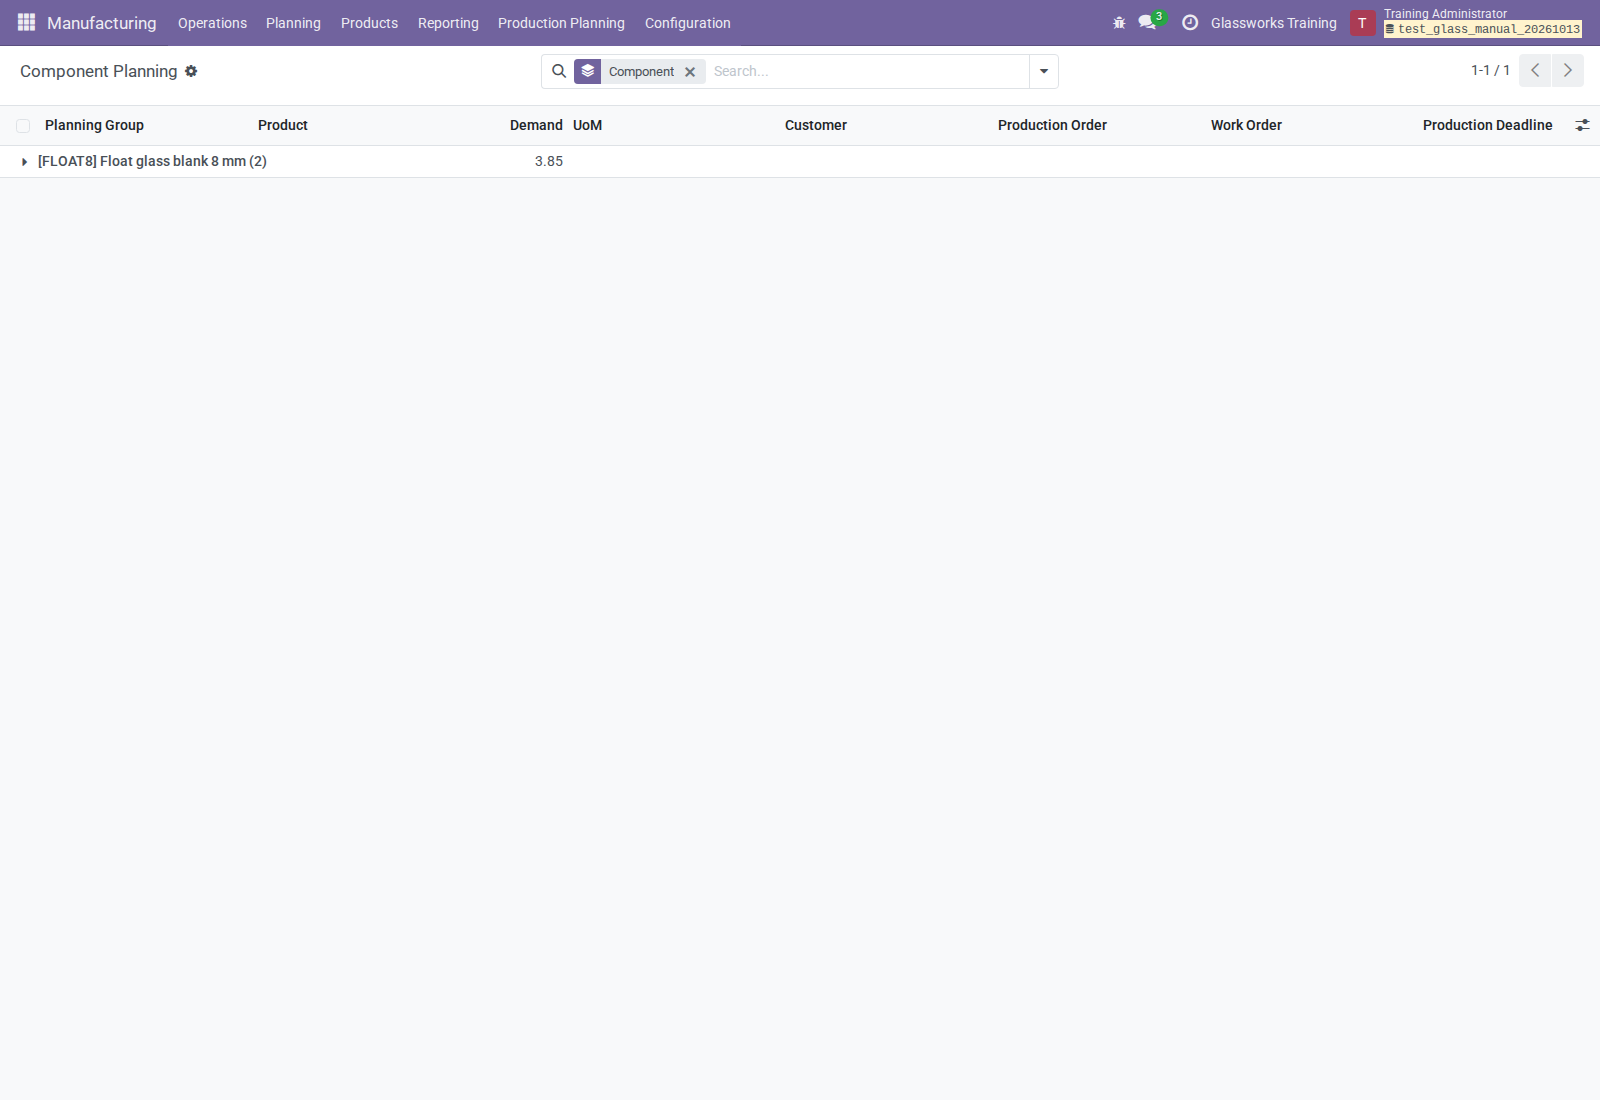
Figure U25. Assigned component demand after removing the default unassigned filter.
Completed/canceled demand is not available for normal assignment. The view does not establish a cutting layout or verify stock-sheet fit.
10.2 Create, assign, or clear groups
Direct suggestion for one component
- Select open component rows belonging to one product and one company.
- Choose Actions → Suggest Planning Group.
- Review the new group, suggested component/week name, work center, and Notes.
Assignment wizard
- Select the component moves, MOs, or eligible WOs and open Assign Planning Group from the selection's Actions menu.
- Choose Create New Planning Group or Assign Existing Planning Group.
- For New, review name, grouping component/work center, and Note. Mixed components are permitted by the wizard, but the new group must belong to one company.
- For Existing, select a group in the components' company.
- Choose Components Only or Components + Production Orders, then Assign.
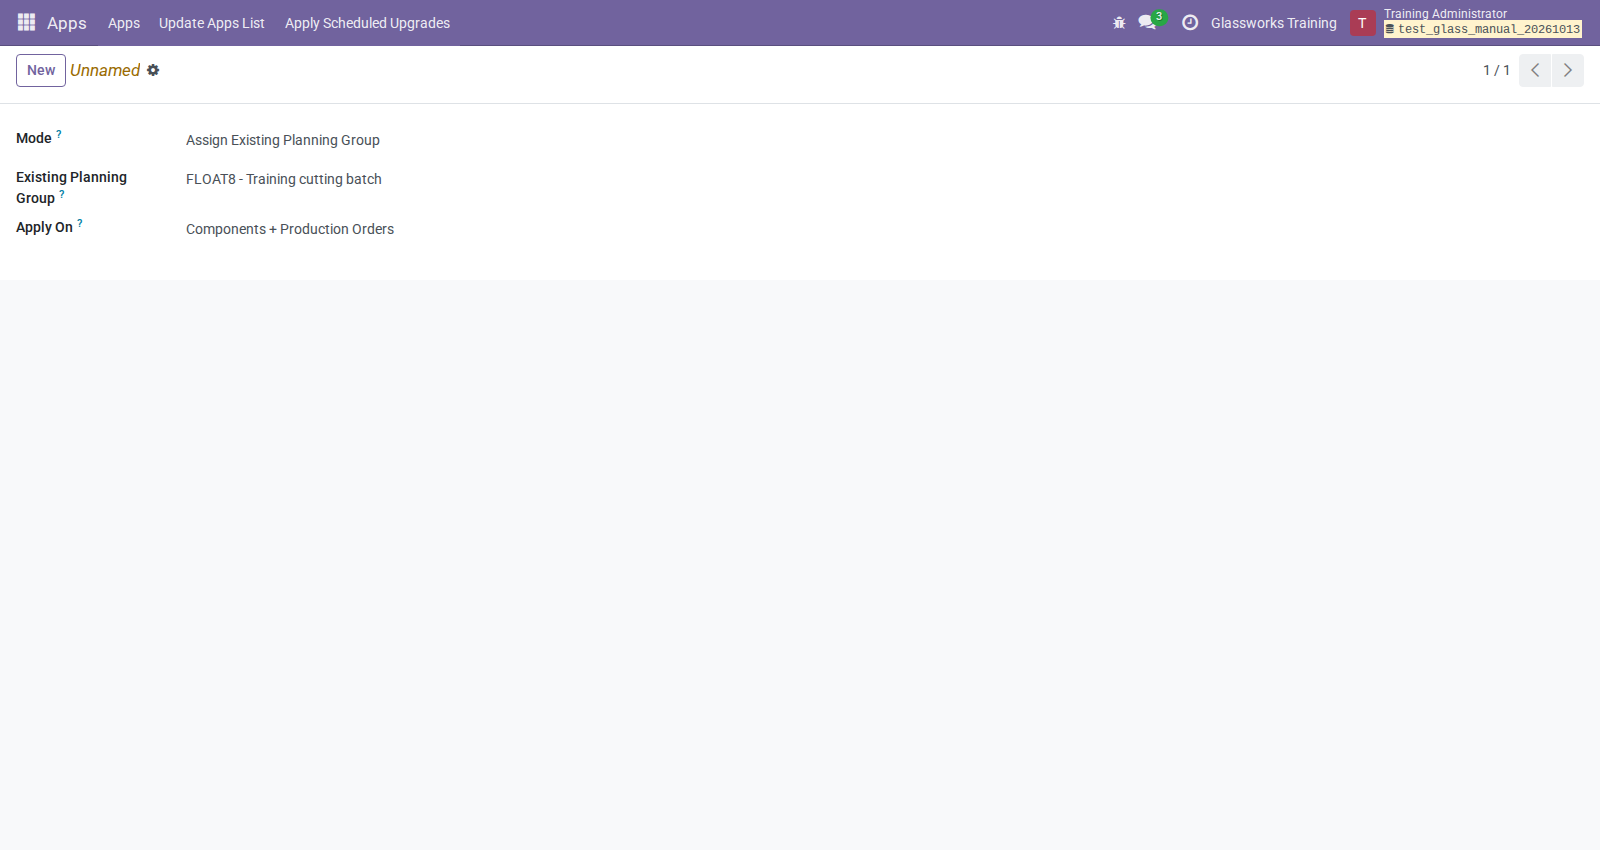
Figure U26. Existing-group assignment and application scope.
Components Only still updates the MO summary through component assignment. Existing-group assignment does not perform the new-group company check; choose the company correctly. WO selections need their own eligible component moves; if none exist, use MO/component selection instead.
Use Clear Planning Group from selected component moves, or the wizard's Clear Planning Group action, to remove assignments. Check the resulting group membership and MO summaries; clearing assignment does not undo previously written work-order dates. An MO displays a single Planning Group only when its assigned components resolve to exactly one group. Multiple groups leave that summary empty.
10.3 Apply work-center planning
- Open the group from Planning Groups.
- Use Components, Production Orders, and Work Orders to verify members.
- Open Workcenter Planning and review automatically added work-center lines.
- Enter each Start and optional End; End cannot precede Start.
- Save and click Apply Planning.
- Read the notification showing the number of planned work orders.
- Review resulting WO dates, remaining unscheduled work, and other groups' work.
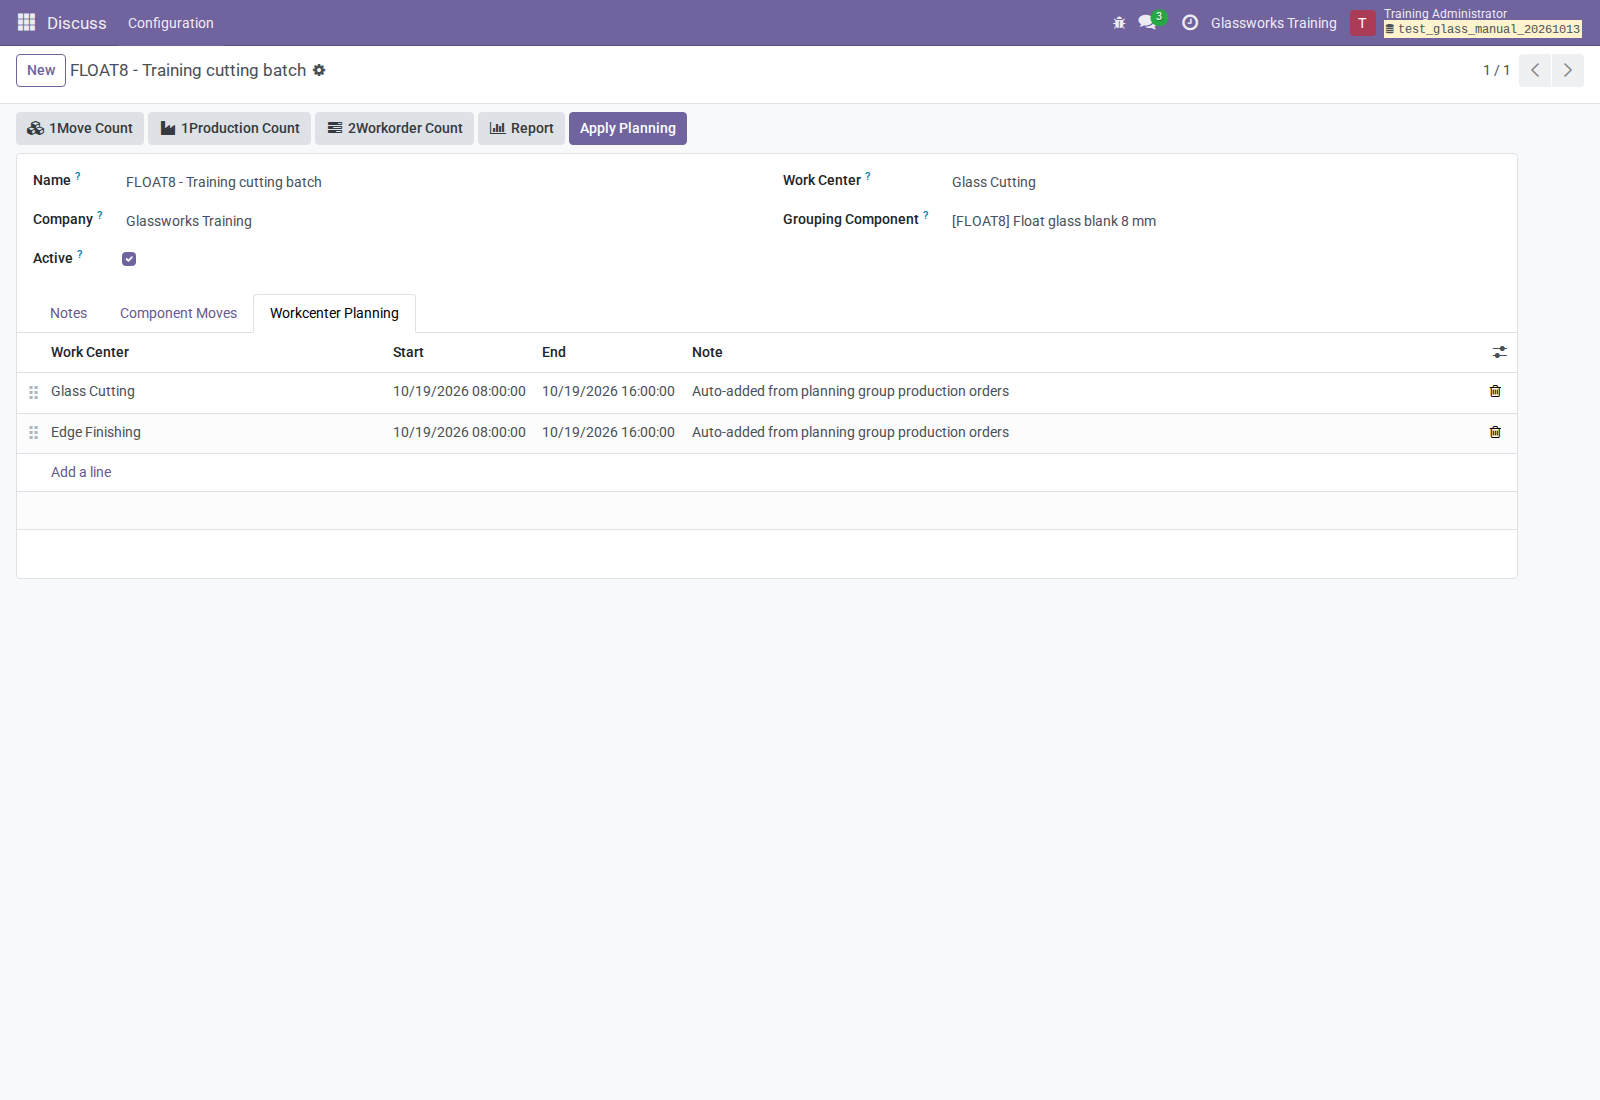
Figure U27. The example planning window is set separately for each work center.
Eligible WOs are scheduled sequentially, primarily by MO deadline, using expected duration with a minimum of one minute. An End that cannot fit the next order stops that line's scheduling. The scheduler does not skip to fit later shorter jobs, resolve other groups' conflicts, or respect breaks through calendar-aware optimization.
All open work orders of the related MOs are considered, including in-progress work and operations unrelated to the selected raw component. Applying Planning can change their dates. Review with the workshop before rescheduling started work. Old work-center lines remain after membership changes until reviewed.
11. Complete partial production and recover canceled work
11.1 Complete or backorder normally
In native Manufacturing, enter actual output/consumption and complete the intended quantity. For partial output, use the native backorder/split workflow according to warehouse settings. Configurator-linked splits/backorders retain the dispatched drawing and approved revision.
On the configuration:
- Completed Sheets adds done quantities for the current dispatched revision.
- Remaining Sheets is demand less completed sheets.
- Any open current-revision MO keeps the drawing In Production.
- Once every current-revision MO is done/canceled, fulfilled demand becomes Done; unfinished demand becomes Production Cancelled.
11.2 Cancel with nothing completed
- Cancel all unfinished linked MOs using normal Manufacturing actions.
- Check the configuration is Production Cancelled with Completed Sheets zero.
- Click Reopen Design, edit/correct, and confirm a new revision.
- Send to Production again and review the replacement job.
Historical canceled orders remain linked. Do not delete them to remove traceability.
11.3 Replace a partially completed canceled remainder
- Cancel every unfinished linked MO, leaving completed work intact.
- Open the Production Cancelled configuration.
- Check Completed Sheets and Remaining Sheets against workshop records.
- With Manufacturing access, click Replace Cancelled Remainder.
- Review the new MO's quantity: it must contain only unfinished sheets.
- Confirm/process it under the same approved revision.
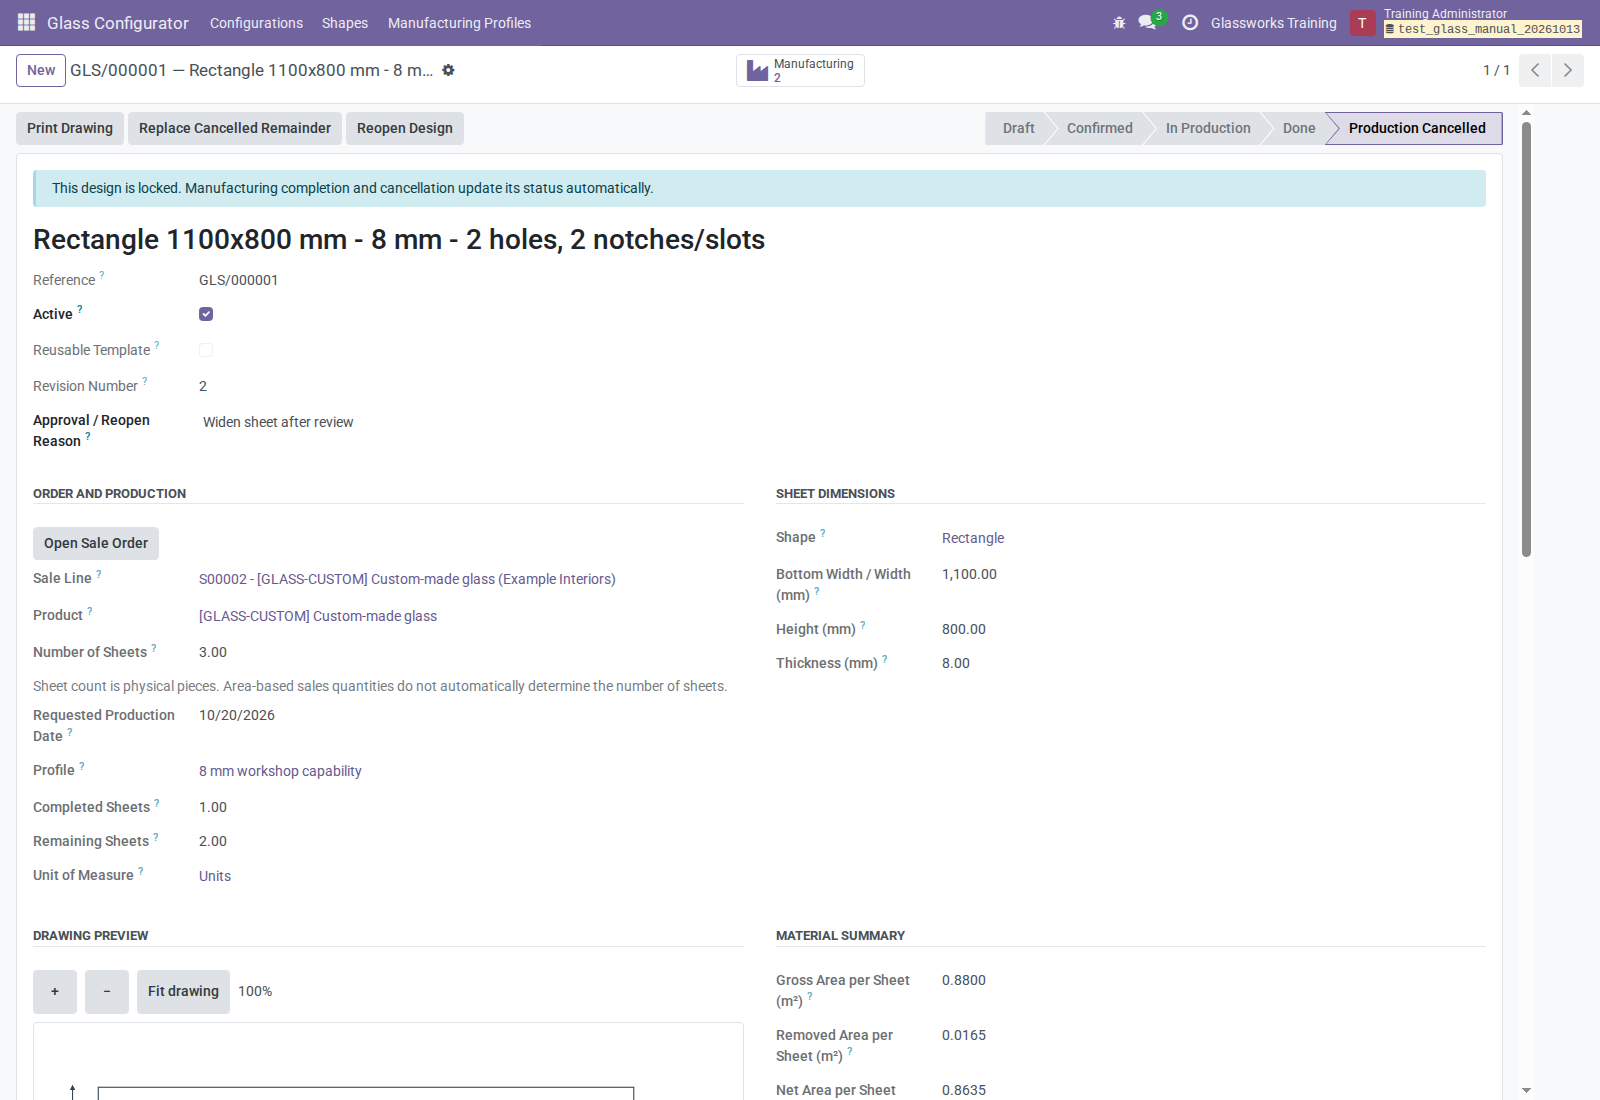
Figure U28. One completed sheet and two unfinished sheets from a three-sheet batch.
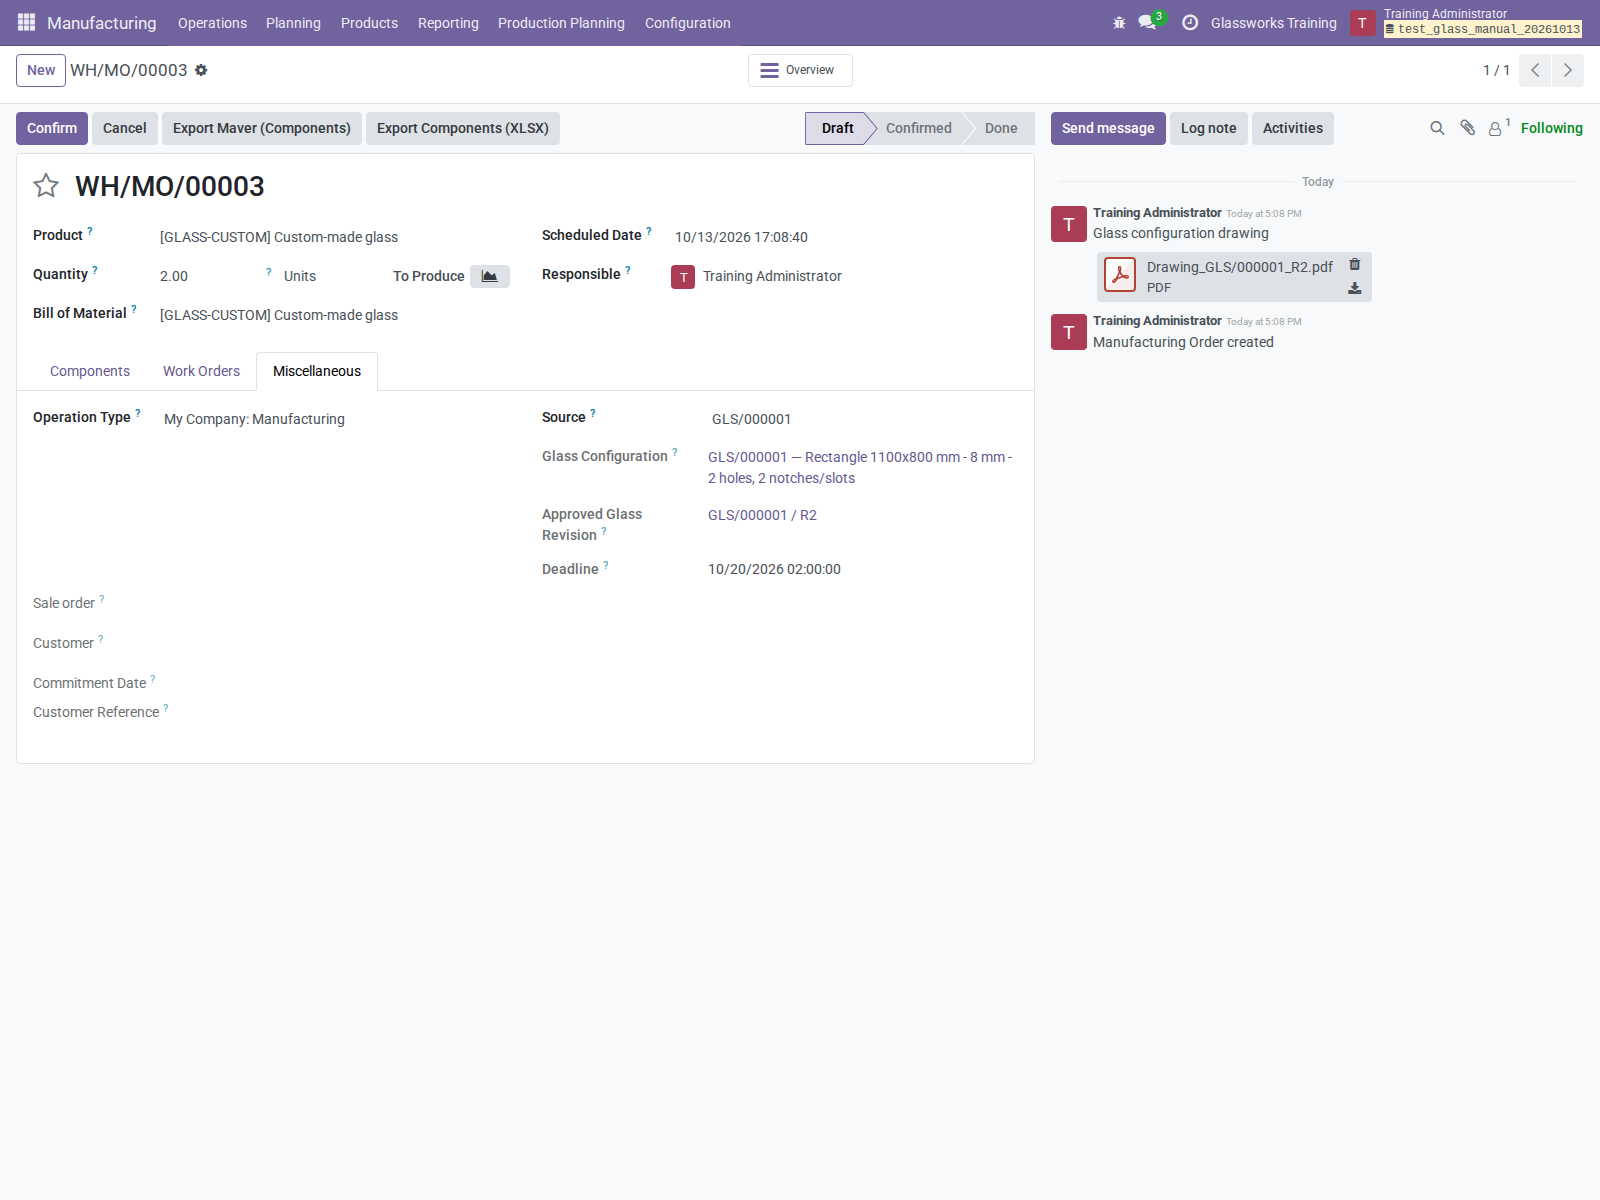
Figure U29. Replacement demand is two Units under the dispatched revision.
Partially completed drawings cannot reopen for geometry changes. Replacement requires a positive remainder and resolved sales/profile issues. Do not dispatch the full original count again or make an unrelated duplicate MO: that would risk reproducing already completed sheets.
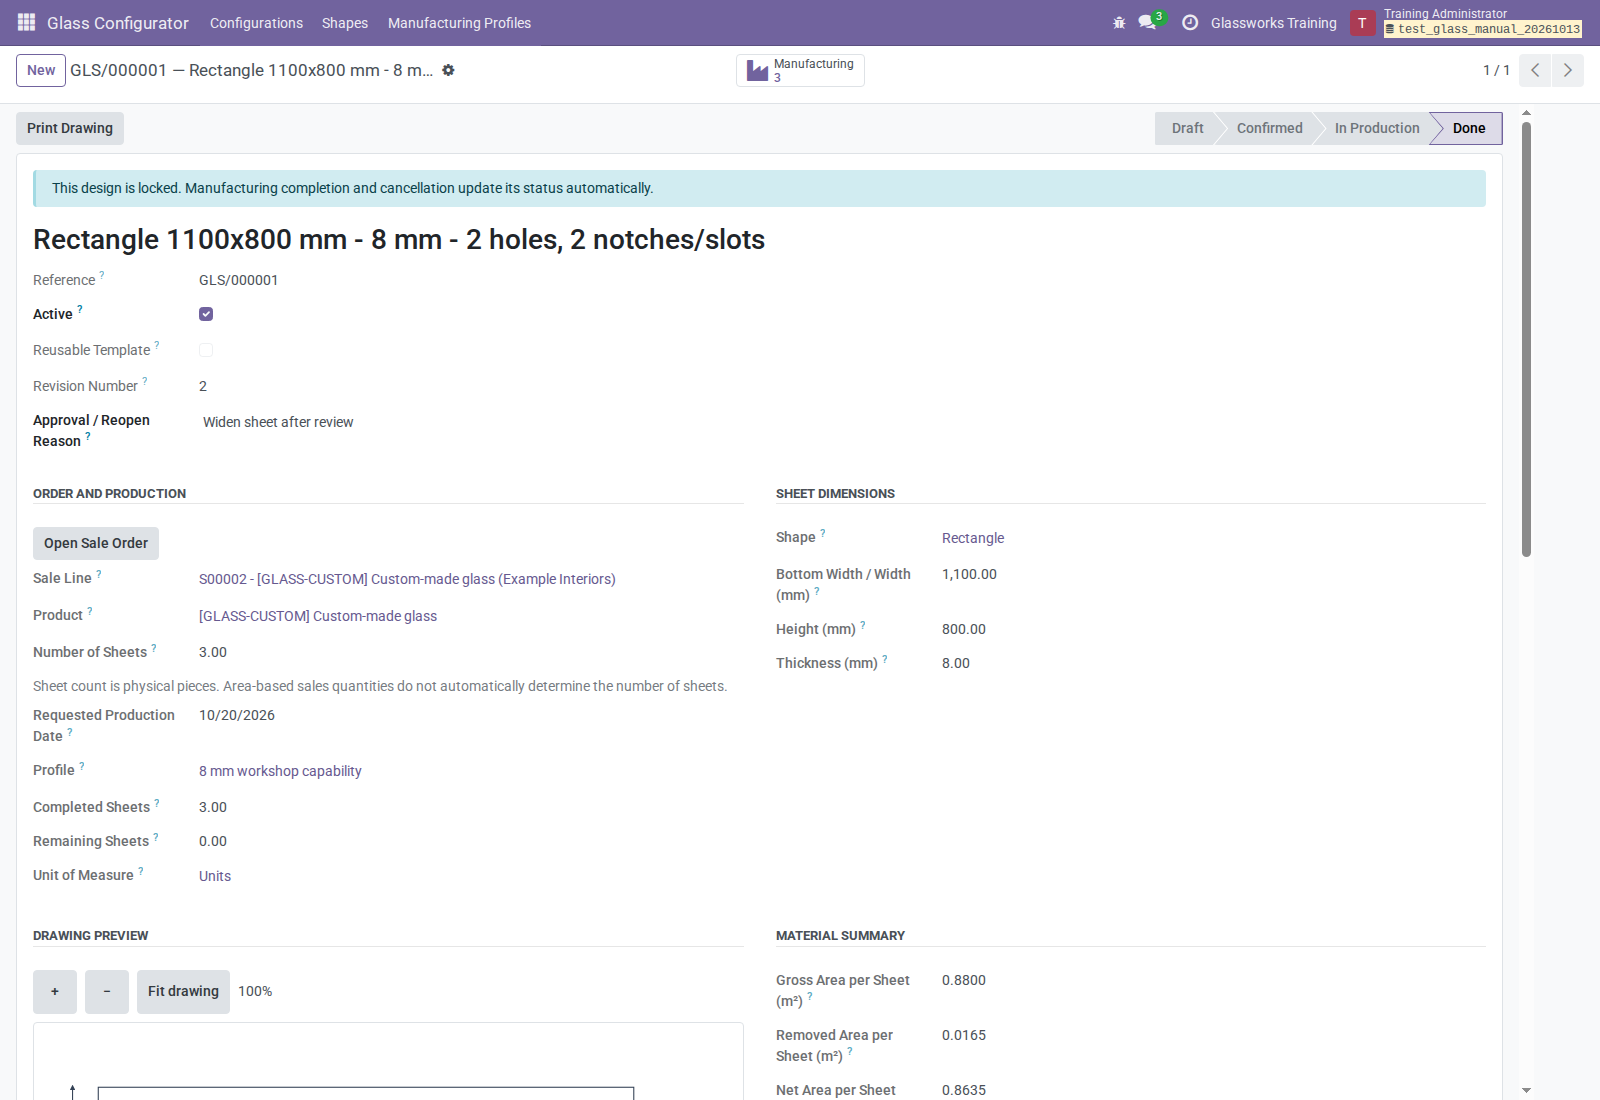
Figure U30. Completing the replacement fulfills the three-sheet demand.
12. Deliver and invoice measured glass
12.1 Full or partial delivery
- Open the order's Delivery button or its Inventory transfer.
- Check the product, native Demand/UoM, dimensions, and Planned Pieces.
- Check availability and detailed operations, including required lot/serial data.
- Enter the actual operational quantity in the displayed UoM.
- Validate and create a backorder for the remainder when appropriate.
- Print the delivery slip and check its quantities, dimensions, and piece counts.
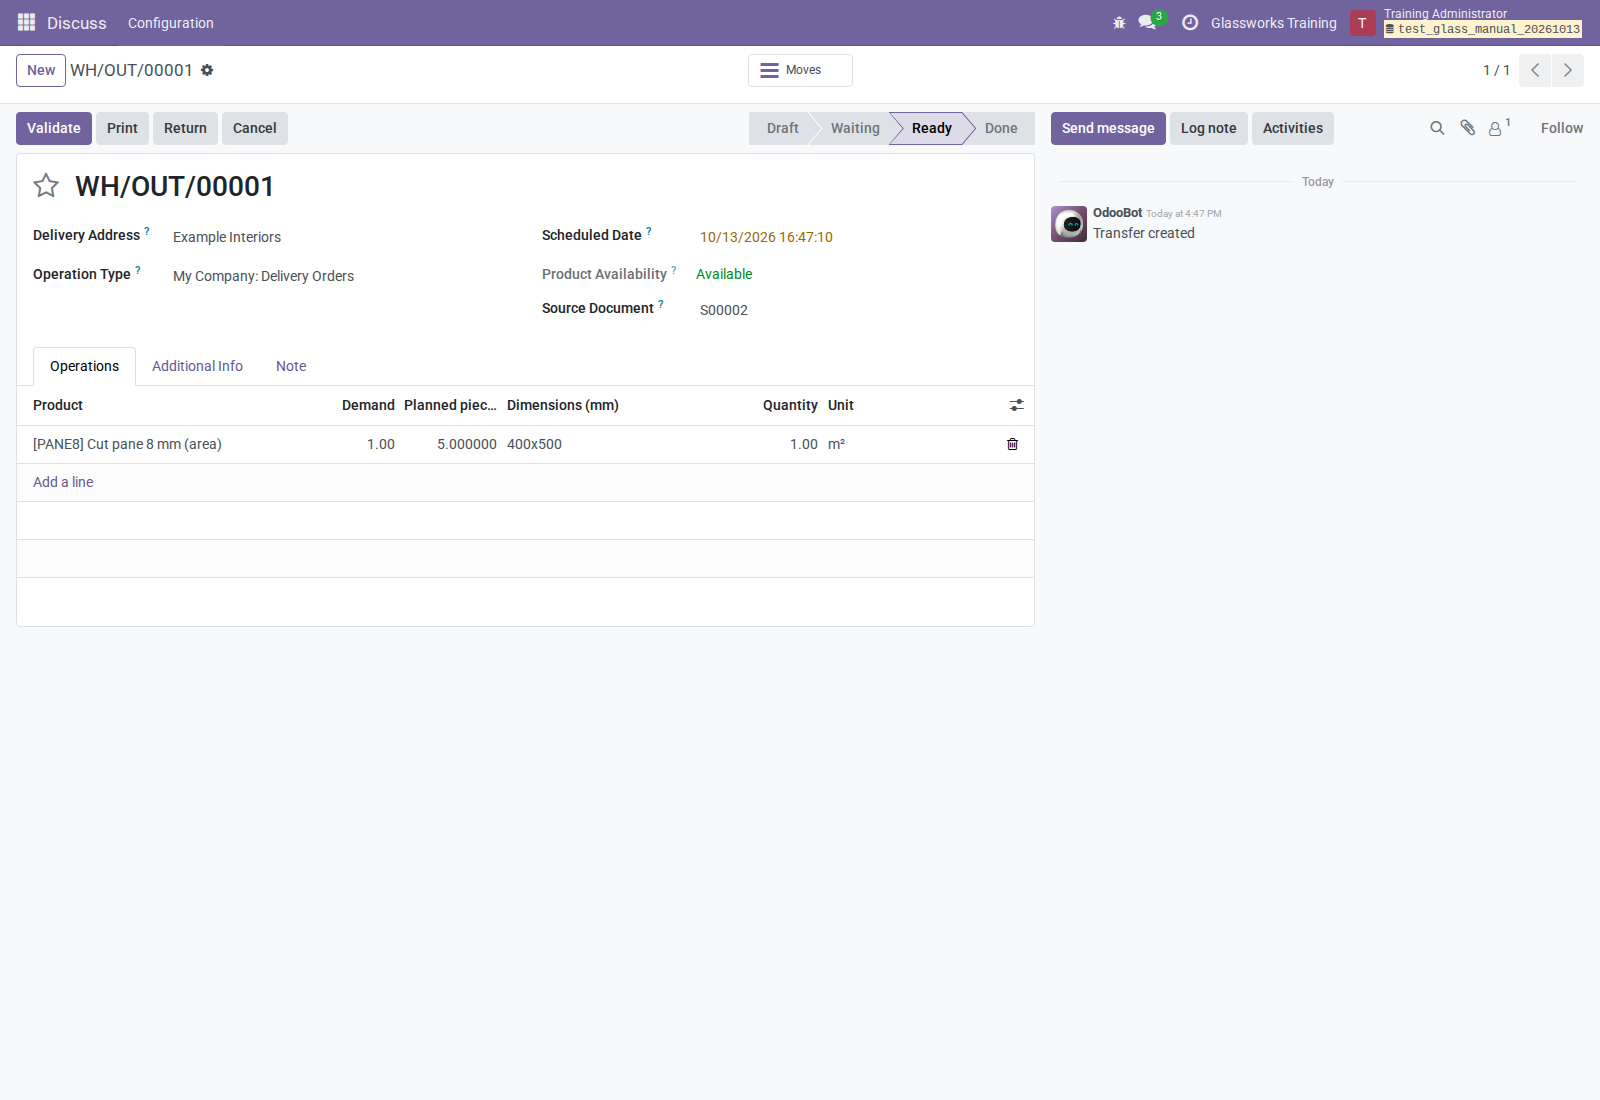
Figure U31. Five pieces correspond to demand of 1.00 m².
For three of the five 400 × 500 mm panes, deliver 0.60 m², leaving 0.40 m²
for two panes. Do not enter 3 in the m² Quantity field. Detailed-operation
pieces are derived from that operation's native quantity, not an independent
editable physical count.
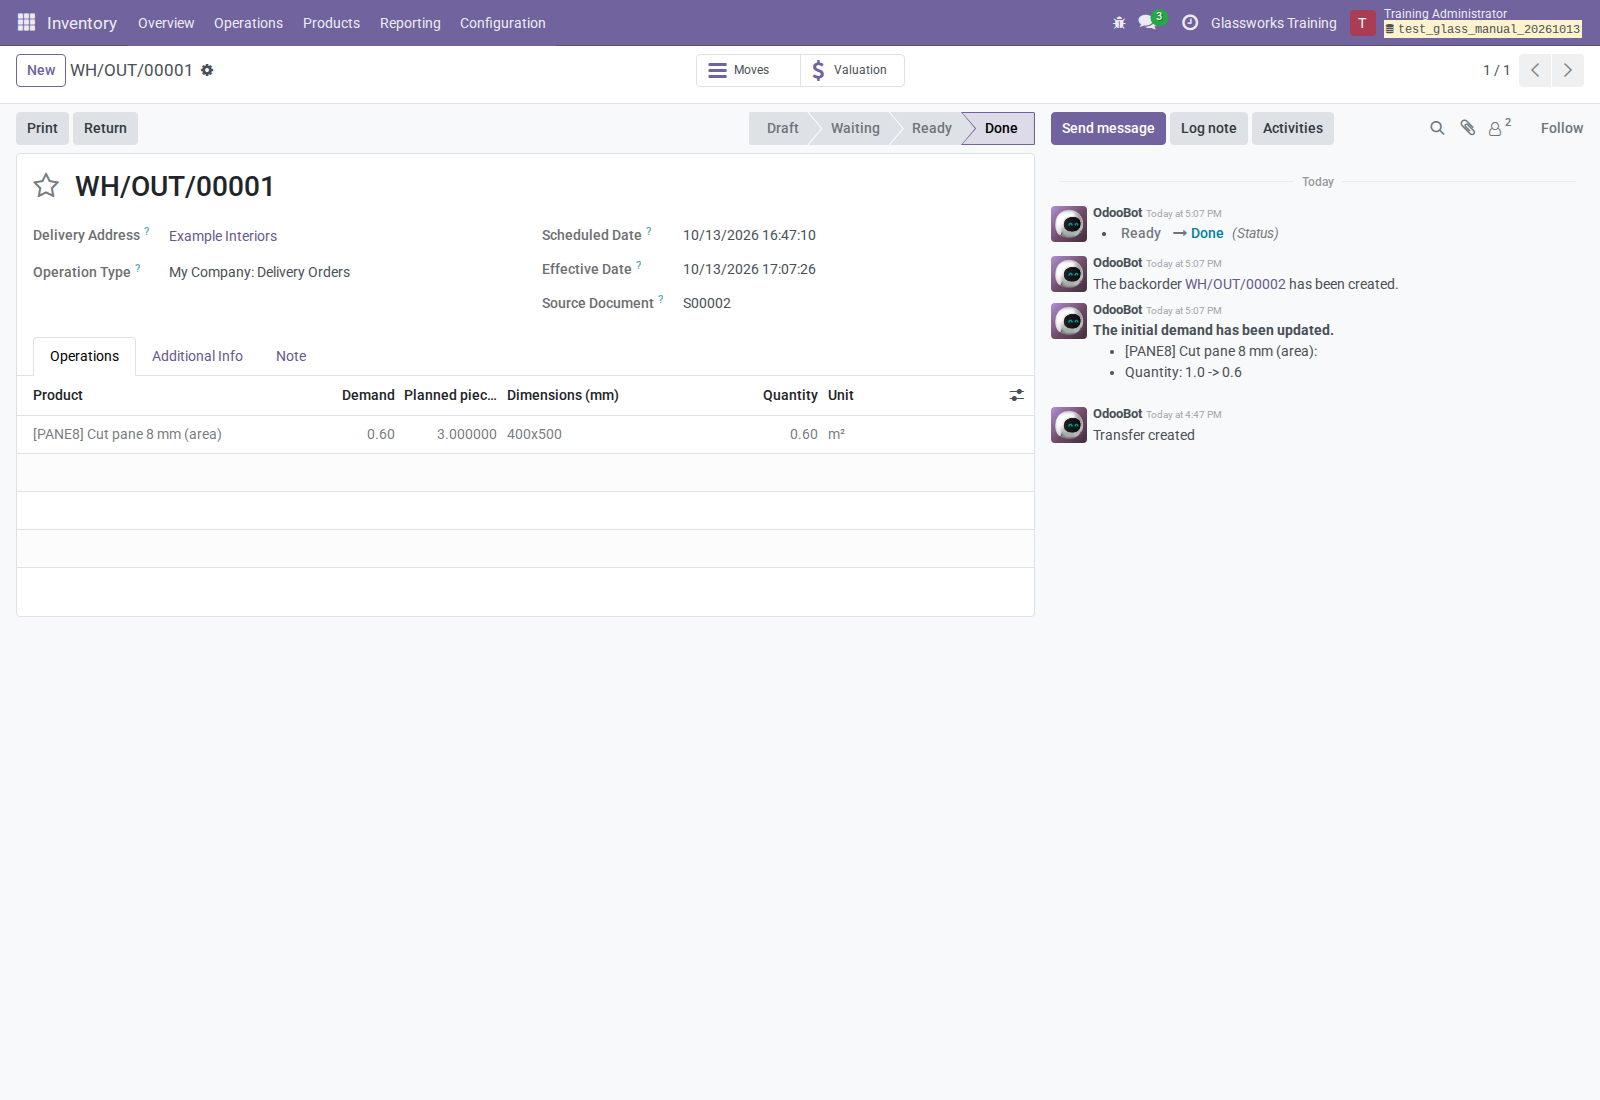
Figure U32. Three pieces delivered; a native backorder retains the remaining area.
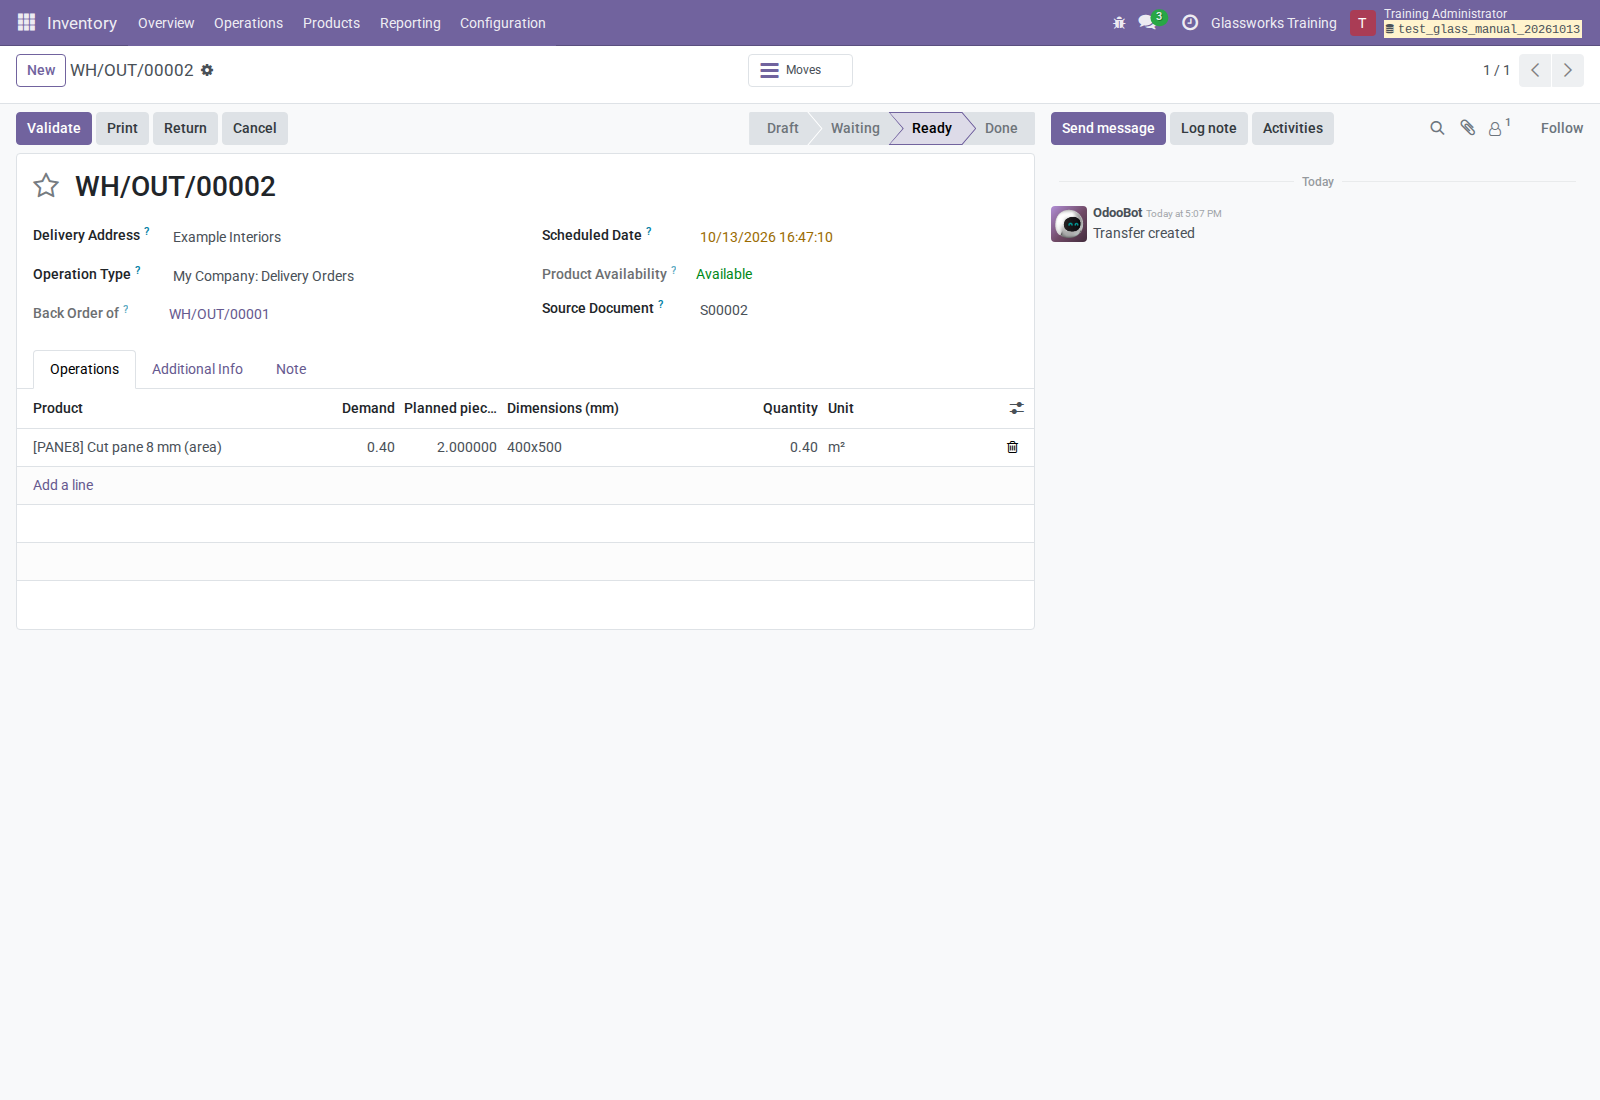
The remaining two panes are represented by 0.40 m² on the backorder.
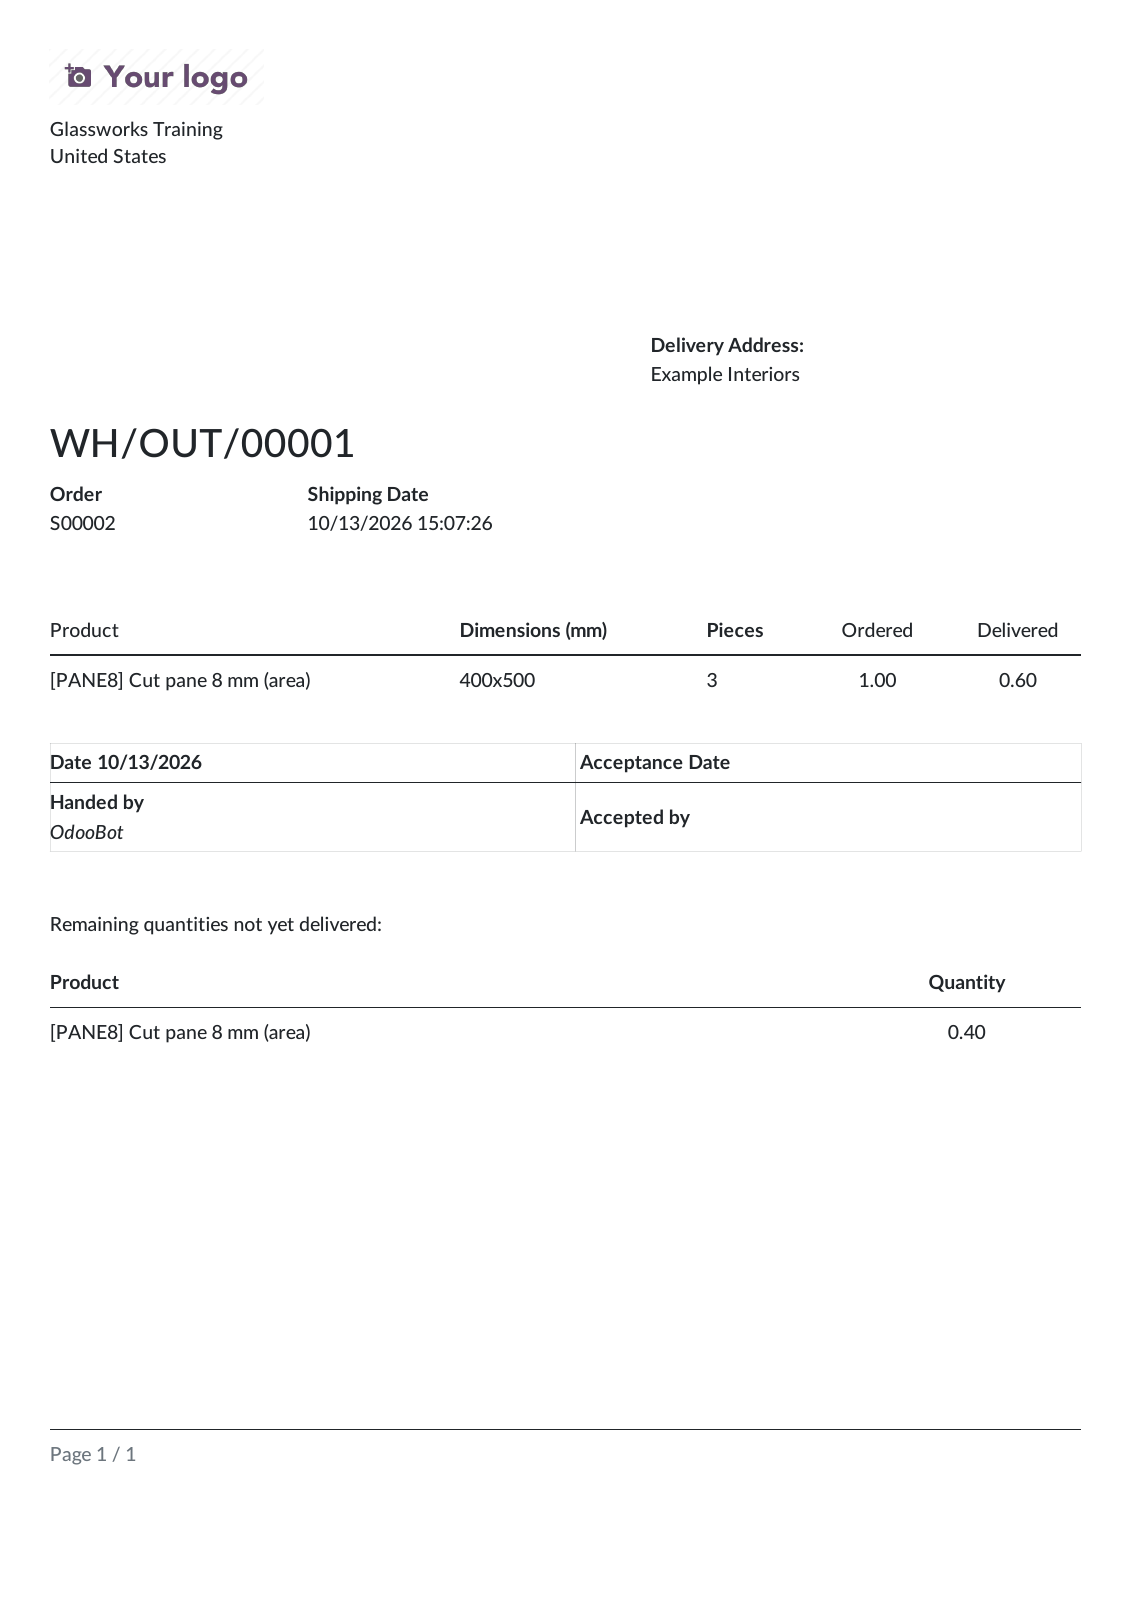
Figure U33. Delivery-slip dimensions/pieces and handover/acceptance writing area.
Delivery reports show planned measurements before completion and move-line measurements after completion, including serial/aggregated cases. Completed slips include Date, Acceptance Date, Handed by, and Accepted by spaces. Common handover labels use Slovenian wording when the report language is Slovenian. These printed spaces do not create a digital customer-acceptance record.
12.2 Invoice and credit-note quantities
- Create the customer invoice from the sale order according to its invoicing policy.
- Review product, Quantity/UoM, price, taxes, and totals using normal Accounting.
- Enable optional Pieces (informational) / Dimensions invoice-line columns if required, or open journal-item detail for informational measurements.
- Confirm/post only through the normal accounting procedure.
- For a correction/refund, use the normal credit-note procedure and native quantity.
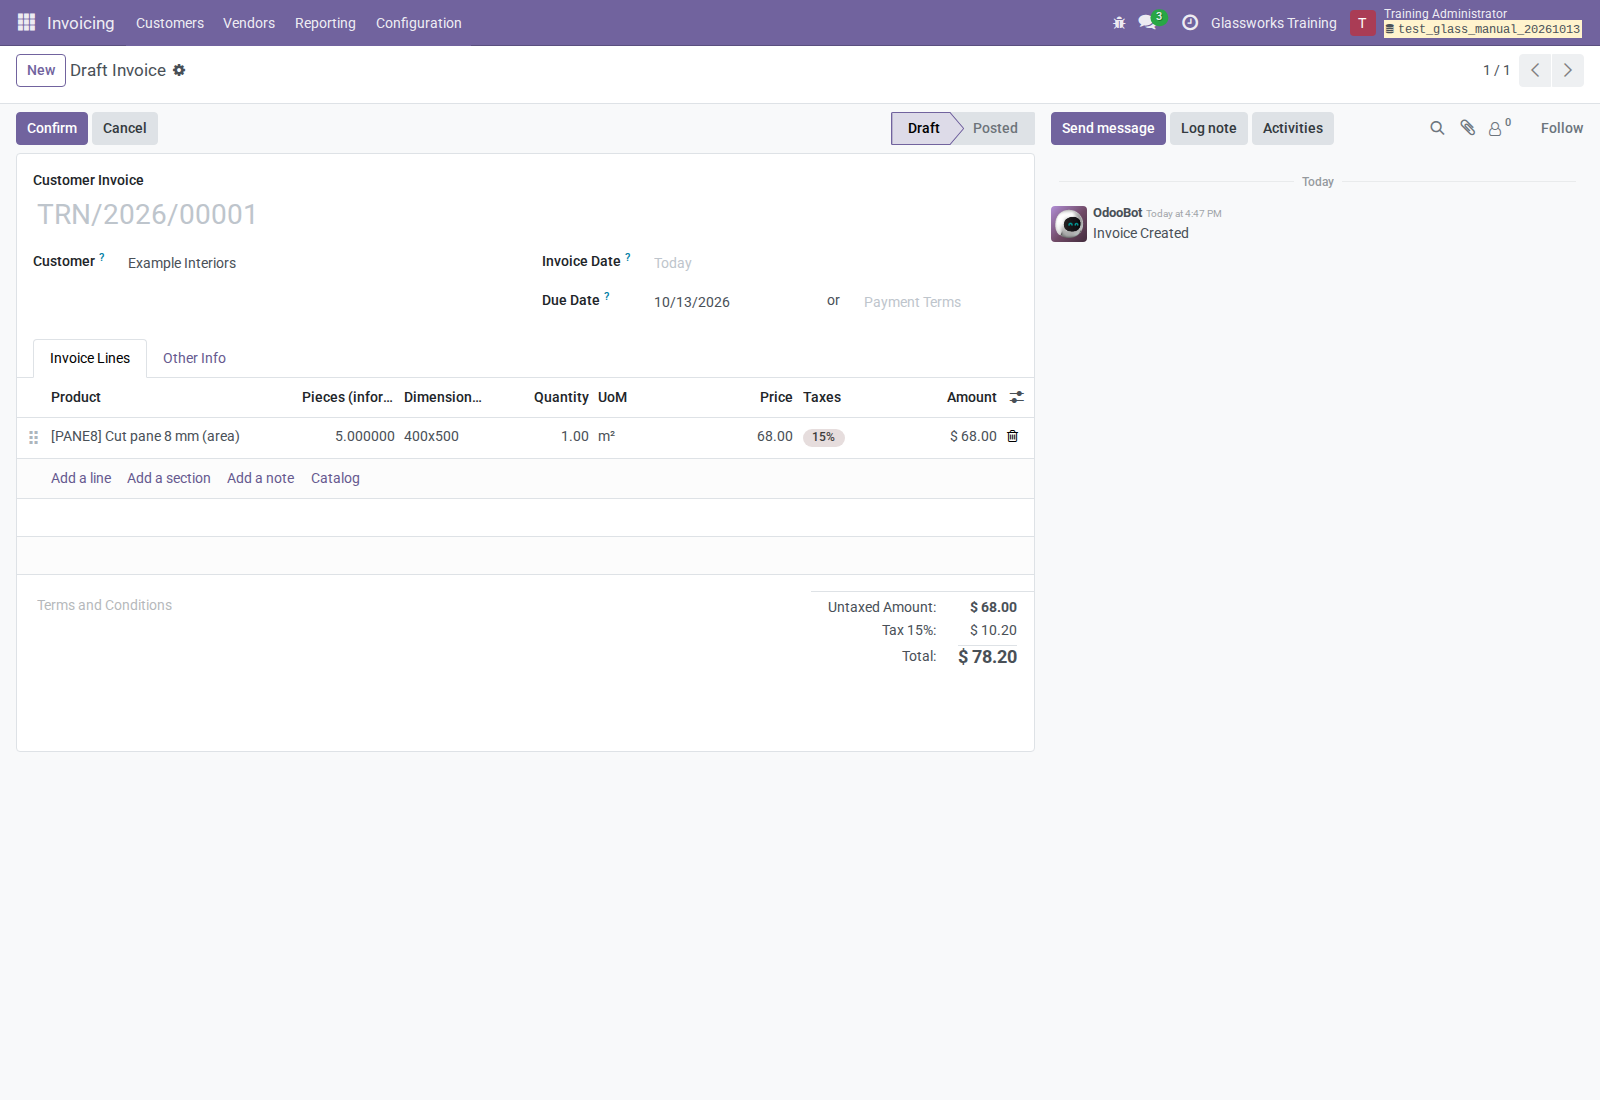
Figure U34. Accounting quantity is authoritative; measurement values are additional line information and optional columns.
Changing invoice Quantity recalculates informational Pieces. Changing descriptive geometry does not replace the native accounting quantity. There is no dedicated PMIS invoice-approval or payment workflow. The addon exposes invoice/journal-item measurements; the loaded report extensions add measurements to quotations, manufacturing labels, and delivery slips rather than supplying a separate measurement invoice PDF template.
12.3 Purchasing and inventory boundaries
Purchase raw glass through the standard Purchase/Inventory workflows in its configured purchase/stock UoM. This repository does not add a measured purchase order entry wizard or dimensional sheet-selection workflow. Reservations and stock valuation remain native Odoo. Legacy quant measurements are not a stock sheet catalog or proof of a remnant's size; do not use them to decide cutting fit.
13. Manufacturing and planning reports
13.1 Filtered Manufacturing Reports
- Open Manufacturing → Reporting → Manufacturing Reports.
- Select finished Products, commercial Customer, and Filter States when required.
- Enable Enable filter by date, then enter Start Date.
- Enable Filter On Responsible, then select Responsible Users.
- Enable Include Work Orders details when needed.
- Optionally enable Only Workcenters on Production Label.
- Click Print Pdf or Export xls; the latter downloads an XLSX workbook.
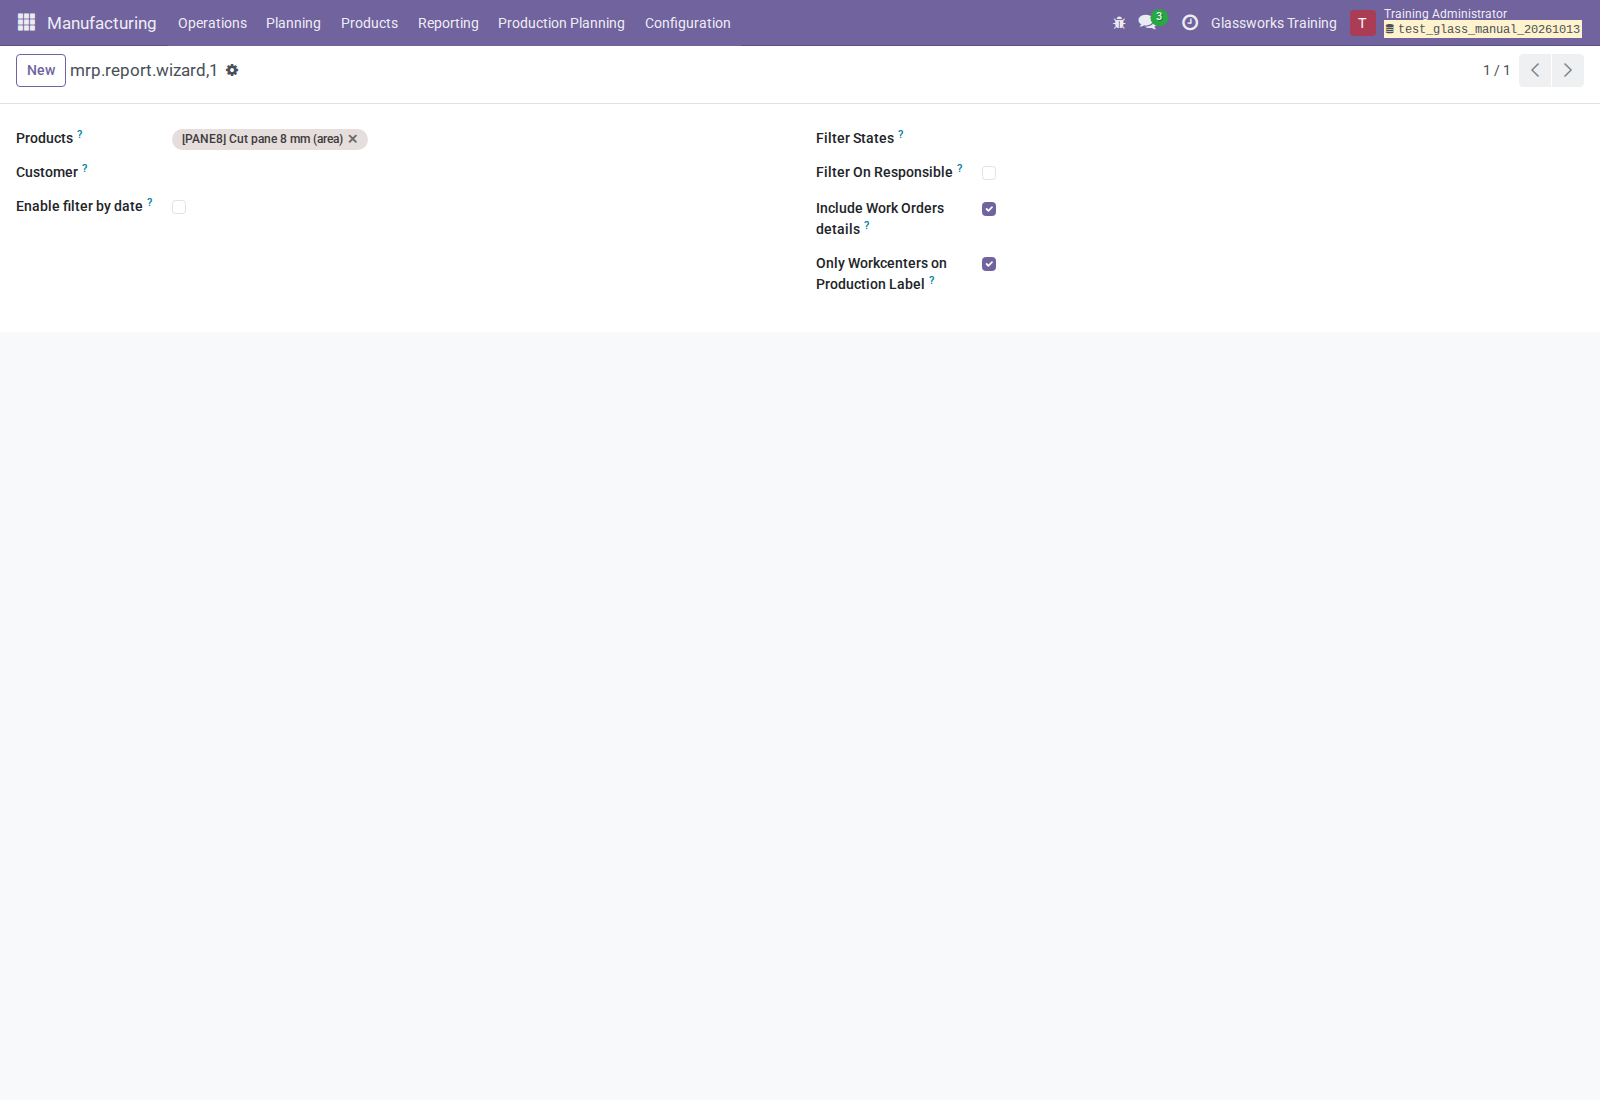
Figure U35. Empty filters leave the report unrestricted within your source access.
Start Date means the MO starts on/after the date; it is not a deadline filter. Selected commercial customers include their contacts. Set filter values after enabling the corresponding option, because toggling the option clears them.
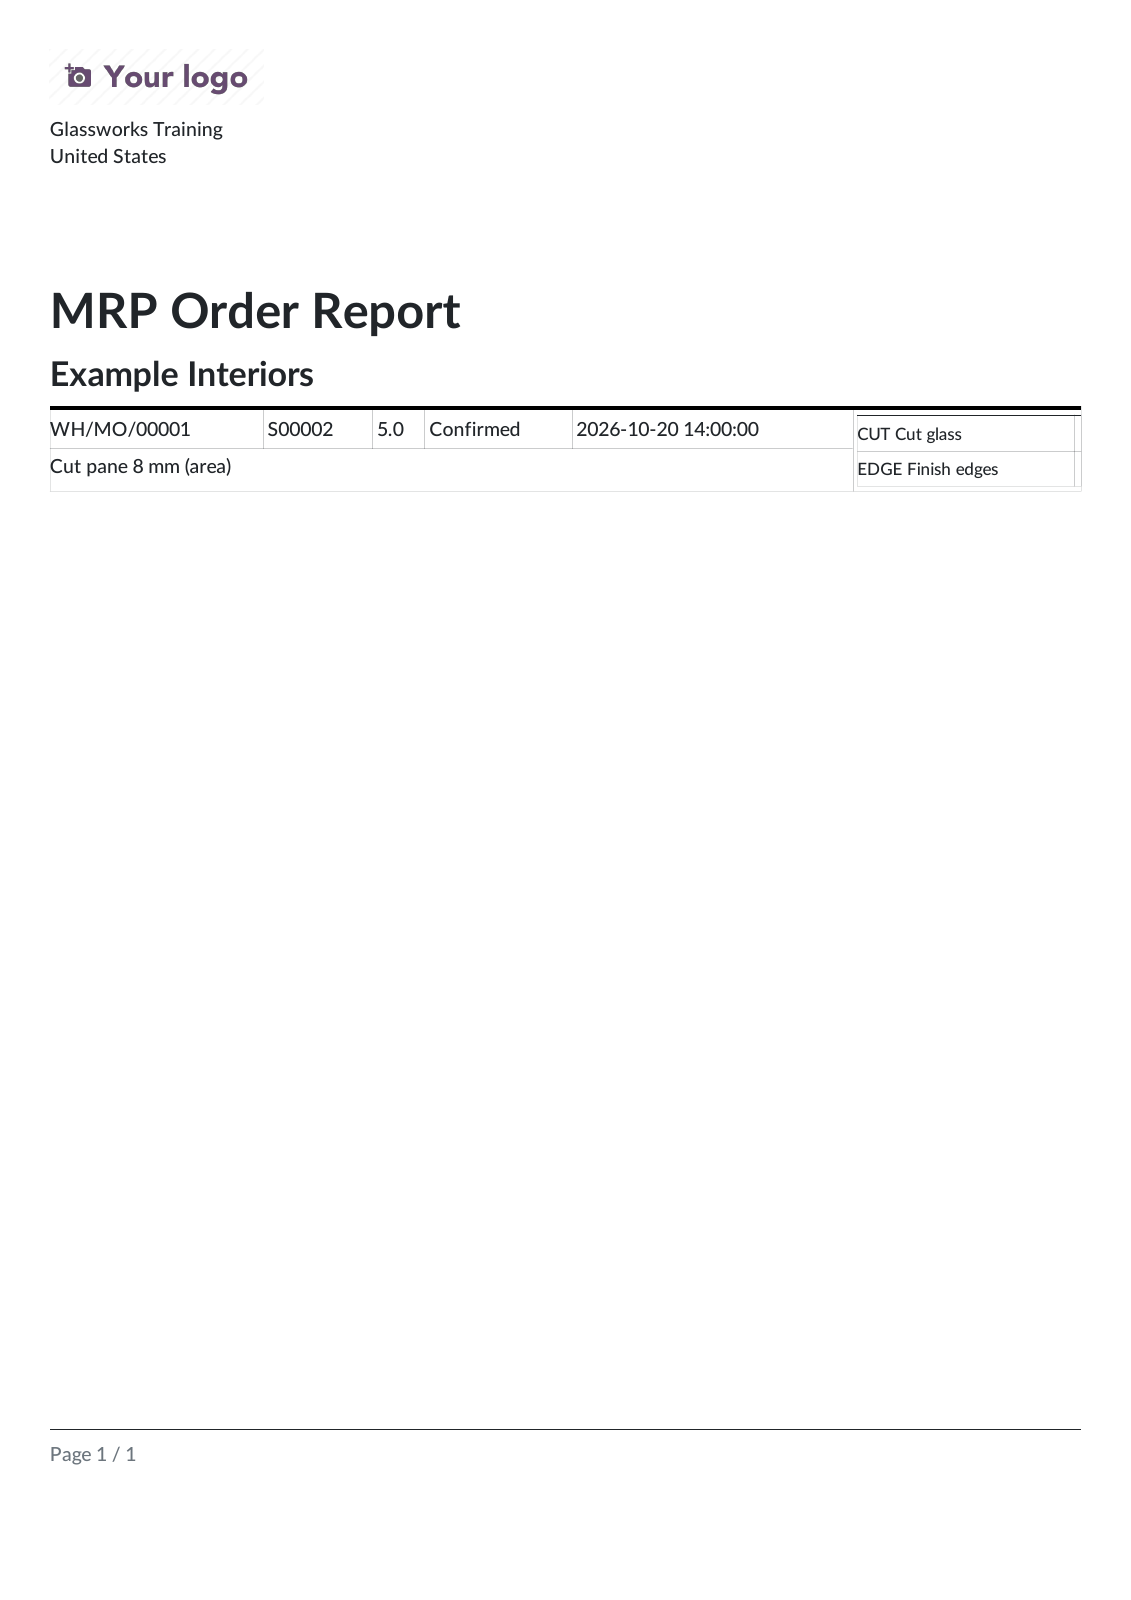
Figure U36. Customer sections with MO, source, product, quantity, state, deadline, and optional work-order details.

The actual exported workbook, displayed using LibreOffice's print rendering. Open the XLSX in a spreadsheet application to inspect all columns and rows.
With Measurements installed, report Quantity is PMIS pieces, including zero for an MO without usable piece metadata. It does not fall back to native quantity for that MO. Without the measurement field, Quantity is native MO quantity. Do not interpret every report number as m².
The label-only option filters work-order detail, not the MO list. Missing label flags omit details when this option is enabled. Customers sharing the same displayed name share a section; absent customers appear as (No Customer). No matching records raises No data is available to print. Reports do not change production quantities, dates, or work orders.
Work-order states are spelled out in XLSX. The PDF shows the work-center code/name and OK for completed work orders, leaving that completion cell blank for unfinished work. Both formats show the MO state.
13.2 Planning analysis
- Open Manufacturing → Production Planning → Planning Group Report, or the group's Report button.
- Filter by group, MO, customer, work center, or work order.
- Use Late, Open MO, and Open WO filters as required.
- Group by Planning Group, Production Order, Work Center, or Customer.
- Switch between List, Pivot, and Graph for detail and summaries.
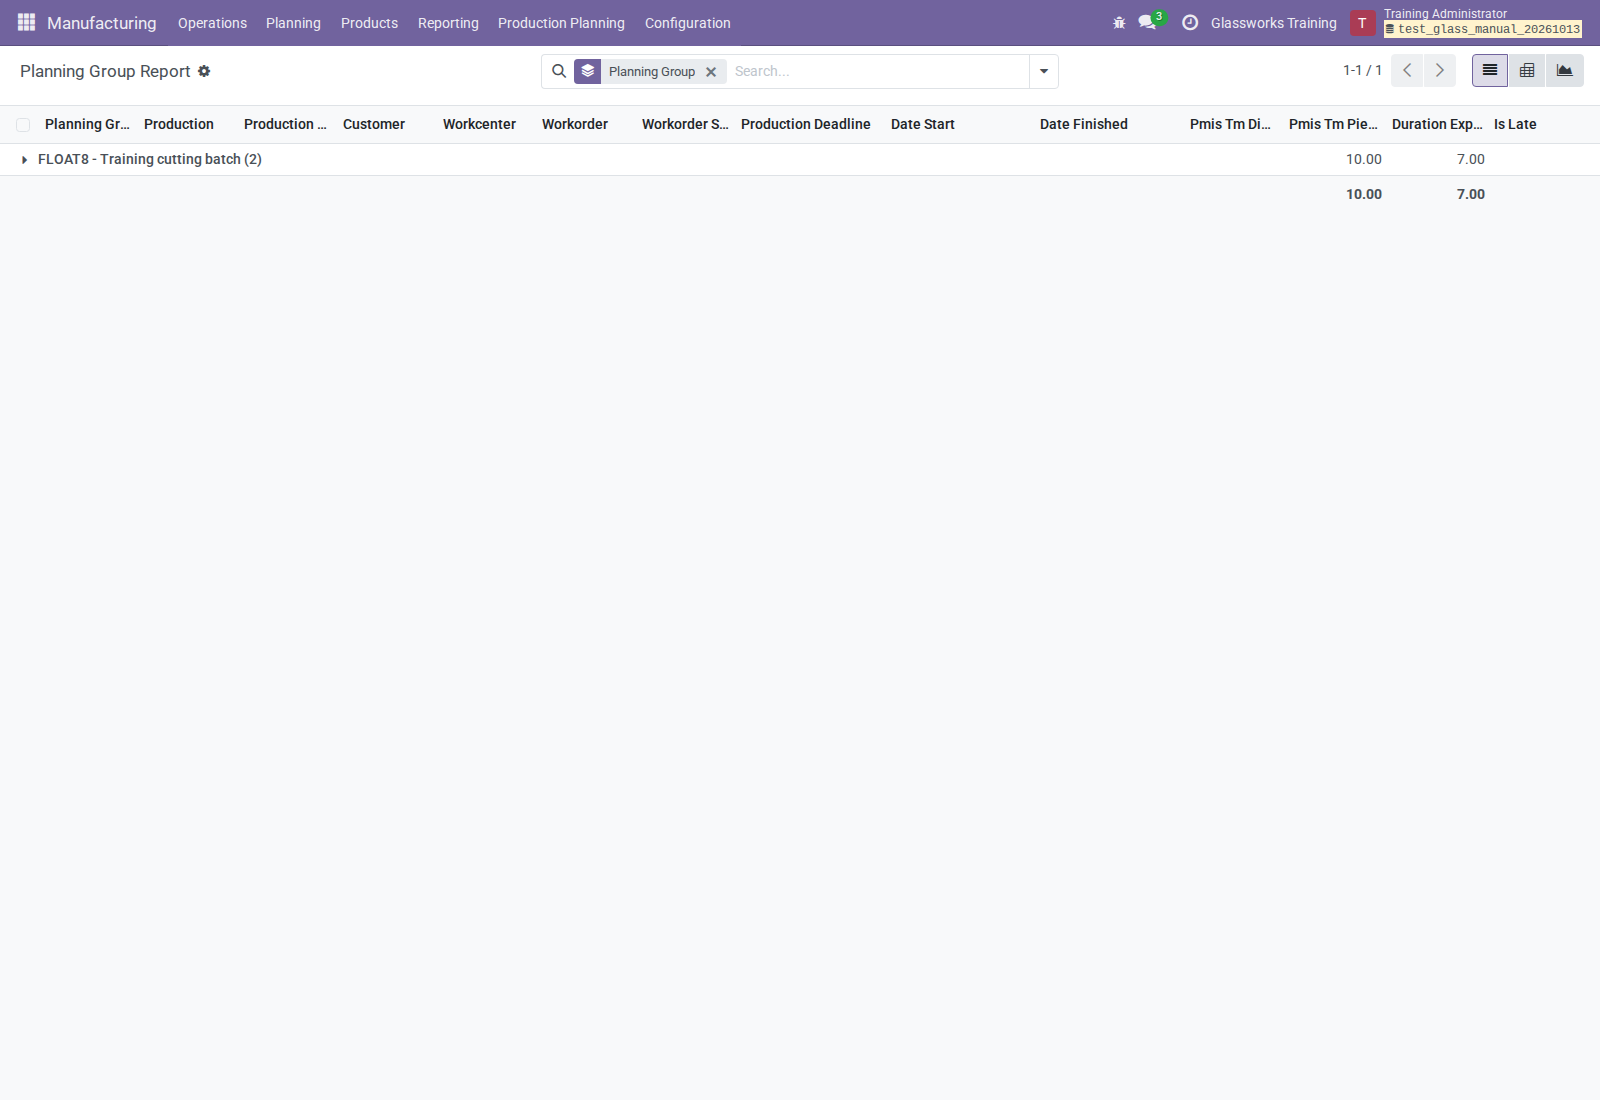
Figure U37. Operation-level planning dates, states, dimensions, pieces, and duration.
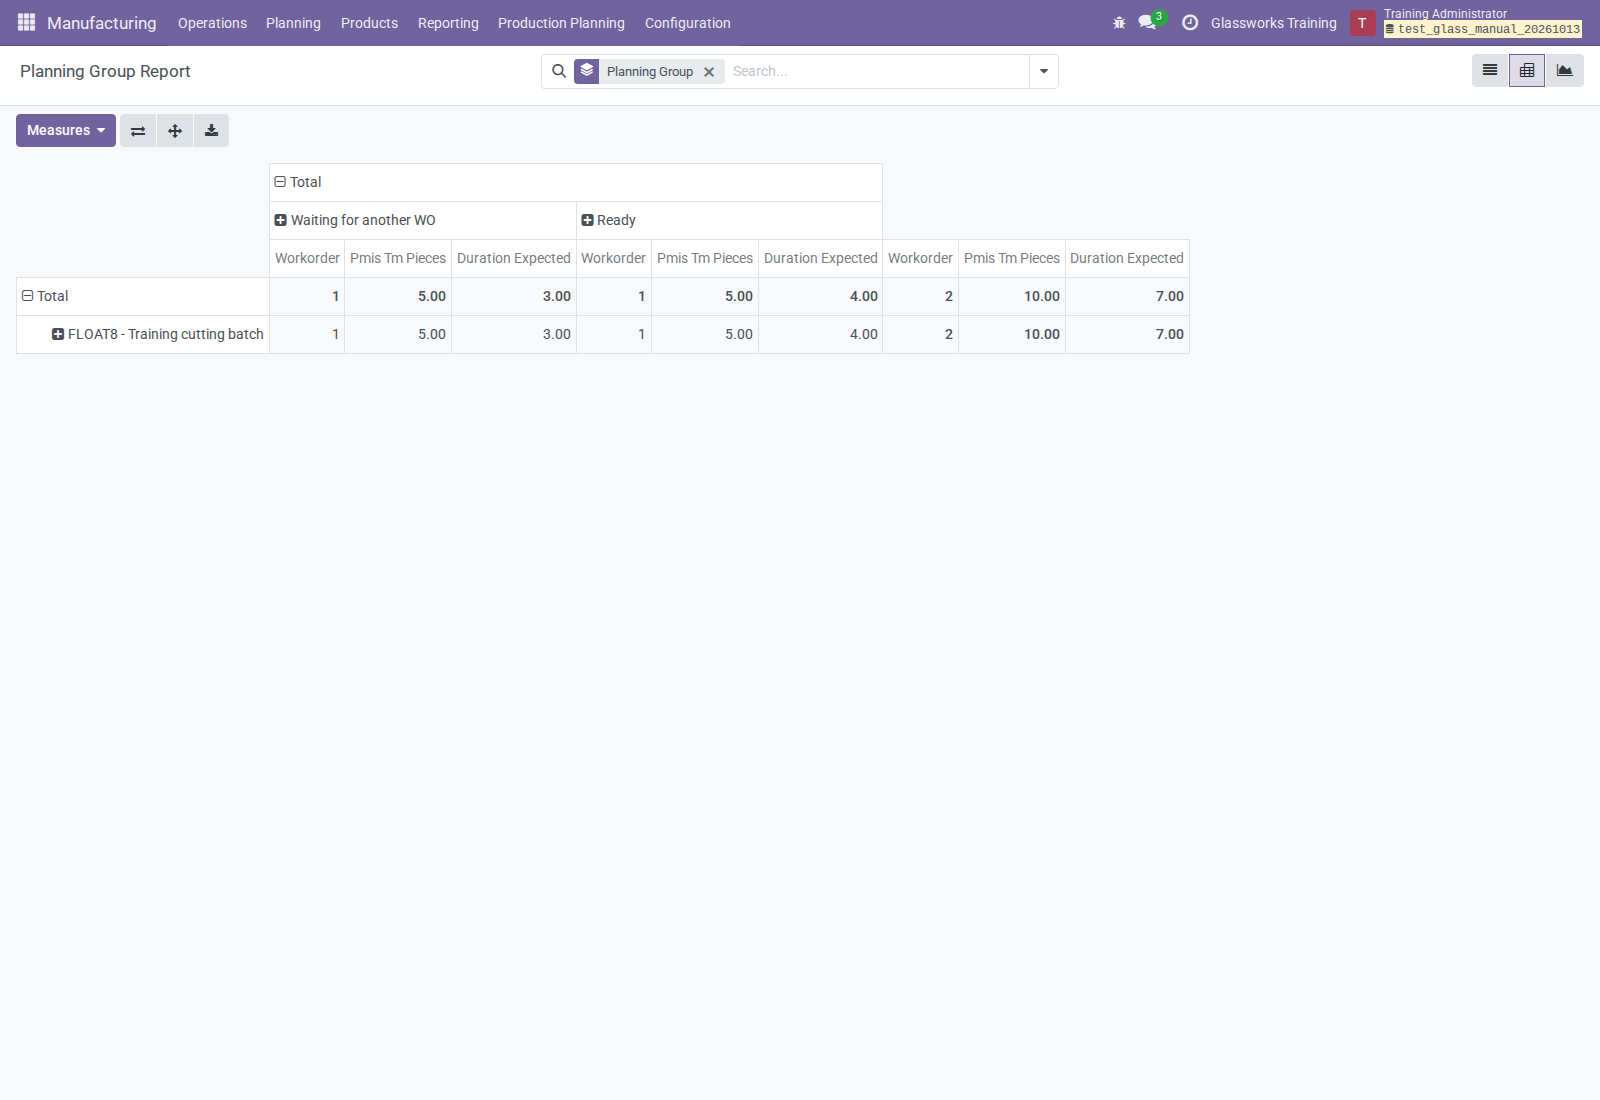
Pivot view for work-center/state measures.
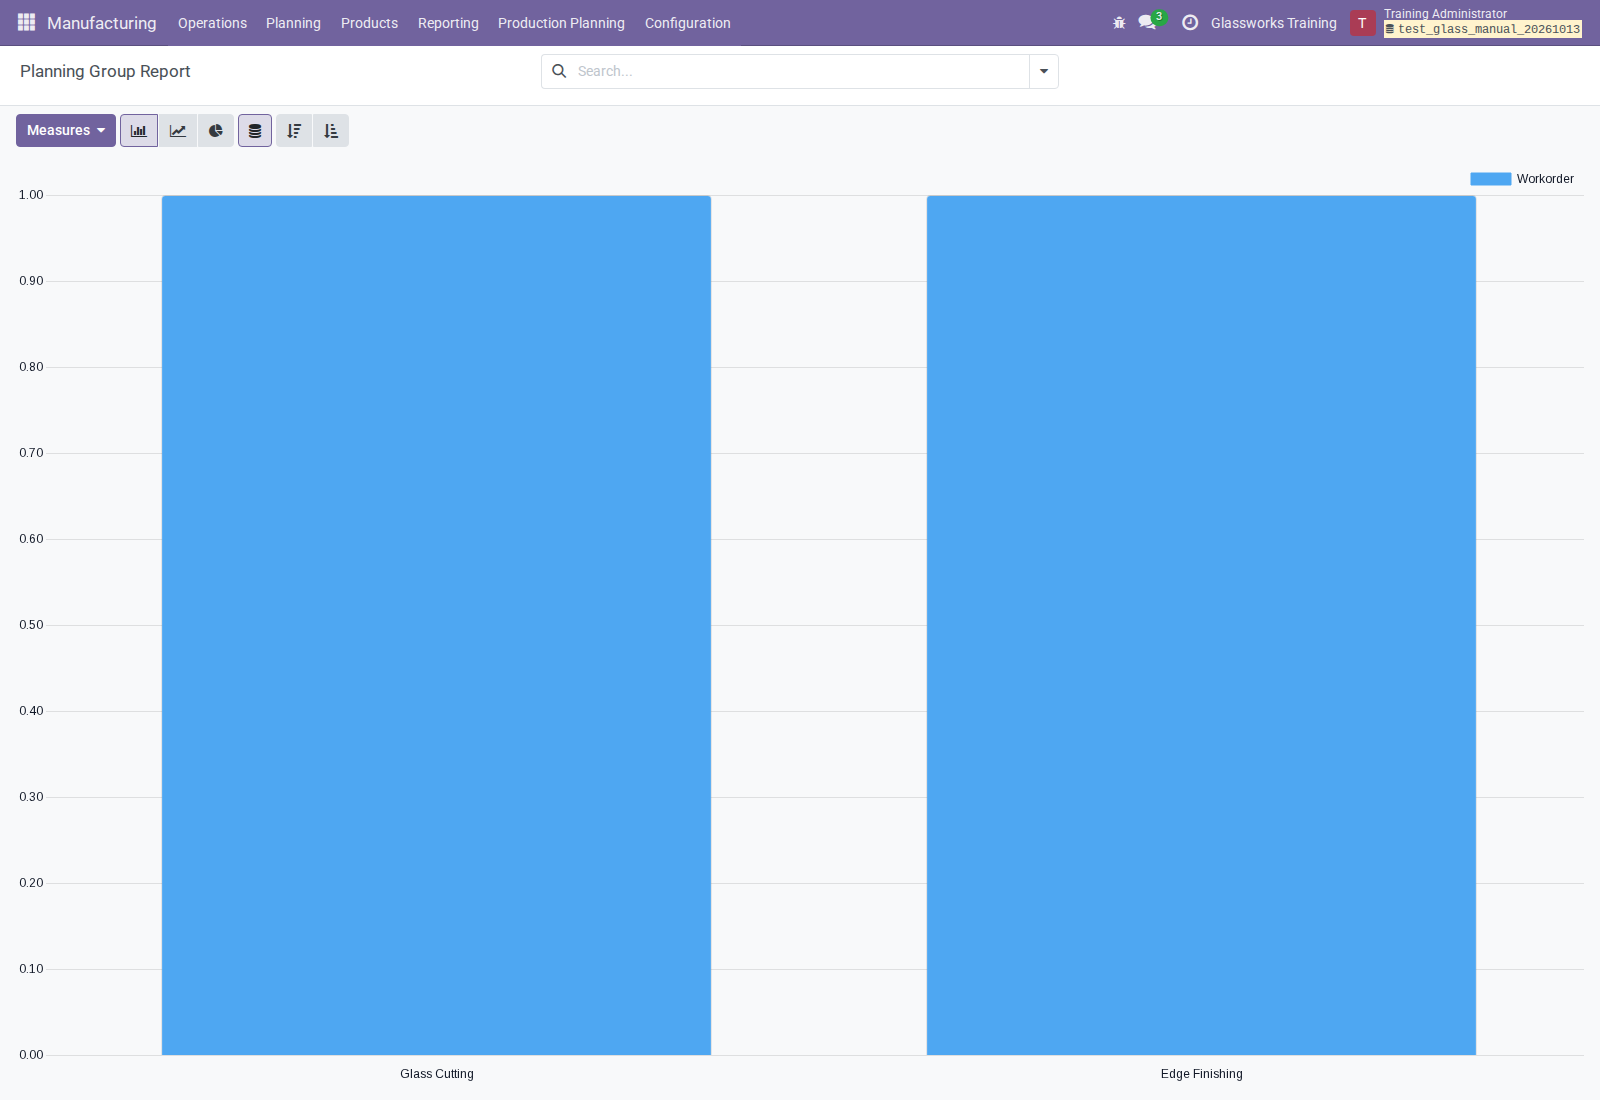
Graph view for work-center workload comparisons.
The pivot supports work-order count, pieces, and expected duration; the graph shows work-order measures by work center. The list provides planned dates, deadline, and late status. Component totals repeat per related work order. Adding pieces across two operations can count the same demand twice; use raw component moves for unique material requirements.
Assigned historical components remain in analysis until filtered out. Late means the recorded WO Finish date exceeds the MO deadline, including a planned finish on unfinished work; it does not exclusively mean actual completed work was late.
13.3 Planning printouts
For Component Work List:
- Open/select the planning group.
- Use Print → Component Work List.
- Review open component Demand/UoM, MO, first WO, customer, and deadline.
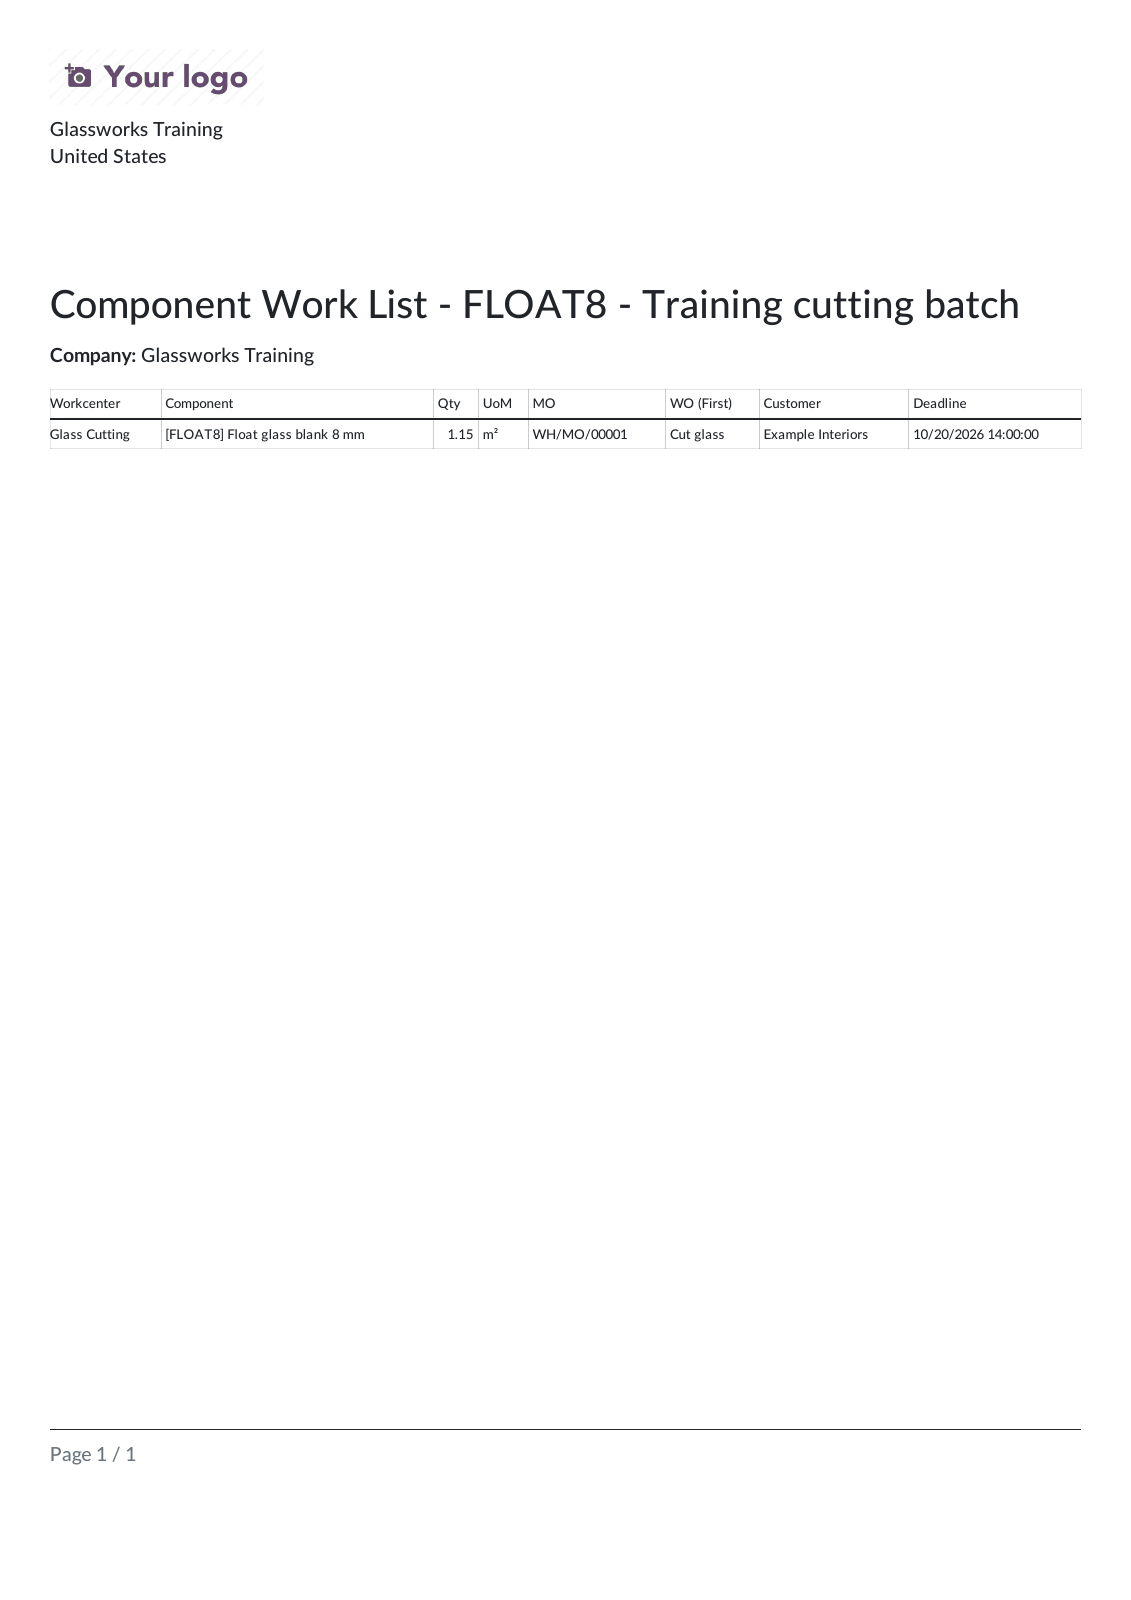
Figure U38. Open native component quantities, without repeating demand per operation.
For Planning Group Workcenter Sheets:
- Open the Planning Group Report and select relevant analysis rows.
- Use Print → Planning Group Workcenter Sheets.
- Review work-center/customer sections, pieces, expected minutes, and total time.
- Use the printed operator/start/end spaces according to workshop procedure.
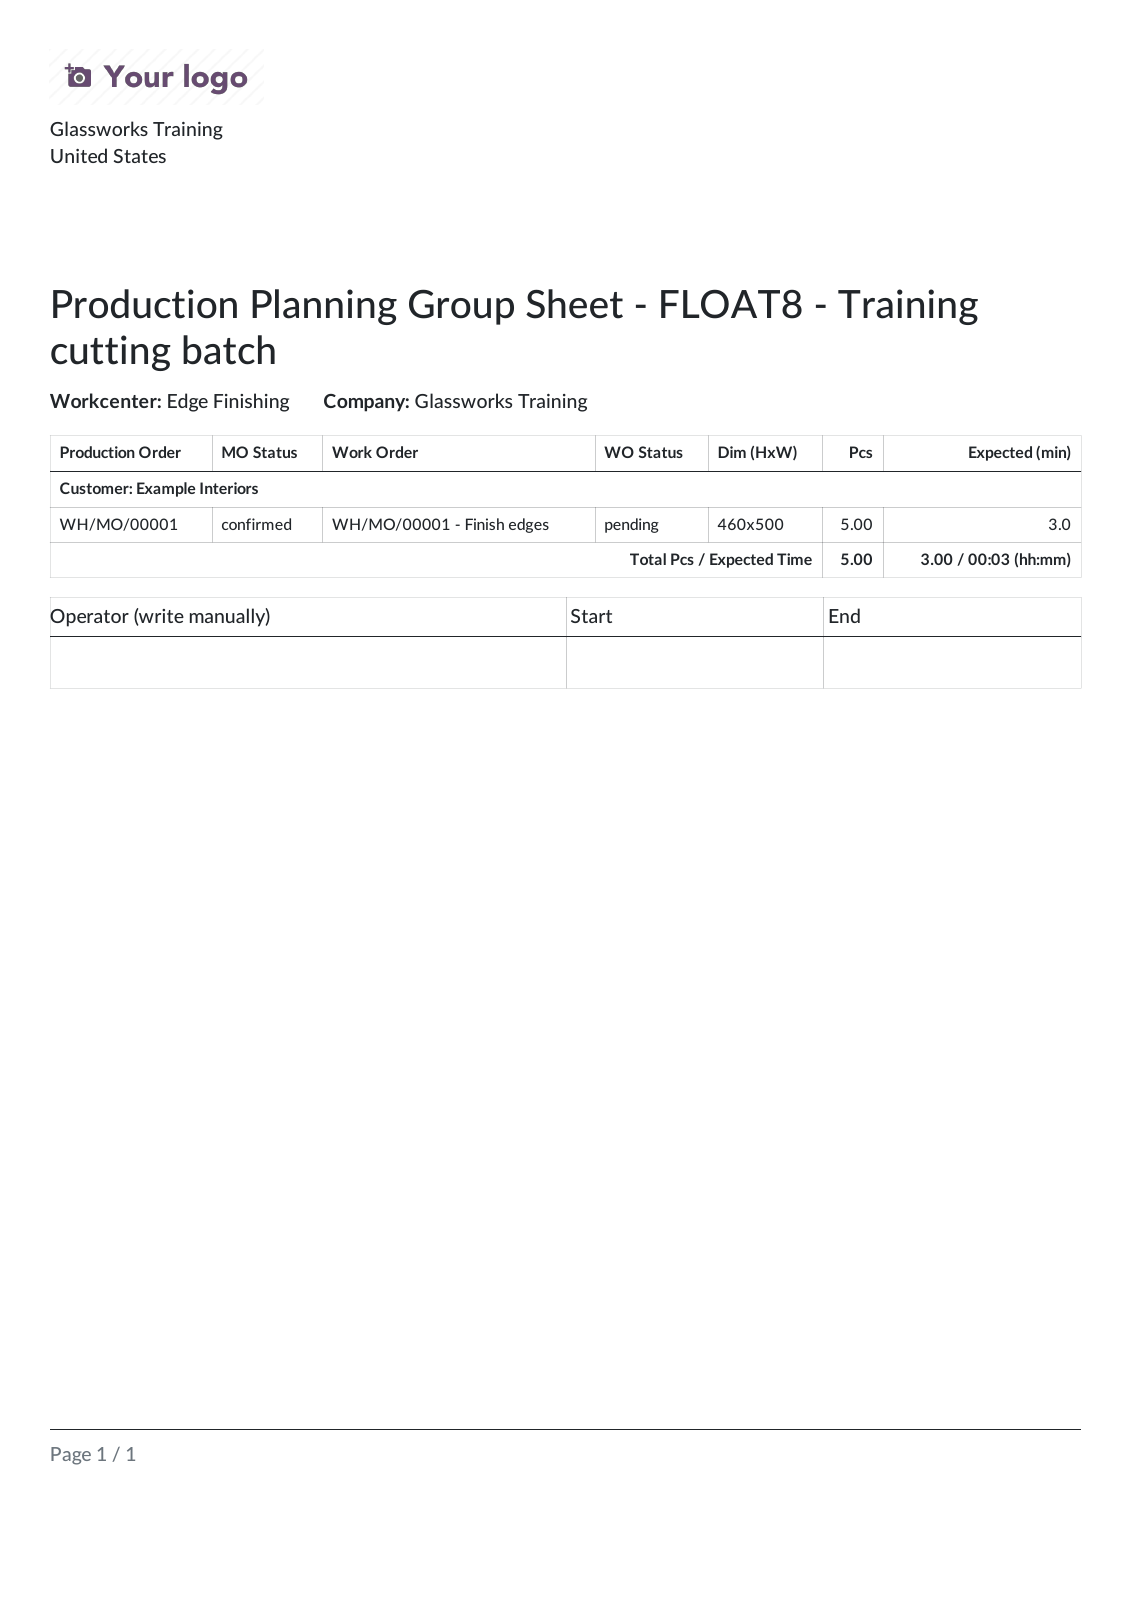
Figure U39. Work-center reporting with manual operator/time spaces.
Printing a sheet does not write actual operator/time values back into Odoo. Interpret the totals at the selected analysis level.
13.4 Production Order labels
The measurement addon replaces the standard MO Production Order report with a label layout intended to show source/order, dimensions, pieces, deadline, barcode, and selected work centers. Show workcenter on production label is controlled by the administrator.
Current limitation: with only the declared dependencies installed, this
report fails because its template refers to a missing mrp.production.notes
field. Ask the administrator to resolve the deployment/report dependency before
using it. The separate Manufacturing Reports and component/planning worklists
remain available. Do not assume the label printed successfully just because
its Print action is present.
14. ASC, XLSX, and component worklists
14.1 Pre-export review
Before exporting, inspect the raw component records, not just the finished pane or approved drawing. Check:
- Correct component product and Internal Reference.
- Native demand and noncanceled state.
- Component/move-line pieces and width/height.
- Correct customer/source/MO and deadline.
- Whether selected records represent unique production or several operations of the same production.
Missing dimensions are not taken from the finished drawing. Approved configurator cuts are not transferred to Maver ASC. An export action can produce a file whose values still require correction/review.
14.2 Download Maver ASC V4
- Open an MO and click Export Maver (Components), or select MOs/WOs in a list.
- For a selection, use Actions → Export ASC V4 (Components).
- Download and extract the generated ZIP.
- Inspect the ASC file for each component material reference.
- Follow the organization's authorized Opty-Way Maver import process.
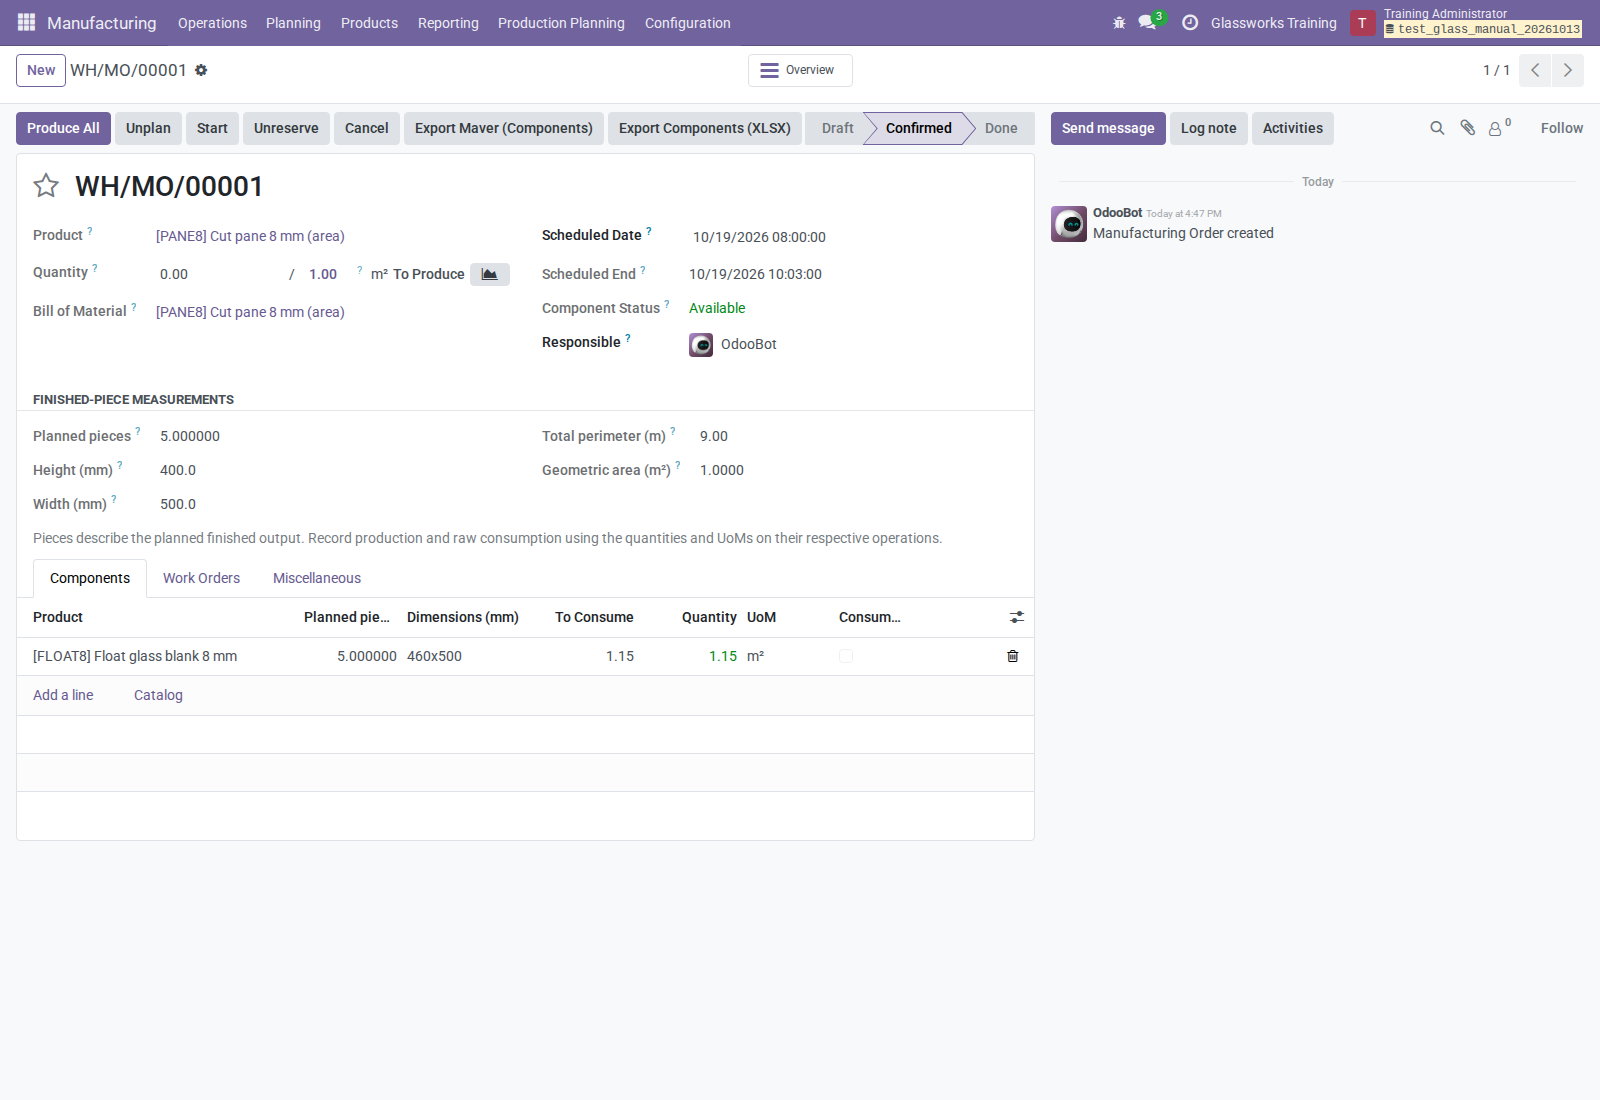
Figure U40. Single-MO component export buttons.
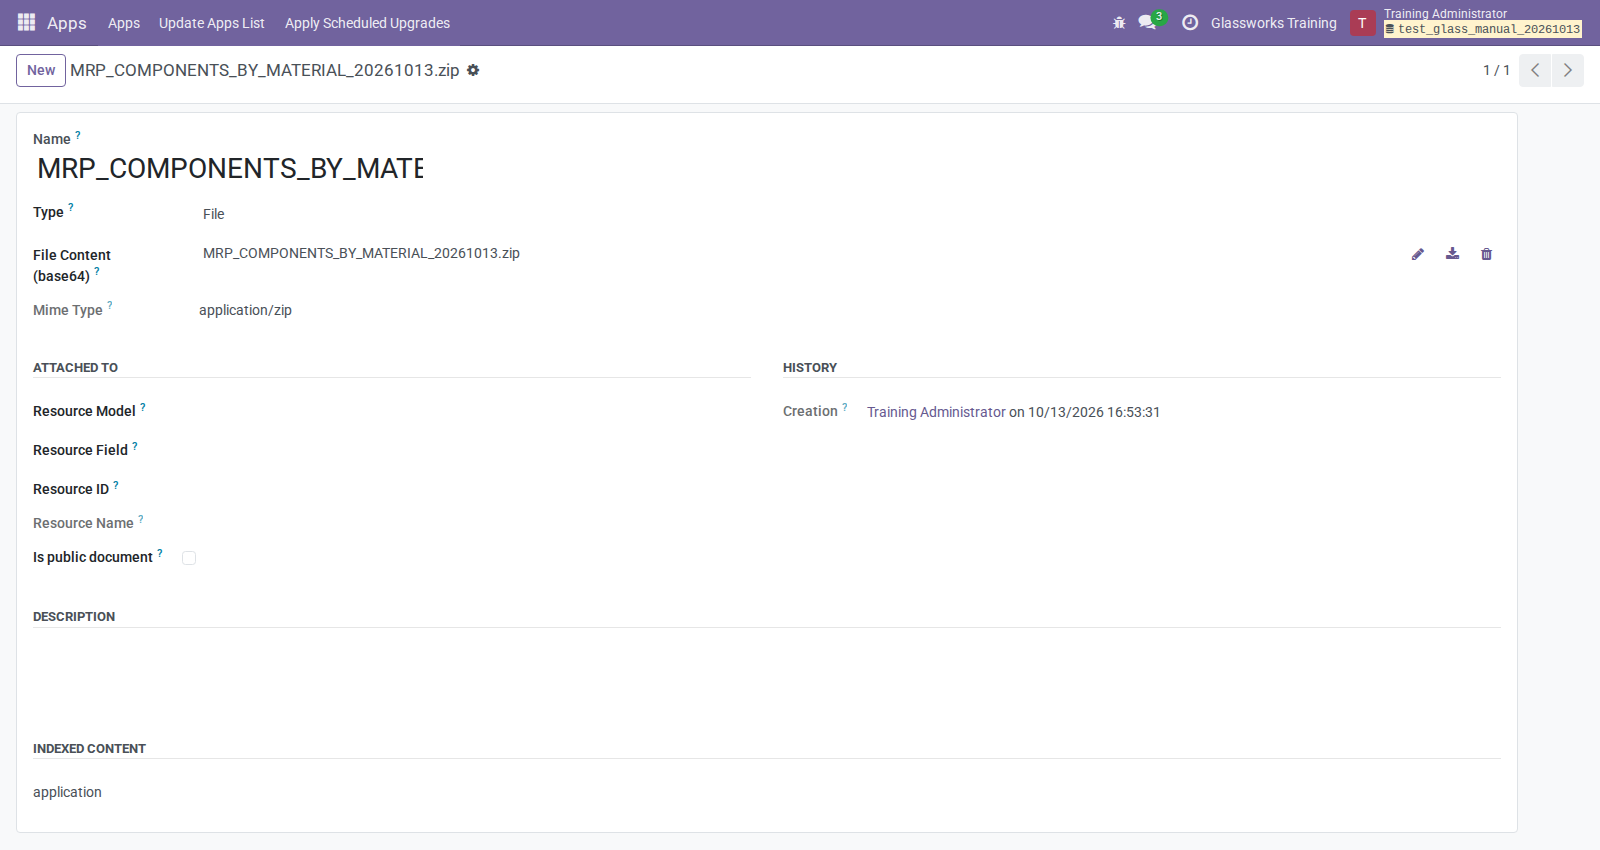
Figure U41. The output is a stored ZIP attachment containing material-specific ASC files.
The download does not submit jobs to a cutting machine or receive import status. Selecting WOs for ASC exports their distinct related MOs once.
Review these fixed export behaviors before import:
| Export rule | Consequence |
|---|---|
| Internal Reference required | Components without one are skipped |
| Reference uppercase/truncated to 16 characters | References can collide after normalization |
| Width + 2 mm / Height + 2 mm | Fixed allowances; missing dimensions become 2.0 mm |
| Grinding 2.0 / rotation Y | Hard-coded values, not per-job configuration |
| SHAPE empty | No curved/trapezoid/cutout shape instructions |
| First MO tag sanitized/truncated | Goes into the note, not SHAPE |
| Integer quantity | PMIS pieces are preferred; rounded counts and zero rows require review |
| Non-ASCII text | Replaced with ?; fixed-width text is truncated |
When move lines exist, ASC uses them. Its fallback does not read Odoo 18's native move-line Quantity, so an unmeasured line can export zero despite positive operation quantity. Ask for source-data correction rather than importing that file as a valid cut list.
14.3 Export component XLSX
- Open an MO and choose Export Components (XLSX), or select MOs/WOs and use the same action from Actions.
- Open the workbook and inspect each component sheet.
- Review source, customer, finished Product, PMIS piece count, dimension, and date.
One worksheet represents each component. The Product column is the finished MO product, not the raw material. MO export omits rows without a usable move deadline/expected date/move date; WO export retains undated rows. Zero PMIS pieces remain zero.

The actual component workbook, displayed using LibreOffice's print rendering; the worksheet identifies the component and Product identifies the finished pane.
WO XLSX repeats a production's components for every selected operation. If you need unique demand, use MO export or deduplicate by the intended source rather than summing all operation rows.
14.4 Print component worklists
- Select MOs and click Print Components in the list header, or open/select WOs and choose Print → Components (per component).
- Review material sections and operation/source/customer/deadline information.
- Distribute only the intended work-center/operation sheets.
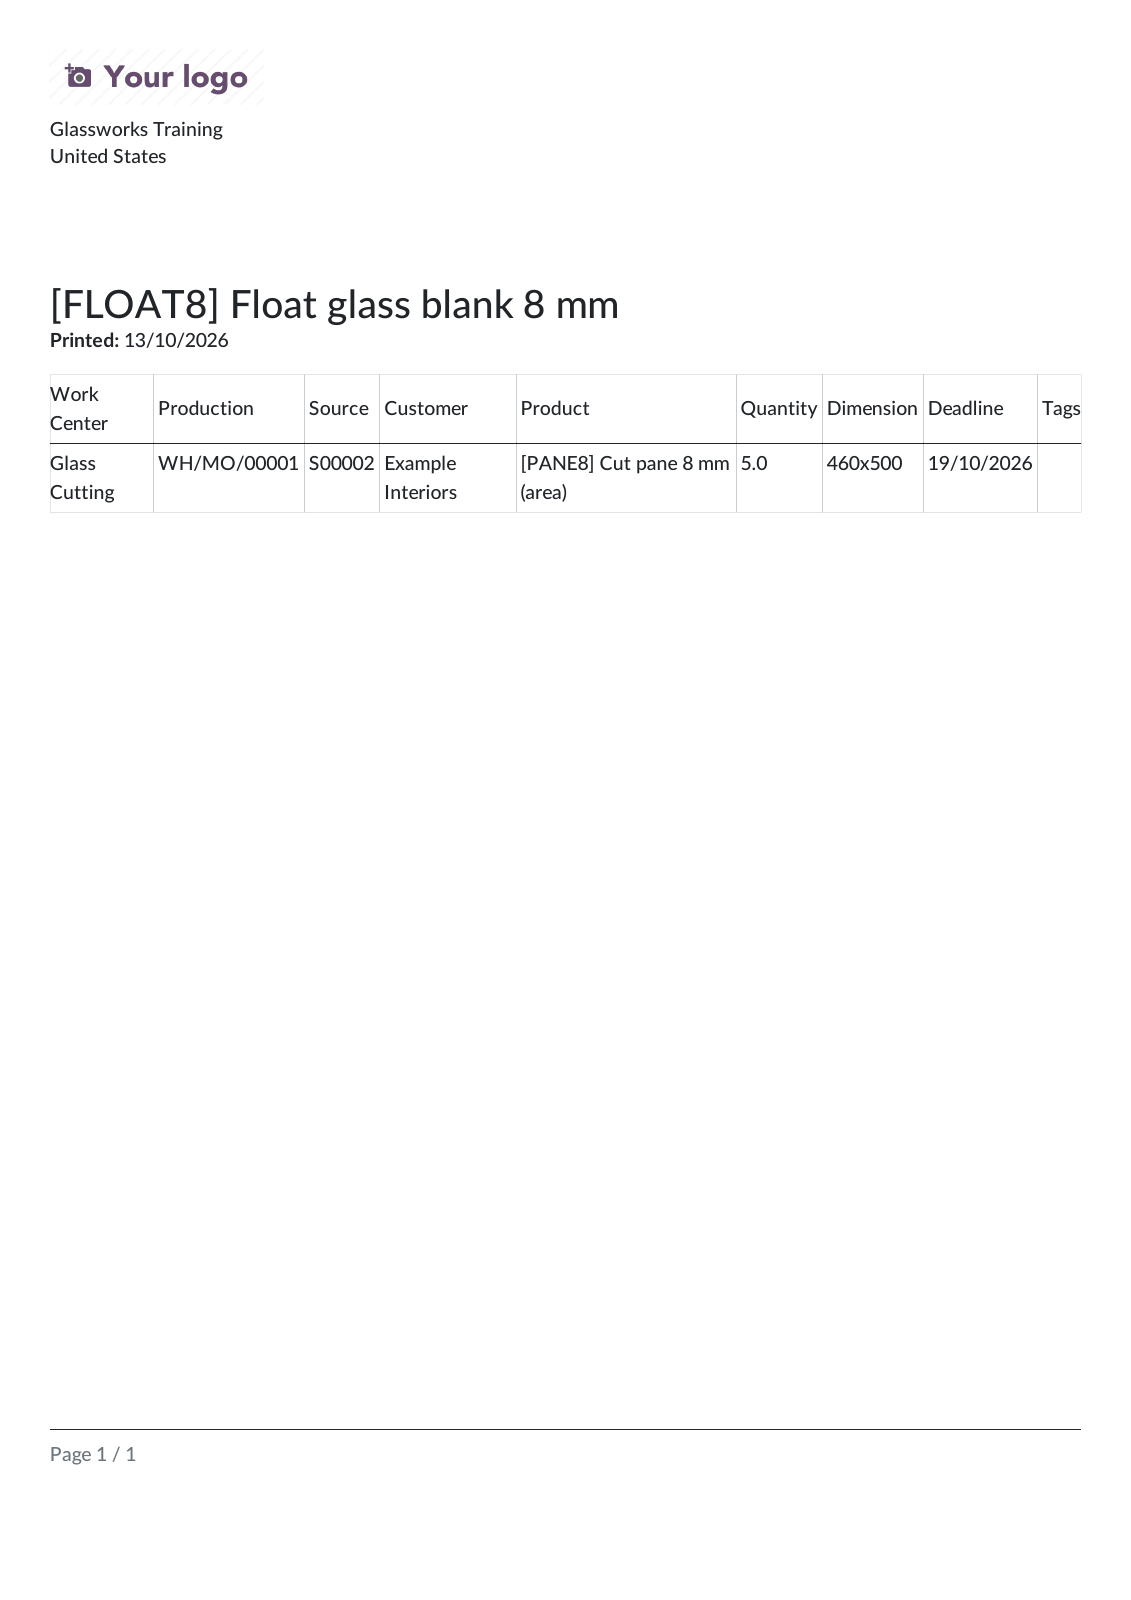
Figure U42. Example with one selected operation to avoid repeated material demand.
MO printing requires at least one WO. For each selected WO, the PDF repeats all noncanceled raw moves of its MO. It is an operation worklist, so totals can duplicate demand when several operations from the same MO are selected.
15. Common problems and corrections
| Problem | What to do |
|---|---|
| No Configure Glass / Copy Drawing | Save a regular product line, check Sales write access, and ensure the order is not canceled. |
| Measurement fields absent | Check product/UoM with the administrator; Unit variants require the exception. |
| Wrong pieces after Quantity edit | Confirm the displayed UoM and complete geometry; 1 m² is not one pane. |
| Dimension label changes orientation | It sorts axes; use the separate Height/Width and approved instructions. |
| Draft cannot save | Correct nonfinite/negative/zero dimensions or nonwhole sheet count. |
| Confirm Design unavailable | Correct invalid geometry, overlaps, notch position, and finish selection. |
| Valid design still fails Confirm/Print | Read blocking-profile feedback; PDF failures require administrator attention. |
| Cannot drag a cut | Save it and load its Fabrications page; approved designs are locked. |
| Move disappeared | Review Save/Discard and loaded rows; unsaved positions are only form changes. |
| Undo does not reverse a helper | Helpers edit saved records; correct numerically or remove copies in draft. |
| Shape card does not apply | Open Browse Shapes from the saved draft to provide selection context. |
| Latest approved PDF differs from preview | You are editing a draft; the PDF still belongs to the prior approval. |
| Quotation changed after approval | Reopen an eligible design, reconcile product/count, and approve a new revision. |
| Send to Production is absent/fails | Require Manufacturing role, approved non-template stockable Units drawing, and resolved sales/profile issues. |
| Cannot reopen canceled production | If sheets are completed, replace only the remainder under the same revision. |
| Component list empty | Check Without Planning Group, demand/MO state, and product/company filters. |
| Suggest Planning Group rejects selection | Use one component and one company; use the wizard for mixed components. |
| WO assignment finds no components | Use the MOs or component moves; no eligible WO raw moves means no fallback. |
| MO has no Planning Group despite assigned moves | It has several groups; inspect component membership. |
| Some WOs were not rescheduled | Check End window, work center, expected duration, and state. |
| Report has no data | Broaden product/customer/state/date/responsible filters within your access. |
| Report pieces are zero | Ask the planner to review MO measurement metadata; the installed piece field has no per-order quantity fallback. |
| Report totals seem doubled | Check whether the same component demand repeats across work orders. |
| ASC missing components/has tiny dimensions or zero count | Check raw component reference and move-line geometry/pieces before import. |
| Cannot print component PDF | Use MOs with WOs or select actual WOs. |
| Production Order label fails | Report the missing Notes field to the administrator; use available alternate worklists. |
| Cannot delete archived drawing/order line | Archive preserves ownership/history; only eligible unapproved drafts can be deleted. |
When escalating, give the module, your role/company, record reference/state, displayed UoM, action, and exact message. Use synthetic/redacted evidence and avoid sending customer data or credentials.