Glassworking Administrator Manual
This manual covers configuration and operation of all five addons in
vertical-glass-working for Odoo 18 Community. For daily tasks, see the
User Manual. Screenshots use English labels and synthetic
records in Glassworks Training; company names, references, dates, and record
numbers in your installation will differ. The illustrated administrator has
combined Sales, Inventory, Accounting, and Manufacturing permissions.
Contents
- Solution map and installation
- Company, access, and basic Odoo settings
- Products and measurement units
- Bills of materials, stock, and manufacturing
- Perimeter and variant pricing
- Glass configurator setup
- Component planning setup
- Manufacturing reporting setup
- Maver ASC, XLSX, and component worklists
- Records, revisions, and retention
- Rollout and routine administration
- Troubleshooting
1. Solution map and installation
1.1 Addon inventory
| Technical addon | Installed application name | Responsibility |
|---|---|---|
pmis_quant_measurements |
PMIS Integrate (m2/Perimeter) based sale pricing | Rectangular cut sizes, physical pieces, area/perimeter, perimeter pricing, and measurement metadata on commercial/operational records. |
pmis_mrp_production_planning_group |
MRP Production Planning Group | Component-demand groups, work-center planning windows, sequential scheduling, and planning analysis. |
pmis_mrp_reports |
PMIS Manufacturing Reports | Filtered customer-grouped manufacturing reports in PDF and XLSX. |
pmis_export_asc_v4 |
PMIS Export Maver (Opty-Way) | ASC ZIP downloads, component XLSX exports, and component PDF worklists. |
pmis_sheet_configurator |
PMIS Glass Sheet Configurator | Parametric drawings, fabrications, specifications, approval PDFs, and optional direct manufacturing. |
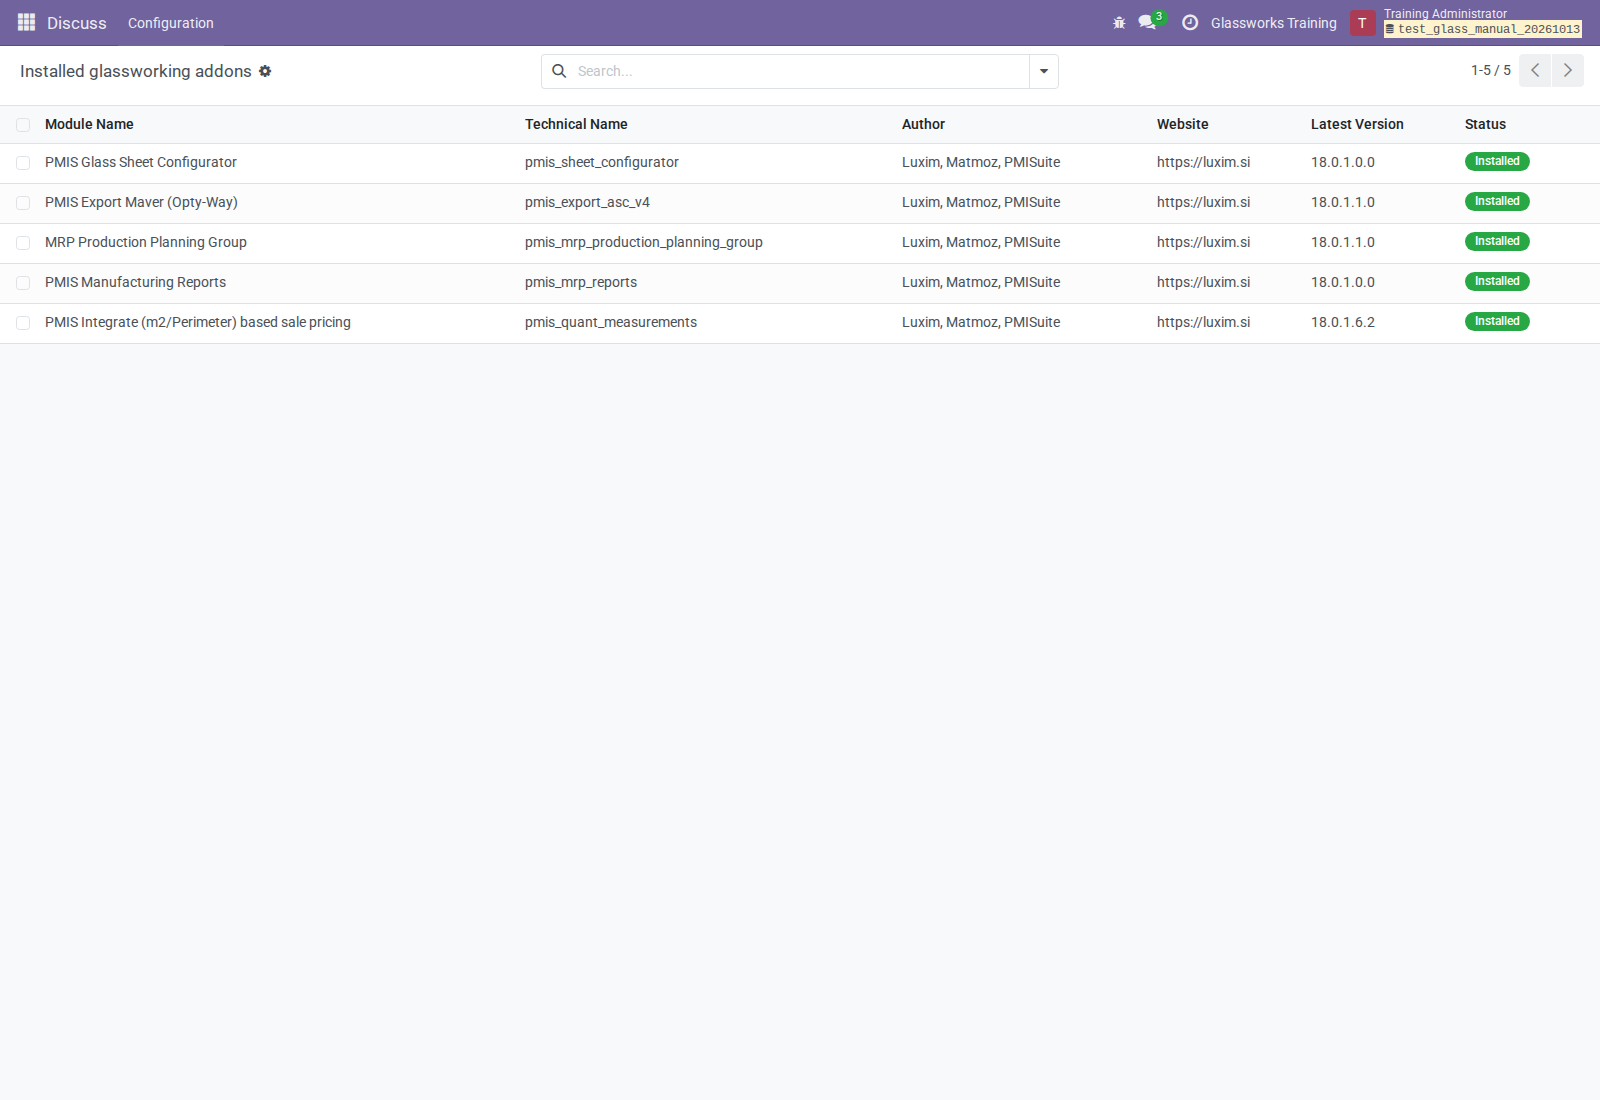
Figure A1. Installed glassworking addons. Only the configurator is marked as an application; the others extend existing Odoo apps.
1.2 Prerequisites
Use an Odoo 18 Community installation with its supported Python environment,
PostgreSQL, and a working Odoo-supported wkhtmltopdf executable. PDF approval
requires the renderer to work: failure to produce a PDF prevents publication of
that approval. The server must be able to reach its configured report URL to load
report styles and assets.
Make these addon directories available on the server's addons_path:
- Odoo's standard addons.
- This repository's root directory, containing the five addon folders.
- OCA
manufacture, providingmrp_sale_info. - OCA
reporting-engine, providingreport_xlsx.
Use Odoo-18-compatible branches of external repositories. The dependency
declarations are oca_dependencies.txt and
requirements.txt. The latter declares xlsxwriter and
openupgradelib. openupgradelib is used by the planning-group upgrade scripts;
xlsxwriter supports spreadsheet output. Install required packages in the
server's Odoo environment through your approved deployment process.
| Addon | Required Odoo modules |
|---|---|
| Measurements | sale_management, account, product, purchase, mrp, stock, uom, base, base_vat |
| Planning | mrp, stock, mrp_sale_info, pmis_quant_measurements |
| Manufacturing reports | mrp, mrp_sale_info, report_xlsx |
| Maver export | mrp, stock, pmis_quant_measurements, report_xlsx |
| Configurator | base, web, sale, mrp |
1.3 Installation sequence
- Back up the target database and its filestore through your normal procedure.
- Deploy the approved Odoo 18 addon code and Python requirements.
- Add the directories above to the appropriate server configuration and restart that Odoo instance through the normal service-management process.
- Activate developer mode, open Apps, and Update Apps List.
- Remove the default Apps search filter to find addons that are not standalone applications. Search by the technical addon name or installed name.
- Install Measurements, Planning, Manufacturing Reports, Maver Export, and Glass Sheet Configurator as required. Odoo installs their declared dependencies.
- Confirm the new Glass Configurator app and the Manufacturing planning and reporting menus are available to the intended users.
- Complete the product, UoM, BoM, access, report, and export configuration below before processing real jobs.
The addons can be installed selectively. Measurements is required by Planning and Maver Export, but is optional for Manufacturing Reports. Configurator does not depend on the other four addons.
1.4 Two production paths
| Path | Commercial and production quantity | Design input | Production creation |
|---|---|---|---|
| Measured rectangular panes | Usually m², with pieces as additional handling information | Sales Pieces, Height, and Width | Standard Odoo manufacturing/procurement routes or a manually created MO |
| Configurator direct dispatch | Physical sheet count in exact standard Units | Approved rectangle, circle, ellipse, or trapezoid with cuts | Send to Production on an eligible approved drawing |
Drawings may retain an area-based or service sales product and still be approved. Direct configurator manufacturing requires a stockable product using the exact standard Units UoM. A valid drawing for an m² product is not directly dispatchable. Drawing geometry does not automatically populate sibling-addon measurements, price a sale line, configure a BoM, or provide Maver shape/cut data.
2. Company, access, and basic Odoo settings
2.1 Company and functional settings
- Set company identity, currency, addresses, and document layout in Settings.
- Configure the warehouse, stock locations, manufacturing operation type, and receipt/delivery steps in Inventory → Configuration.
- Configure accounting localization, journals, accounts, taxes, fiscal positions, and invoicing policies using standard Odoo Accounting settings.
- Enable Units of Measure where multiple compatible units are needed.
- Enable Pricelists in Sales for perimeter pricing.
- Enable Work Orders in Manufacturing for work-center operations, planning, work-order reporting, and component PDF worklists.
- Enable routes such as manufacturing and replenishment on the relevant products and warehouse when automated procurement is intended.
The modules do not supply a chart of accounts, warehouse design, procurement routes, taxation rules, or a production calendar for your business.
2.2 Assign access by job
Open Settings → Users & Companies → Users and assign app permissions to each internal user. Ordinary users should receive their job's access rather than the combined administrator permissions illustrated here.
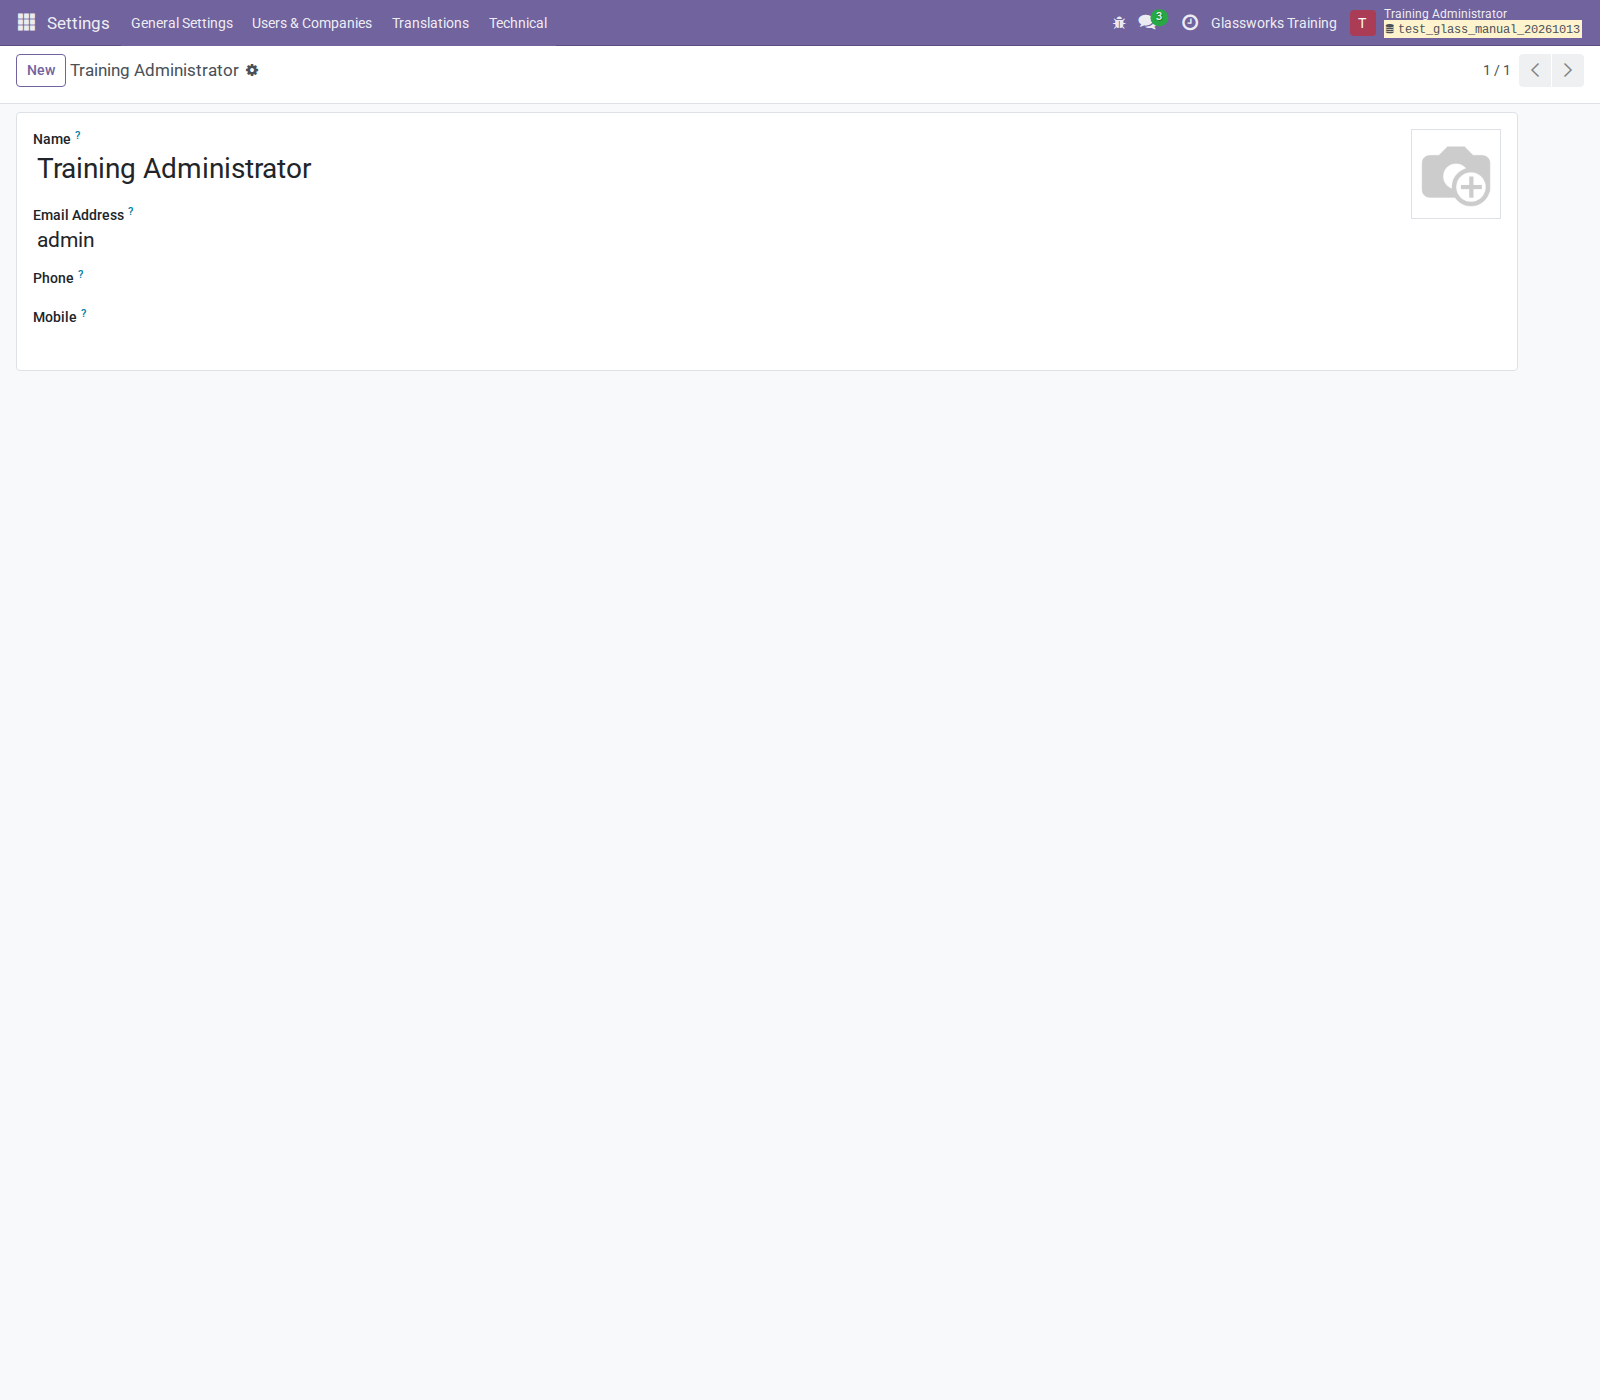
Figure A2. Application permissions on the training administrator.
| Job | Access needed | Configurator capabilities |
|---|---|---|
| Salesperson | Sales user | Create/edit/approve/print accessible drawings; open or copy onto writable quotation lines |
| Sales manager | Sales manager | Sales functions and shape-catalog maintenance |
| Workshop operator | Manufacturing user; Inventory access for relevant stock tasks | Configure accessible drawings and dispatch approved eligible designs |
| Manufacturing manager | Manufacturing manager | Workshop functions, shape maintenance, and manufacturing-profile maintenance |
| Planner | Manufacturing/Inventory access for the source documents | Component assignment, planning groups, schedules, and analysis |
| Accountant | Accounting permissions for the intended invoice/journal tasks | Native accounting with informational measurement fields |
Manufacturing access alone does not grant access to sale orders. Opening the owning quotation and Copy Drawing require the relevant Sales access. Configurator attachments follow configuration access; customer-portal drawing access and portal approval are not provided.
2.3 Company visibility and planning limitations
Configurations, fabrication rows, edge finishes, revisions, and manufacturing profiles have allowed-company rules. Personal-sales users see their own or unassigned quotation drawings. Standalone drawings are shared among eligible users of the allowed company. All-document Sales and Manufacturing roles see drawings within their allowed companies.
The seeded Custom-made glass product must be accessible in the drawing's
company. Optional pmis_base_multi_company product sharing is supported but
not required. If the seeded product is inaccessible or incompatible, the new
standalone configuration leaves Product empty for explicit selection.
Configure shared products or separate company products deliberately.
Planning requires additional access governance in a multi-company deployment. Its supplied ACLs give every internal user create/write/delete access to groups and planning lines, read access to analysis, and access to the assignment wizard. The addon does not supply a dedicated planner role or company record rules for these planning models. Company fields and new-group checks do not isolate records or the SQL analysis. Restrict those permissions/records through your deployment's security configuration before relying on cross-company separation. Removing a menu alone does not revoke model access.
3. Products and measurement units
3.1 Standard area-based glass products
Use separate products for the finished pane and its raw glass input.
- Open the product from Sales, Inventory, or Manufacturing → Products.
- Select a stockable Goods product when stock tracking is required.
- Set the stock/sales UoM to m², in Odoo's Surface category.
- Set a compatible purchase UoM and the desired pricing, costing, accounts, and invoicing policy.
- Configure Manufacture and other procurement routes as appropriate.
- Give each exported component a distinct Internal Reference.
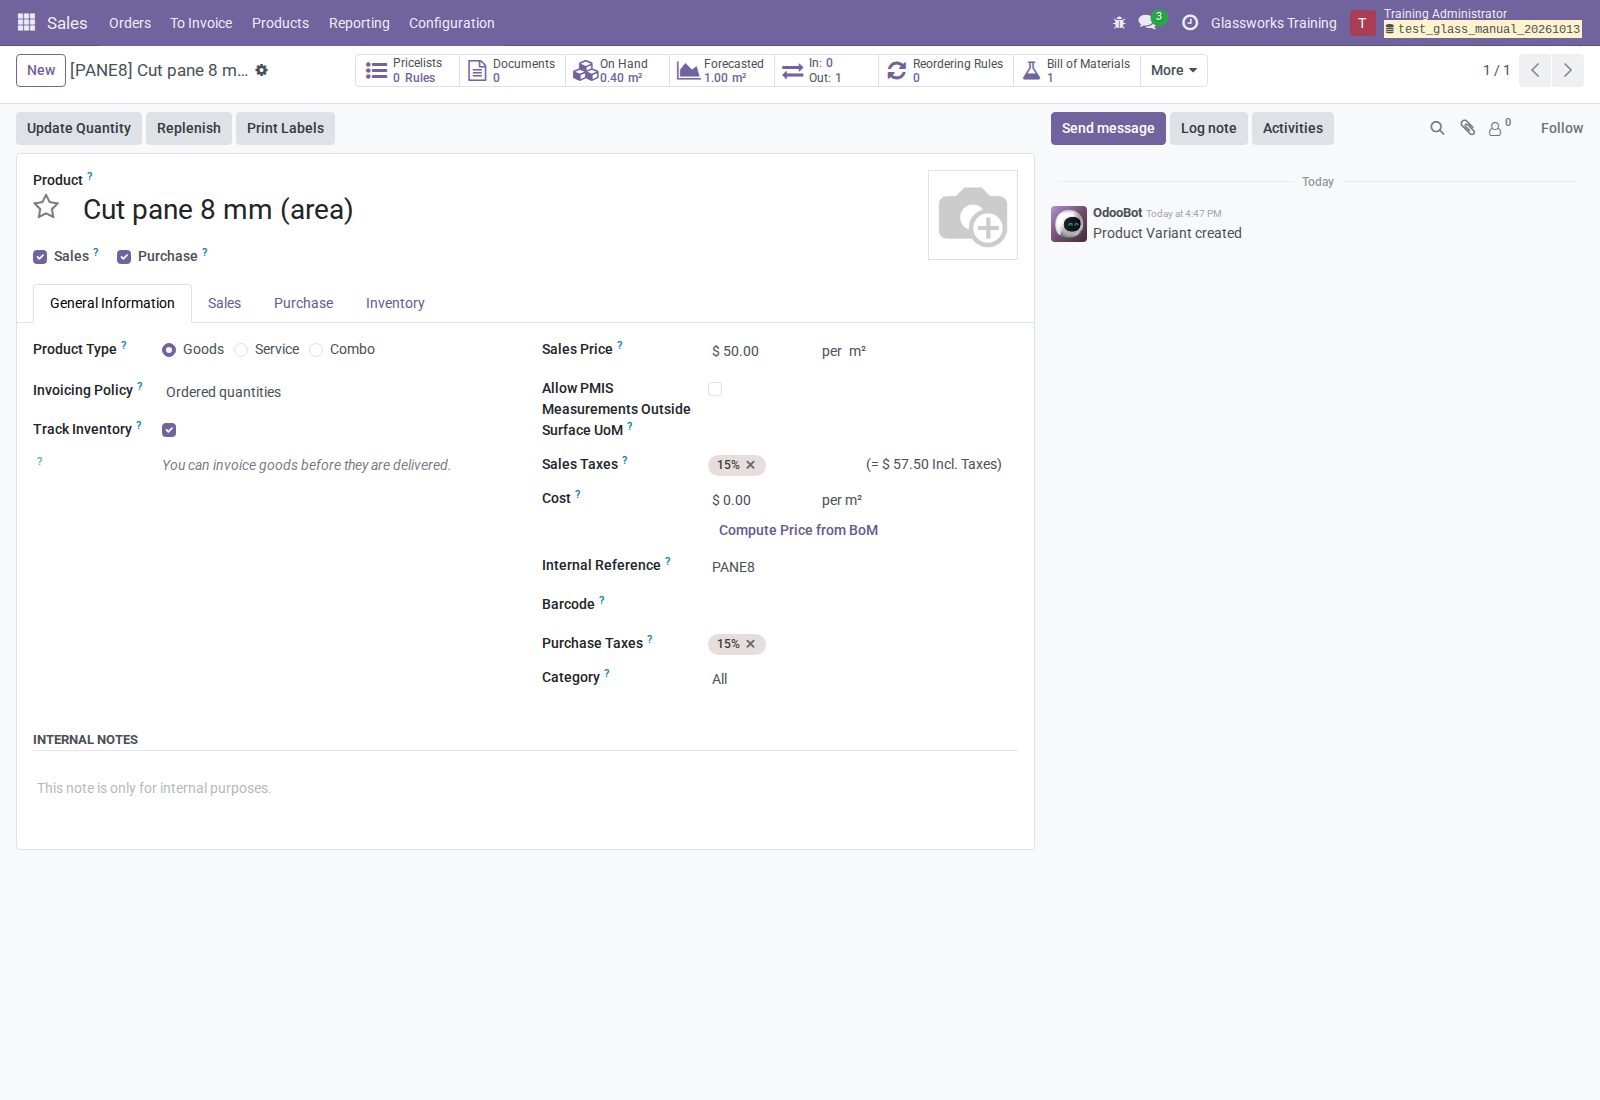
Figure A3. The finished pane uses m². Surface-category products are automatically eligible for PMIS measurements.
The checkbox Allow PMIS Measurements Outside Surface UoM does not control Surface applicability. It may remain disabled on a Surface product.
3.2 Unit-category exception
For a product stocked in Units or a compatible Unit-category UoM:
- Open the product variant, using Product Variants where necessary.
- Enable Allow PMIS Measurements Outside Surface UoM.
- Save and enter complete positive rectangular dimensions when using measured sales lines.
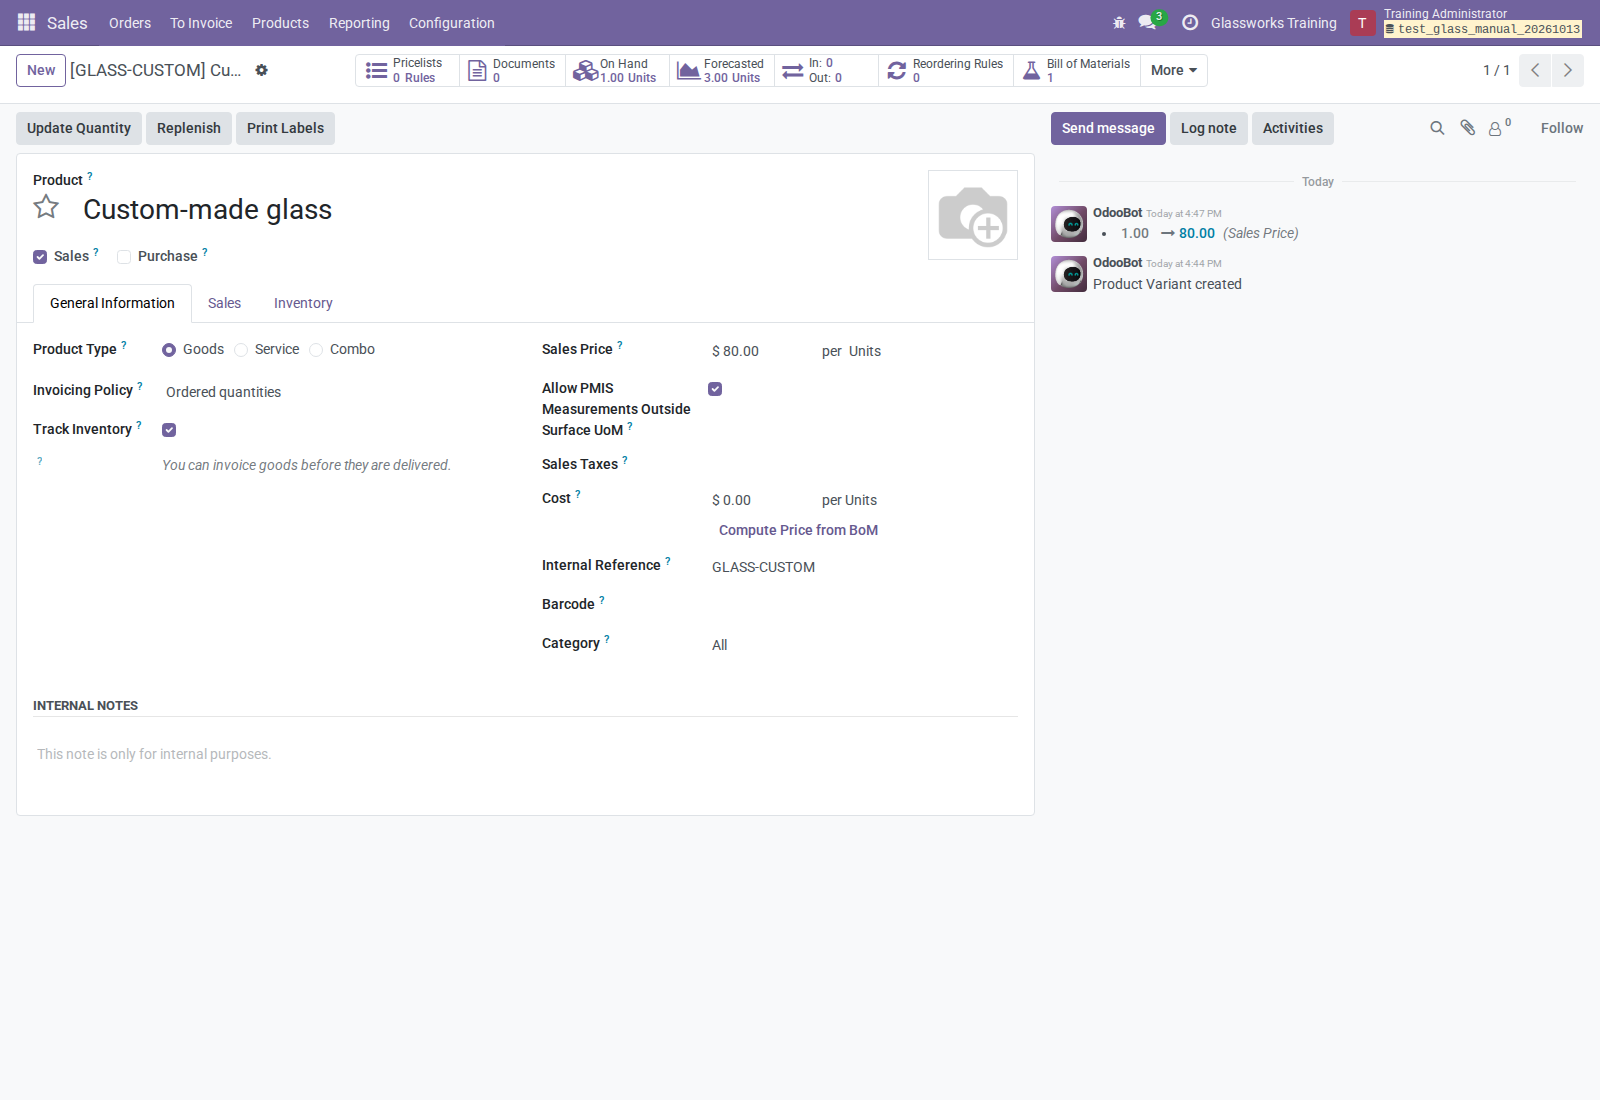
Figure A4. The exception is on the product variant, not the product template.
This setting is company-independent. One Unit represents one physical piece; one Dozen represents twelve. Geometry remains informational. Weight, Length, Volume, and arbitrary custom categories do not become supported by this switch. Changing the flag does not rewrite existing BoMs, sales, stock, manufacturing, or accounting history. Search filters on variants identify enabled/disabled exceptions, and variants can be grouped by the setting.
Configurator drawings do not require this measurement exception merely to be created or approved. The screenshot enables it to illustrate the separate measurement capability of the same Unit product.
3.3 UoM rounding and the physical count
Open Units of Measure in the applicable configuration menu to review ratios and rounding. Transaction UoMs must belong to the product stock UoM category. Compatible Surface units such as cm² or ft² use the native Odoo conversion ratios.
For five 400 × 500 mm panes:
| Value | Result |
|---|---|
| Area per pane | 0.20 m² |
| Commercial quantity in m² | 1.00 m² |
| Perimeter per pane | 1.80 m |
| Total perimeter | 9.00 m |
| Pieces per m² | 5 |
Select rounding that can represent the intended pane quantity and distinguish neighboring whole-piece counts. A very coarse UoM increment can make a valid size unrepresentable. Commercial quantities are rounded in the product's stock UoM; geometric area is displayed at four decimals. For example, a 2890 × 906 mm sheet has 2.6183 m² geometric area; with 0.01 m² rounding its commercial representation is 2.62 m².
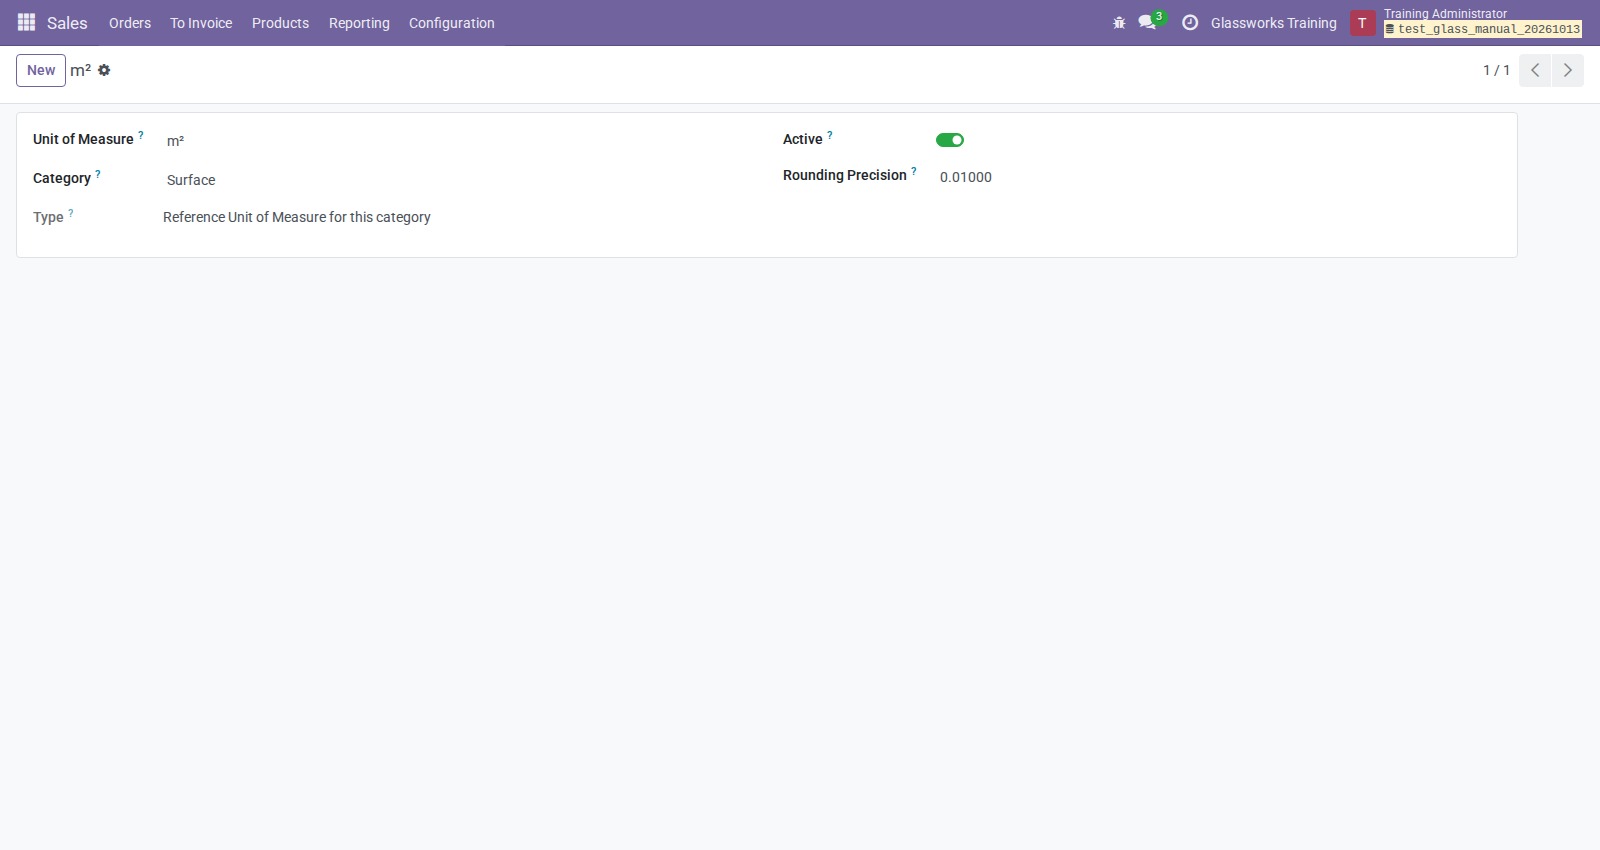
The training m² unit uses a rounding increment of 0.01.
The combined dimension label sorts the smaller axis first and normalizes to
one-decimal millimeter precision. Keep entered Height/Width in the requested
orientation for directional glass; 400x500 does not establish the cutting
orientation. Do not import arbitrary pieces-per-UoM factors: conversions are
derived from geometry and native UoM ratios.
4. Bills of materials, stock, and manufacturing
4.1 Measured pane BoM
Open Manufacturing → Products → Bills of Materials and create the BoM for the finished product. Set the native output quantity and each component demand explicitly; PMIS reference pieces and dimensions do not replace those fields.
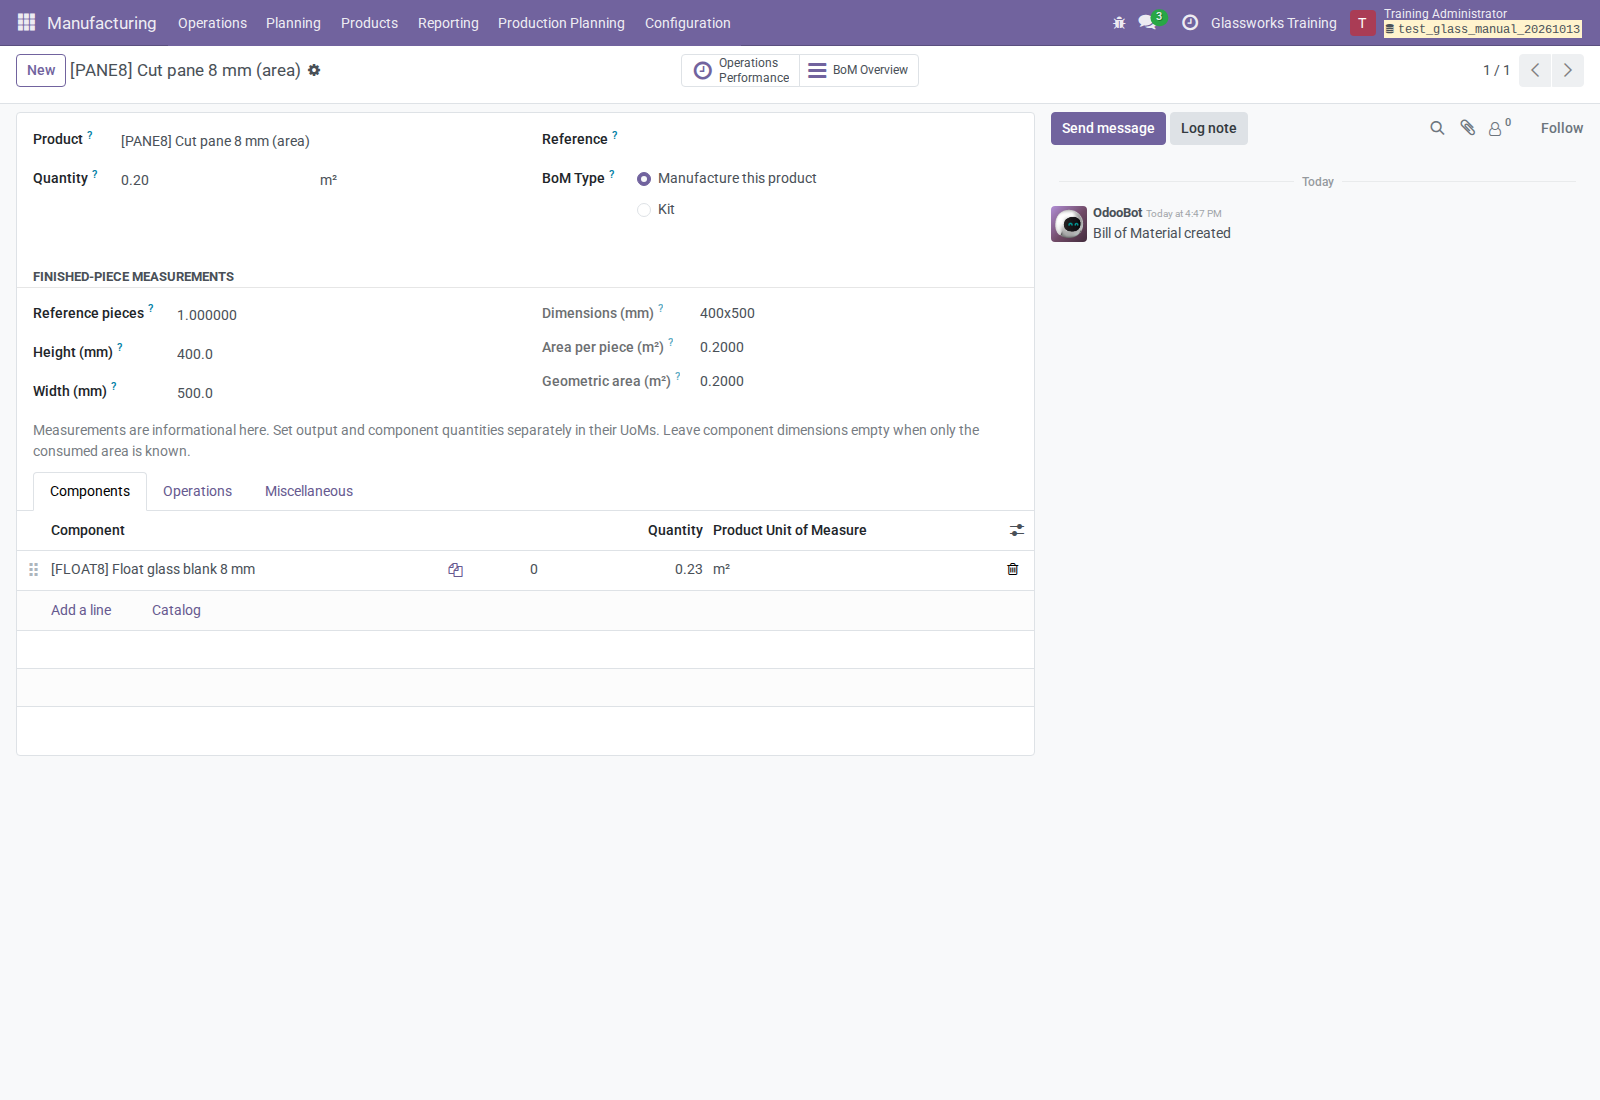
Figure A5. A BoM produces 0.20 m² of finished pane from 0.23 m² of input glass.
The training example produces one 400 × 500 mm pane from one 460 × 500 mm rectangular input blank:
- Finished output: 0.20 m², reference pieces 1, height 400, width 500.
- Raw component: 0.23 m², reference pieces 1, height 460, width 500.
- An MO for 1.00 m² therefore plans 1.15 m² of raw input and five panes.
The component's geometry describes its own blank. If only consumed raw area is known, leave raw geometry empty. Never copy finished dimensions onto the raw component to express an allowance. BoM ratios express fixed consumption; they do not optimize layouts or calculate size-dependent yield.
4.2 Work centers and operations
- Enable Work Orders.
- Create work centers in Manufacturing → Configuration → Work Centers.
- Set working hours, capacities, time efficiency, setup/cleanup times, and alternative work centers using standard Odoo fields.
- Add operations on the BoM's Operations tab and set expected durations.
- Enable Show workcenter on production label for work centers that must appear on labels and in the optional reporting detail filter.
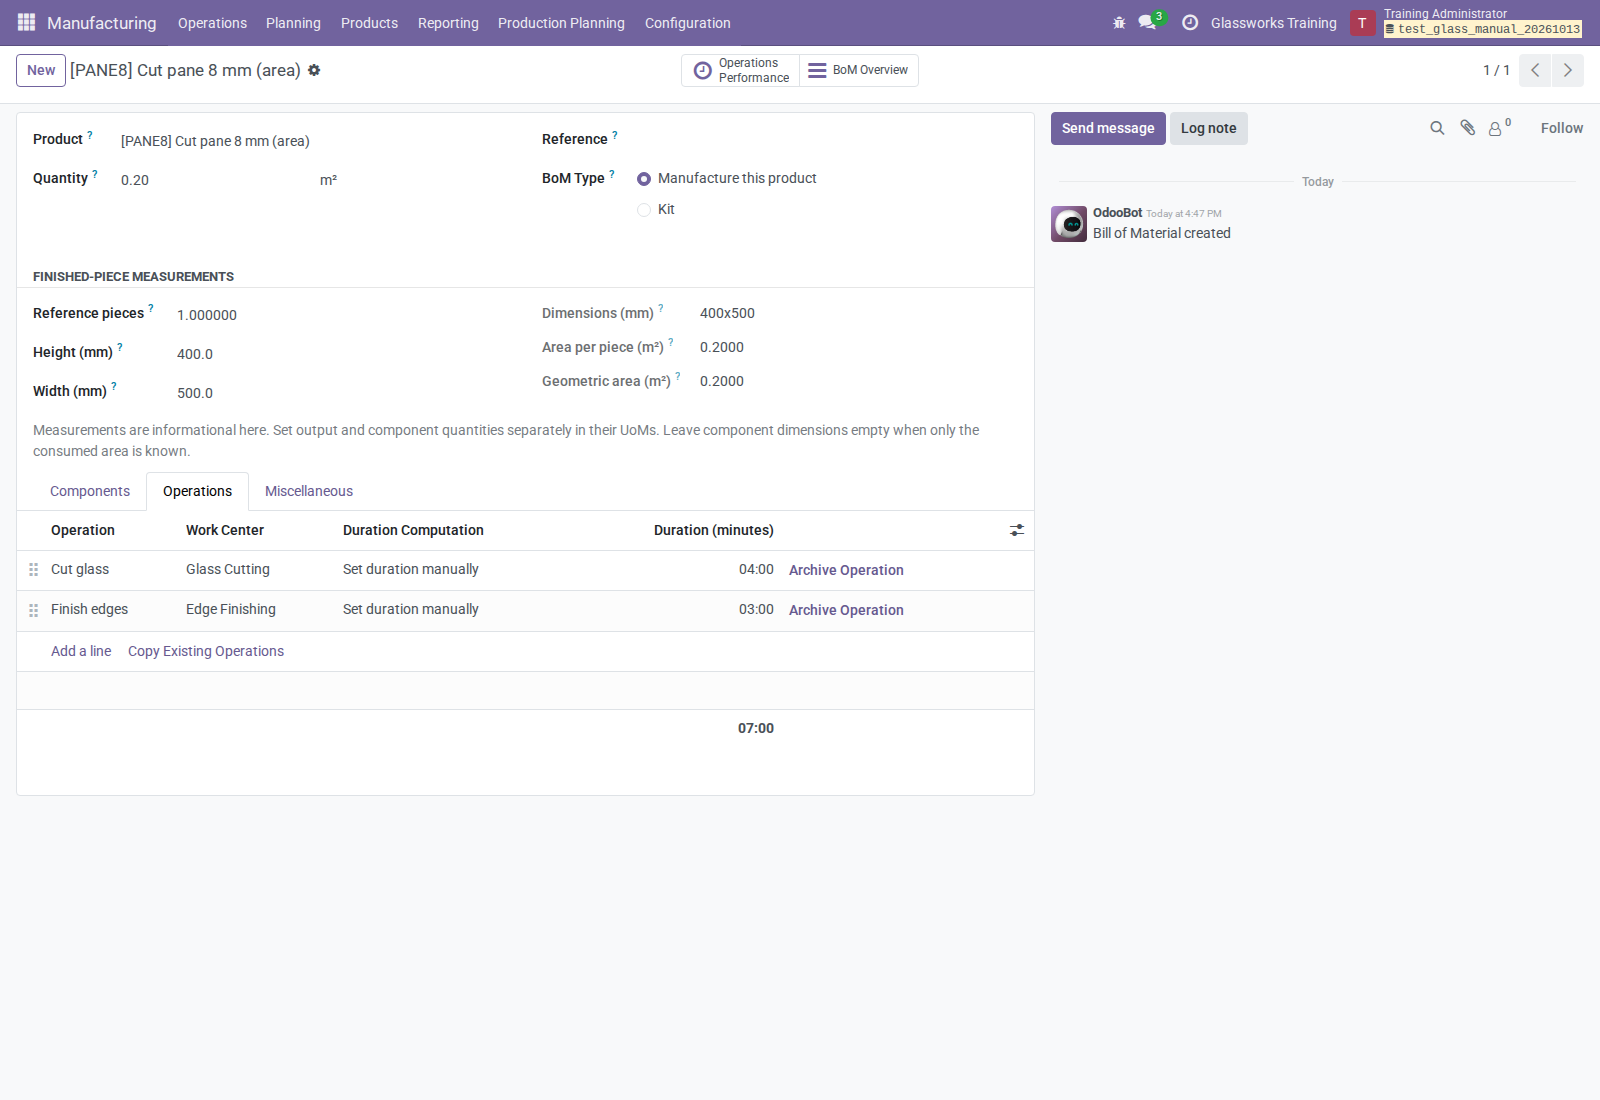
Figure A6. Cutting and edge finishing are explicit BoM operations.
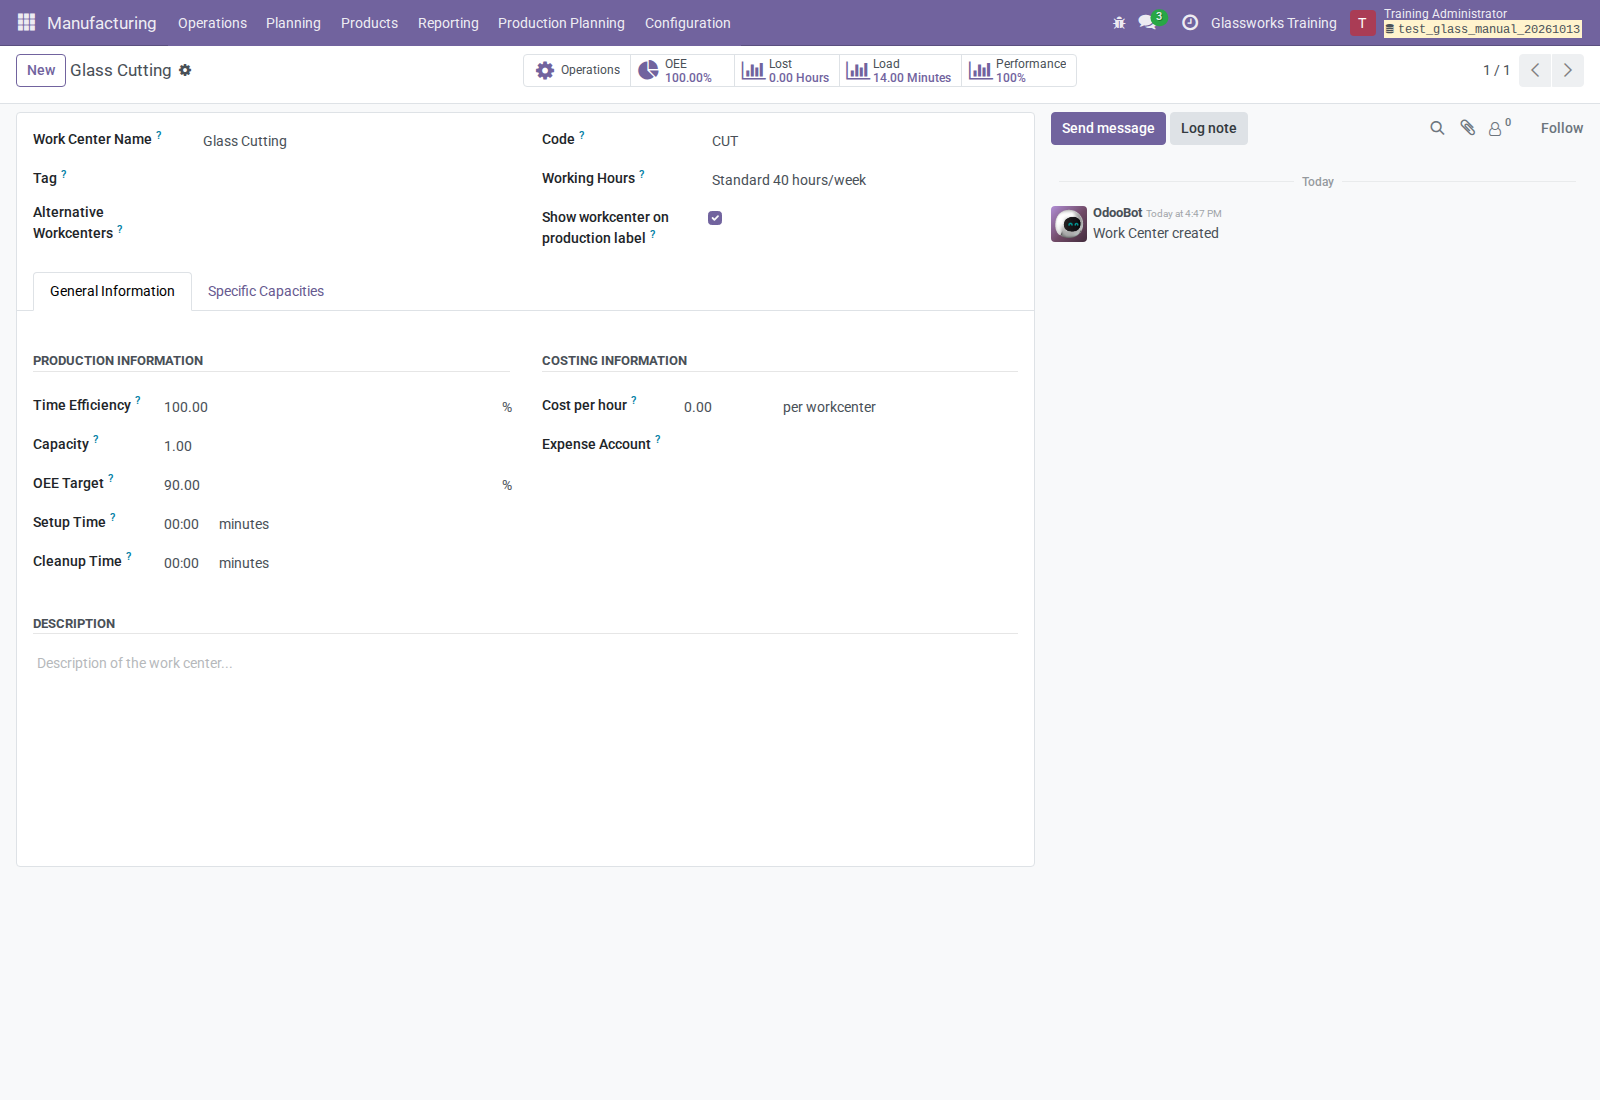
Figure A7. The production-label switch is a display/reporting choice.
The measurement addon replaces the standard Production Order print template.
In an installation containing only the declared dependencies, that template
currently fails because it references an undeclared mrp.production.notes
field. The label switch remains configurable, and the separate Manufacturing
Reports wizard can use it. If another deployment addon supplies Notes, verify
the complete label output before making it part of the workshop procedure.
Operation duration uses native Odoo quantity, capacity, efficiency, cycles, setup/cleanup, and alternative-work-center behavior. The compatibility field Operation Time Basis offers Native quantity; there is no perimeter- or piece-driven duration engine. A perimeter charge does not create an operation.
4.3 Stock and manufacturing quantities
Measurement metadata accompanies procurement, MOs, moves, and move lines when the source is complete and safe. Finished moves may inherit finished-pane geometry; raw moves use their own BoM-line geometry. Missing/unsafe downstream metadata is omitted rather than blocking normal procurement.
Reservations, availability, material consumption, stock valuation, and invoices use native Odoo quantities. Dimensional metadata does not select a stock sheet, reserve by pane size, create packages, or track remnants. Record scrap and by-products through standard Odoo workflows.
Quant fields under Legacy measurements are deprecated read-only residue. They are not a dimensional inventory. Quants gather and merge by native company, product, location, lot, package, and owner identity, even if old PMIS residue differs. Dimension grouping and quant measurement pivots are disabled.
4.4 Configurator manufacturing BoM
The default Custom-made glass product is stockable and uses standard Units. Create its BoM and operations separately if direct dispatch should consume raw materials or create work orders. Enter the per-sheet native input requirements for the intended job. The drawing does not generate these from its outline, net area, fabrications, thickness, or specifications.
Changing drawing dimensions therefore requires a separate review of BoM input quantities, operations, and cost. If several sizes need different inputs, use appropriate products/BoMs or controlled job-specific production preparation.
5. Perimeter and variant pricing
5.1 Formula pricelist surcharge
- Enable pricelists in Sales → Configuration → Settings.
- Open Sales → Products → Pricelists and choose the pricelist.
- Add a price rule and select Formula for price computation.
- Configure the native base, discount, surcharge, rounding, and margin values.
- Enter EUR/m (formula) for the perimeter charge and save.
- Assign the pricelist to the customer/order and use Update Prices after checking the cut sizes and pieces.
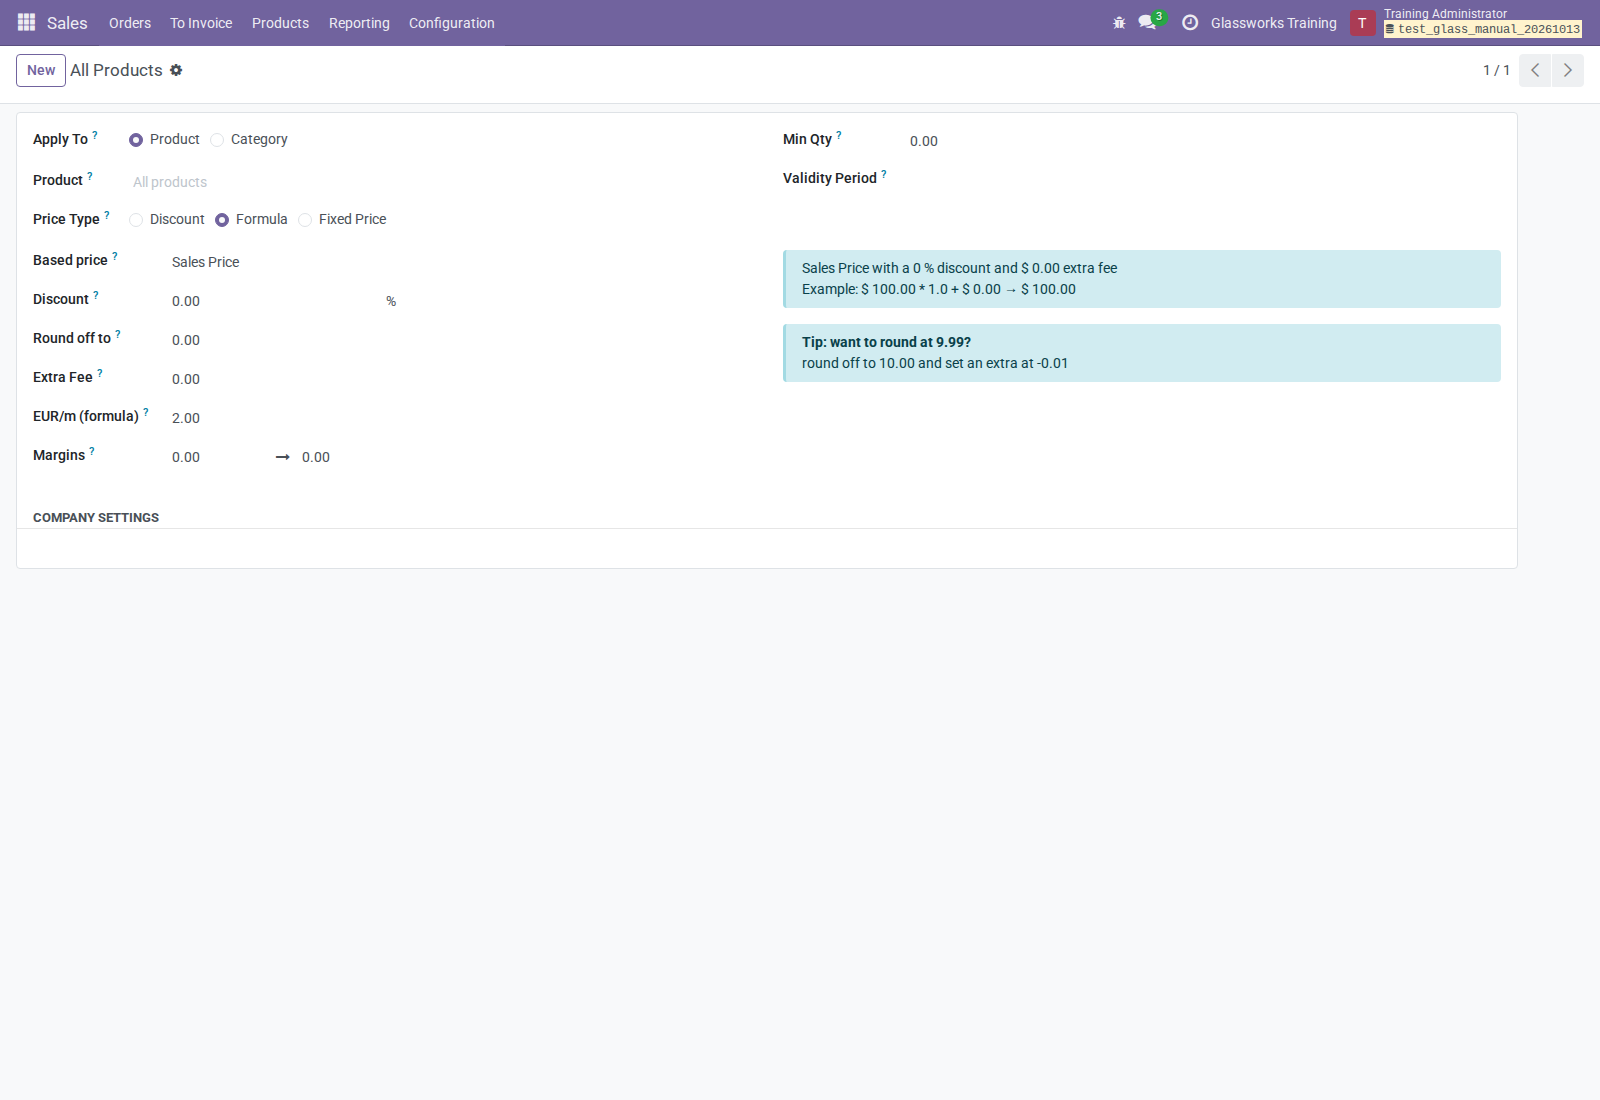
Figure A8. A formula rule adds 2 per linear meter to the native formula price.
The source label says EUR/m. The implementation adds its numeric charge to the selected pricelist's computed price; it does not independently convert an EUR fee to another currency. Configure the amount consistently with the pricelist's currency and verify a non-EUR rollout before use.
5.2 Attribute-value surcharge
- Open Sales → Configuration → Attributes and edit the attribute.
- Enter Extra price per linear meter on the relevant attribute values.
- Add the attribute/values to the glass product and select the required variant on the quotation.
- Use a formula pricelist rule and refresh order prices.
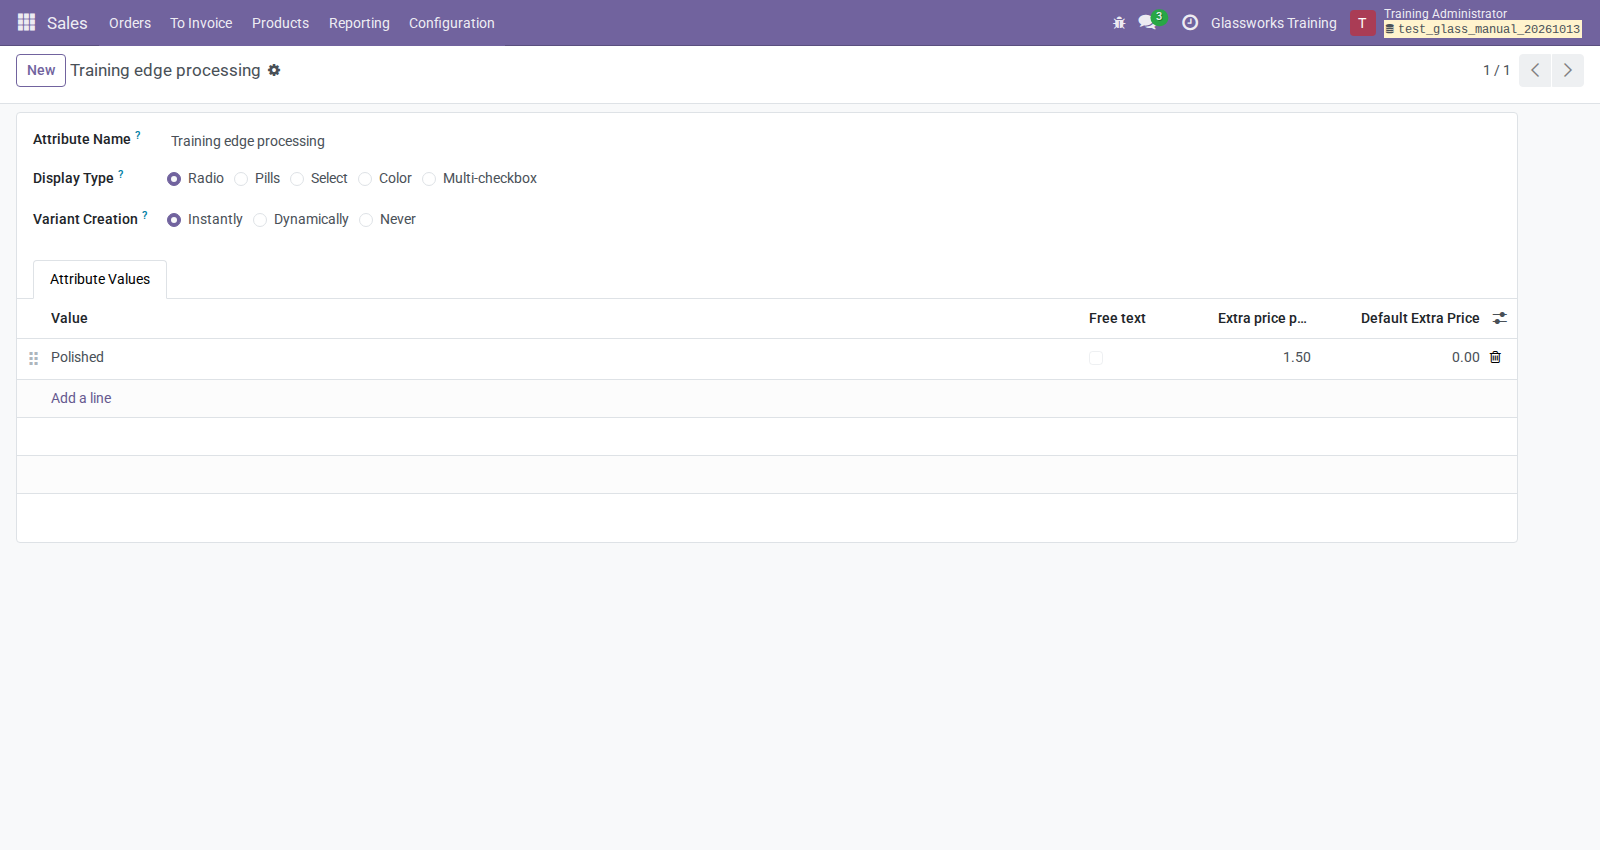
A variant attribute value can add its own per-meter rate to a formula rule.
The applied rate is the formula rule's rate plus the selected variant values' rates. Fixed-price and percentage-price rules do not receive either PMIS perimeter surcharge. Positive quantity and nonzero perimeter are required.
For five 400 × 500 mm panes, 9 m at 2/m adds 18 before discounts and taxes. At a base price of 50/m² and quantity 1 m², the resulting line unit price is 68. The charge is embedded in the unit price, not a separate service line. Configurator outlines and edge finishes do not feed this pricing automatically.
6. Glass configurator setup
6.1 Shape catalog
Open Glass Configurator → Shapes as a Sales manager or Manufacturing manager. The four supplied geometry types are:
| Catalog shape | Required dimensions | Restriction |
|---|---|---|
| Rectangle | Width, height | Positive dimensions |
| Circle | Diameter | Positive diameter |
| Ellipse | Width, height | Positive axes |
| Trapezoid | Bottom width, top width, height | Centered isosceles; positive top width no larger than bottom width |
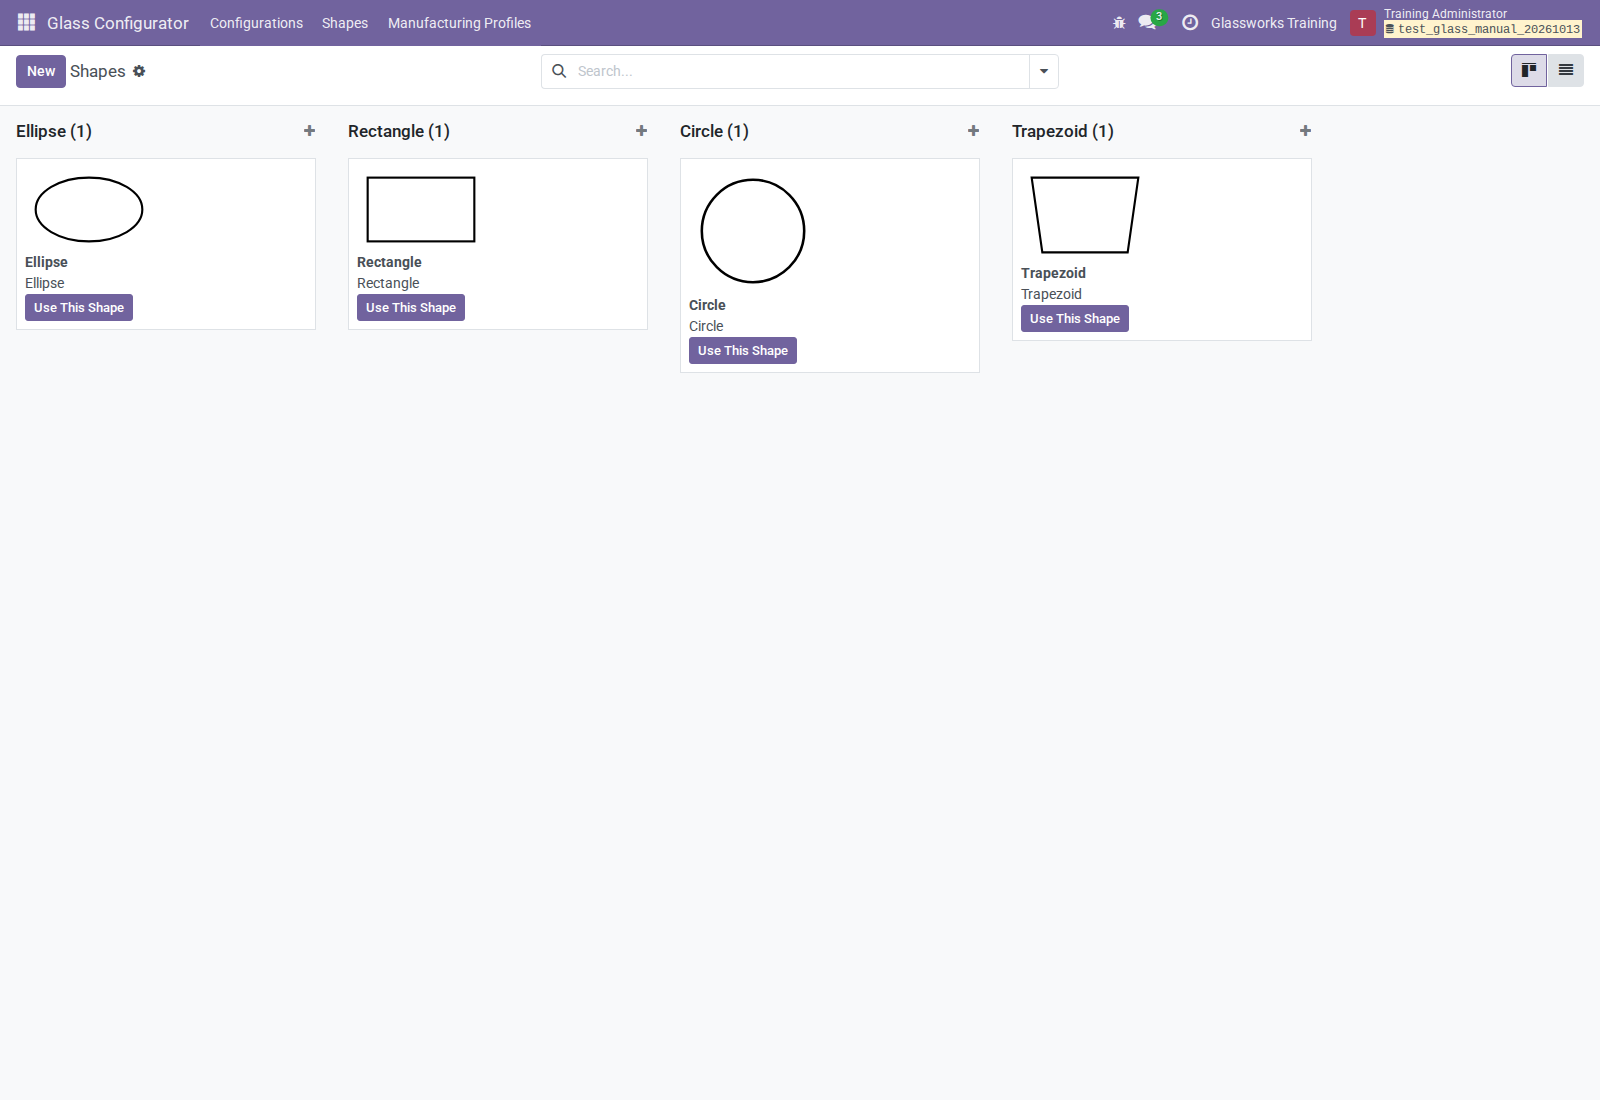
Figure A9. Catalog entries select implemented geometry; images are descriptive.
To add a catalog entry, enter Name, Code, Shape Type, image, and description. Additional entries reuse one of the four implementations. A new name/image does not implement arbitrary polygons, asymmetric trapezoids, rotated cuts, or CAD import. A shape type cannot change while an active non-draft drawing uses it; create another catalog entry instead. Names/images remain catalog metadata rather than fully frozen approval data.
Use This Shape applies a card when the catalog was opened using Browse Shapes from a saved draft. Opening Shapes directly does not start a drawing.
6.2 Manufacturing profiles
As a Manufacturing manager, open Glass Configurator → Manufacturing Profiles. Create a profile for the company and choose the policy.
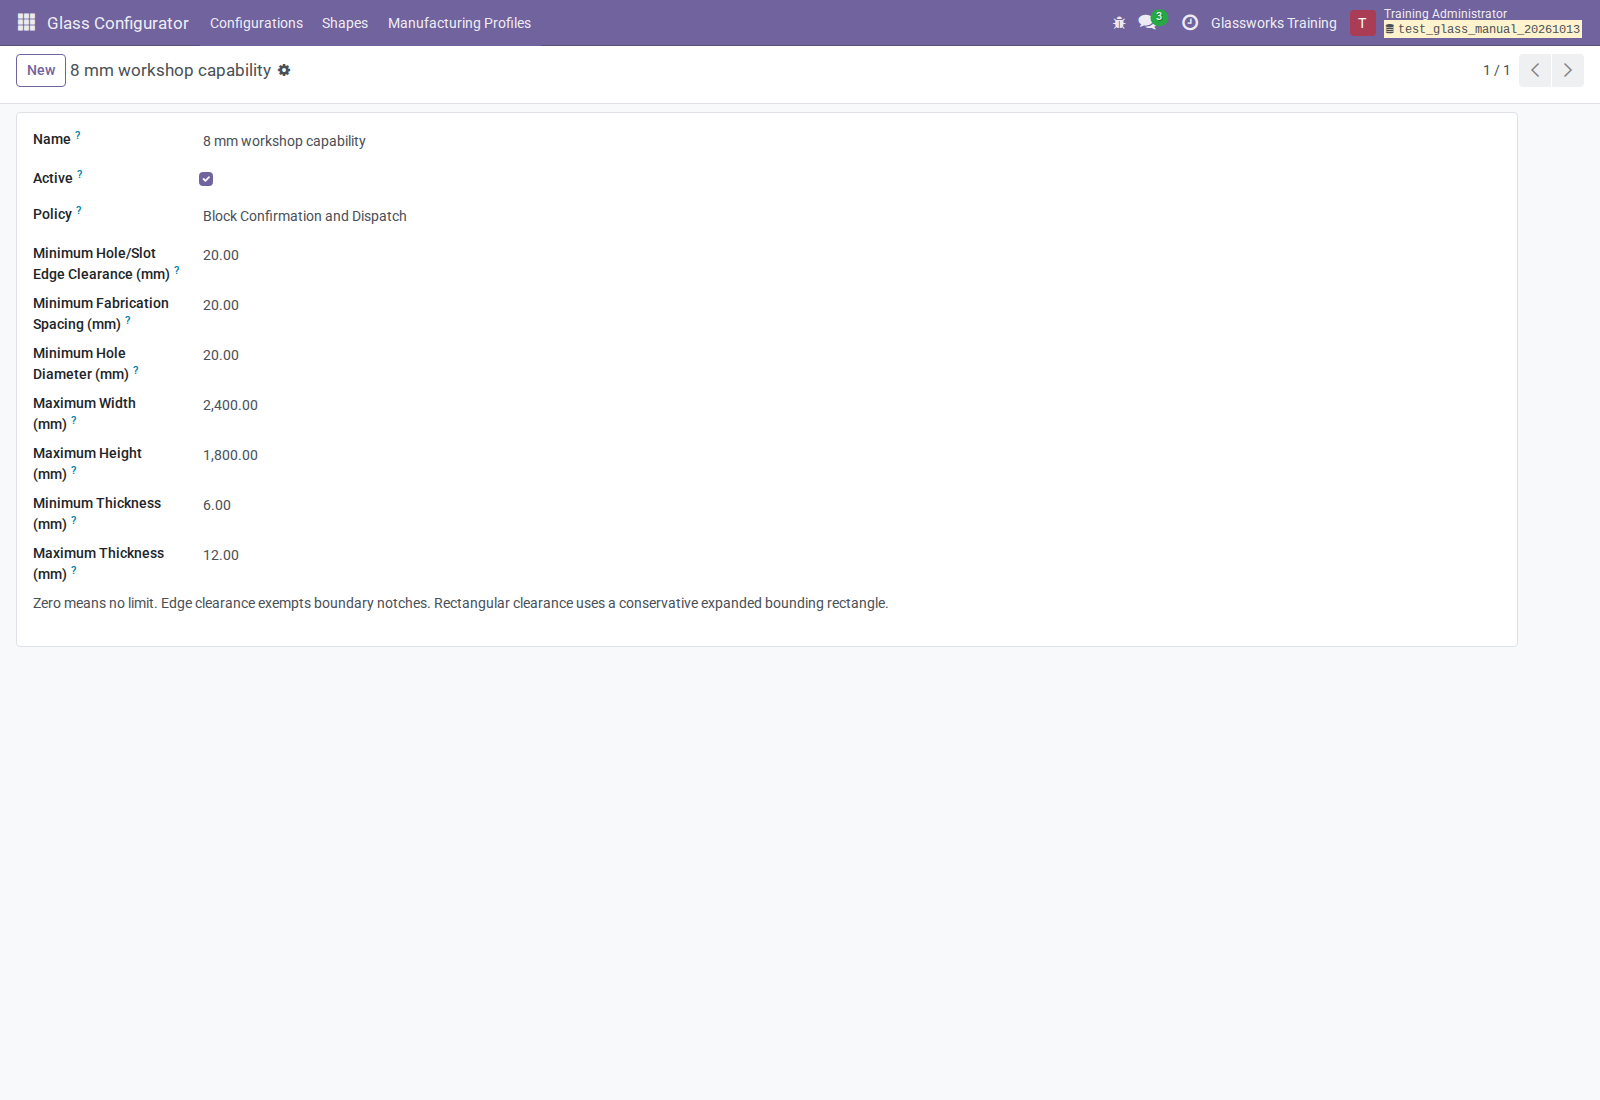
Figure A10. Example workshop review limits; these values are illustrative.
| Setting | Meaning |
|---|---|
| Warning | Displays violations; does not block approval |
| Block Confirmation and Dispatch | Violations prevent confirmation and dispatch; also prevent Print Drawing |
| Minimum Hole/Slot Edge Clearance | Distance check against the actual outline; boundary notches are exempt |
| Minimum Fabrication Spacing | Minimum gap between fabrications |
| Minimum Hole Diameter | Minimum permitted circular-hole diameter |
| Maximum Width / Height | Maximum bounding dimensions in mm |
| Minimum / Maximum Thickness | Allowed thickness interval in mm |
Zero disables a numeric limit. Values must be finite, nonnegative, and consistent. Rectangular hole/slot clearance uses a conservative expanded bounding rectangle. Select the profile on each applicable draft; creation alone does not assign it to every drawing. These are review limits, not certified manufacturing tolerances. A visible Confirm Design button does not guarantee that profile checks pass.
6.3 Drawing defaults and authoring rules
New standalone drawings default to a rectangle, 8 mm thickness, one sheet, and the accessible seeded product. Set outline dimensions explicitly. References are assigned on save by the shared sequence; the reference remains unchanged across revisions and is shared across companies.
Configure operators to use these conventions:
- Coordinates start at the bottom-left of the sheet's bounding box.
- Holes use their center; notches/slots use their lower-left corner.
- Notches must touch the outline; slots are used for interior rectangular cuts.
- Fabrications may touch but must fit inside/on the outline without overlap and leave positive net area.
- Thickness and physical count must be positive; count must be a whole number.
- Correctable invalid layouts can be saved as drafts, but cannot be printed or approved. Negative/nonfinite fabrication dimensions are rejected.
Weight uses a fixed density of 2,500 kg/m³: net area × thickness in meters × density. Total weight multiplies by sheet count. Material descriptions do not change density. Gross/removed/net areas and weight are estimates; invalid-draft figures are provisional.
6.4 Specifications, finishes, and templates
Material, treatment, and coating/surface specifications are free-text instructions. They appear in managed quotation descriptions, approval snapshots, and PDFs. They do not select a product, configure routes, or perform treatment operations.
Edge finishes permit one Whole Outline instruction, or one instruction per selected straight edge Bottom, Right, Top, Left on rectangles and trapezoids. Do not mix Whole Outline with individual edges or repeat an edge. Circles and ellipses support Whole Outline only. Lengths follow the original outline, exclude fabrication boundaries and notch deductions, and are approximate for ellipses.
Mark standard drafts Reusable Template. Templates retain design content, fabrications, specifications, and finishes. Use Template creates a fresh standalone draft without sale ownership, approvals, manufacturing history, requested date, or reason. Templates cannot dispatch directly. Copy Drawing can reuse an accessible same-company source on another saved quotation line.
7. Component planning setup
7.1 Prepare source demand
Planning uses raw-material moves linked to MOs, carrying a product, and not done/canceled. The Component Planning menu also excludes completed/canceled MOs. Confirm MOs and ensure their BoMs generate work orders with work centers and expected durations.
Open Manufacturing → Production Planning → Component Planning. The default search groups by Component and shows Without Planning Group. Remove that filter to inspect assigned demand.
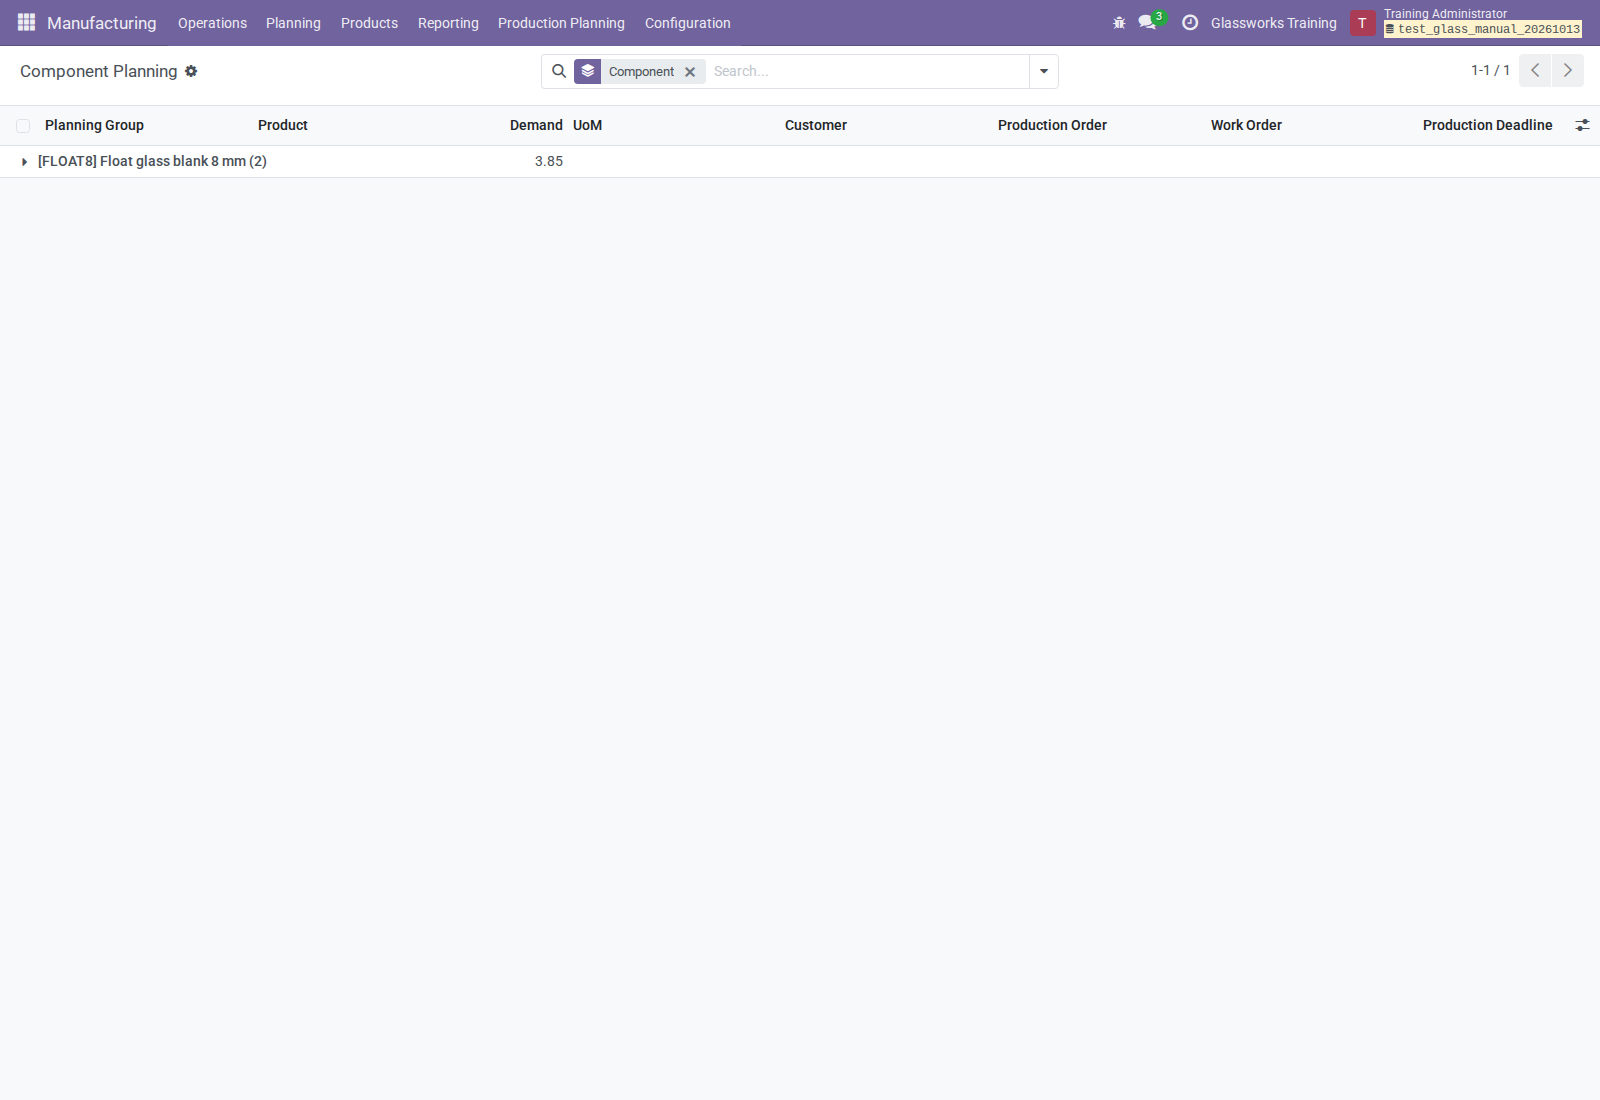
Figure A11. Planning membership is defined by component moves.
The action Suggest Planning Group creates a group directly from a selection containing one component product and one company. Suggested names use the component reference and current ISO calendar week.
The assignment wizard can create a mixed-product group or assign an existing group. New groups still require one company. Existing-group assignment does not perform that same company-selection check: operators must choose a group in the component's company. Components Only still synchronizes the MO summary through the stock-move write hook.
MO selections resolve their raw moves. Work-order selections use their eligible
move_raw_ids; a work order with none does not fall back to every raw move on
the MO. Such a selection cannot be assigned using the wizard.
7.2 Work-center planning windows
Open Manufacturing → Production Planning → Planning Groups and review the group's Workcenter Planning tab.
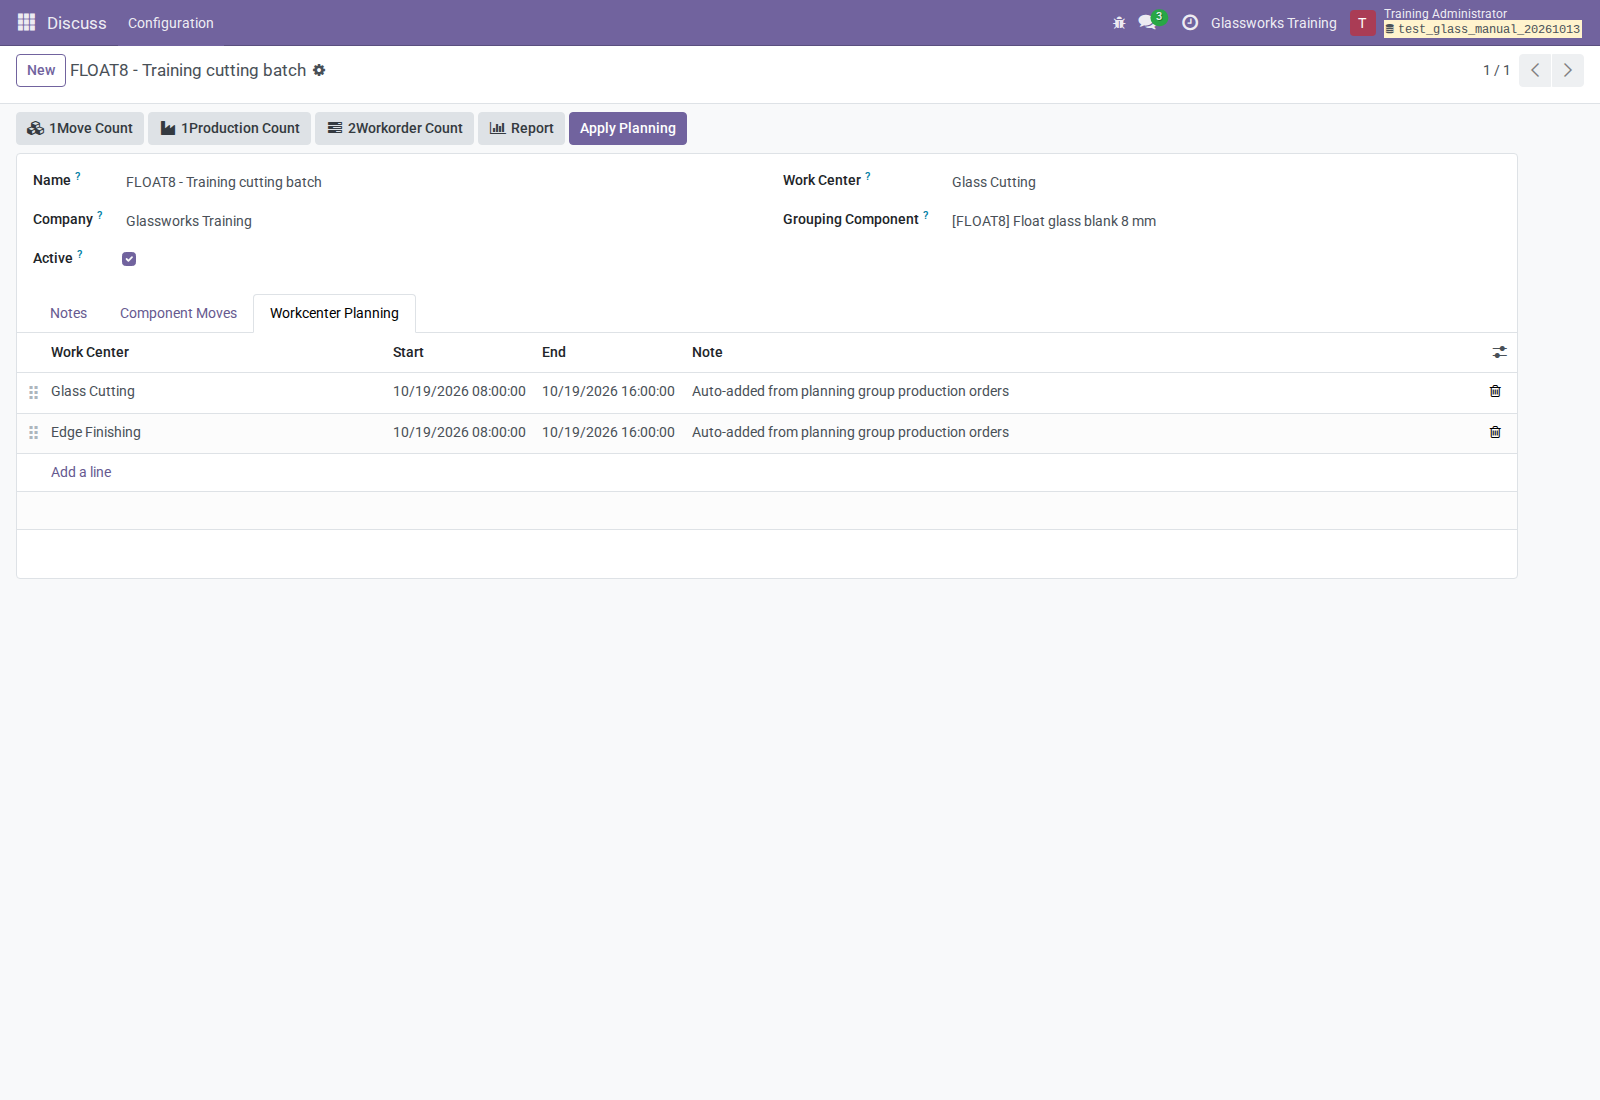
Figure A12. Each work center has a start and optional end for this group.
Missing work-center lines are created from related MOs. Review their dates rather than accepting initial starts as a production commitment. The end must be no earlier than the start. Obsolete lines are not automatically removed when group membership changes.
Apply Planning assigns sequential work-order start/finish dates, primarily by MO deadline, using expected duration with a minimum of one minute. If the next order exceeds a line's End, processing stops for that line; subsequent work is left without a new schedule from that line. An empty End supplies no upper bound.
All non-done/noncanceled work orders of the related MOs are considered, including already-started work and operations not consuming the selected component. The planner must review such changes. The scheduler does not resolve calendar breaks, capacity conflicts, or overlaps between groups.
7.3 Summaries and analysis
An MO's Planning Group summary is populated only when its assigned component moves resolve to exactly one group; mixed assignments leave it empty. Work orders inherit that MO summary. Use the group's Components, Production Orders, Work Orders, and Report buttons for the complete membership.
Planning Group Report offers list, pivot, graph, search/grouping, Late, Open MO, and Open WO filters. Component totals are repeated for each work order; adding pieces across operations can double count demand. Use component moves or Component Work List for unduplicated native demand. Planning Group Workcenter Sheets provides operation-oriented printed sheets and writing spaces for operator/start/end details.
Analysis retains assigned historical component moves; use the Open filters to limit current activity. Late compares the work-order Finish date with the MO deadline and can flag a planned finish on an unfinished order. It is not solely a completed-production lateness measure.
7.4 Existing predecessor deployments
The 18.0.1.1.0 migrations rename predecessor mrp_component_campaign models,
tables, fields, and external IDs. They require openupgradelib and check conflicting
schema/assignments and preservation of IDs, dates, and links. Installing a
differently named addon is not itself proof that the migration path executes.
Prepare a deployment-specific upgrade plan and backup before migrating an
existing predecessor database.
8. Manufacturing reporting setup
Open Manufacturing → Reporting → Manufacturing Reports.
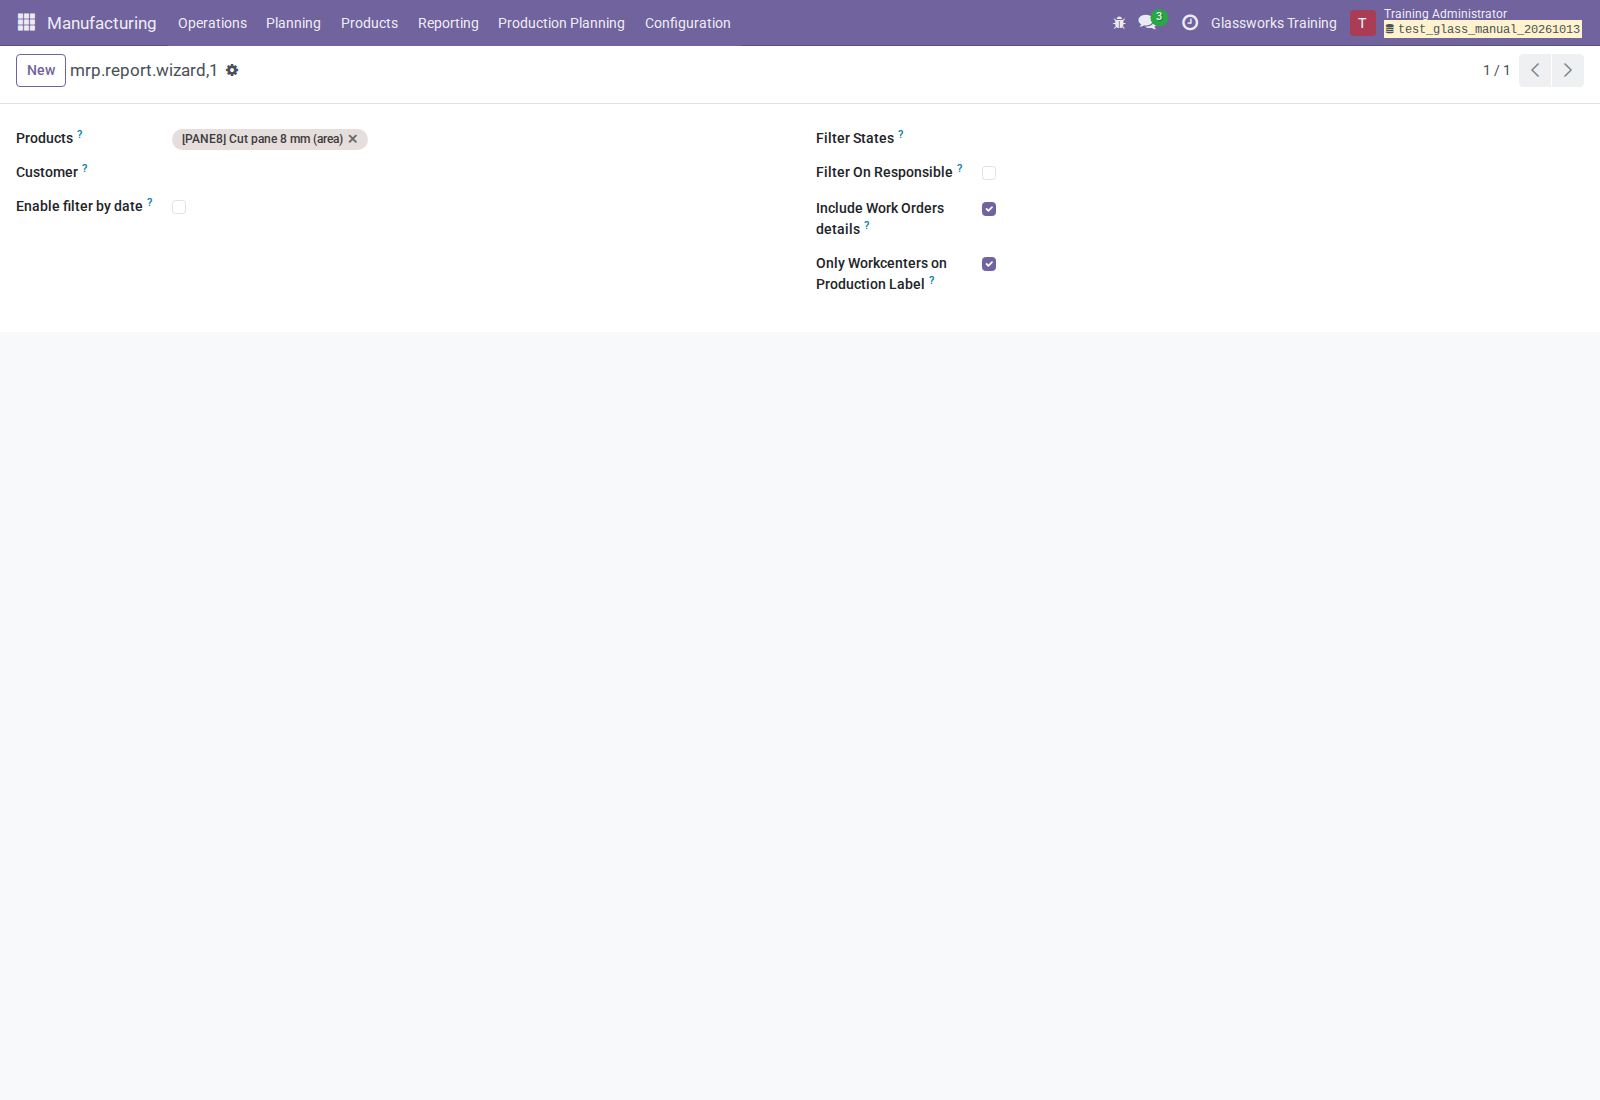
Figure A13. Filters and work-order detail switches.
The report requires Manufacturing access to source records and customer/source
information supplied by mrp_sale_info. Configure real sale/procurement links;
an Origin label alone does not guarantee that every customer relation is set.
| Option | Behavior |
|---|---|
| Products | Restricts finished MO products |
| Customer | Includes contacts of selected commercial customers |
| Filter States | Restricts native MO states |
| Enable filter by date / Start Date | Includes MOs starting on or after that date; does not filter deadlines |
| Filter On Responsible / Responsible Users | Restricts responsible users |
| Include Work Orders details | Adds work-order names, work-center codes, and states |
| Only Workcenters on Production Label | Restricts details to work centers with the measurement addon's label flag |
The XLSX work-order details show translated states. The current PDF shows work-center code/name and OK for completed work orders; it does not print the full work-order state labels. MO states are shown in both formats.
Enabling/changing the date or responsible filter clears its selected values; enter them afterward. Empty optional filters leave the search unrestricted within the user's source-record access.
Print Pdf produces a QWeb PDF. Export xls produces XLSX despite the label.
The XLSX path uses this addon's authenticated /xlsx_reports handler; ensure
deployment proxies permit the normal authenticated report download.
With Measurements installed, Quantity uses PMIS pieces even when zero. It does not fall back per MO to native quantity. Without that field, native MO quantity is used. Without the label flag, enabling the label-only option omits all work-order details, but does not omit the MOs. Identical displayed commercial customer names share a report section. Missing customers appear as (No Customer).
9. Maver ASC, XLSX, and component worklists
9.1 Material references and measured component data
- Assign an Internal Reference to every raw component to be exported.
- Use distinct references after uppercasing and truncating to 16 characters.
- Set each component's own pieces and dimensions through its valid BoM/move source; do not assume the finished drawing is transferred to raw moves.
- Review native demand, move-line quantities, measurement fields, and deadline.
- Generate a sample and check it in the target cutting-software import procedure before allowing routine operator imports.
There is no connection credential, machine endpoint, import acknowledgment, or automatic submission setup in this addon. All outputs are downloads.
9.2 ASC behavior and fixed-width contract
Single MOs expose Export Maver (Components). MO/WO selections offer Export ASC V4 (Components). Work-order ASC deduplicates their related MOs. The generated ZIP is stored as an Odoo attachment, with one ASC file per material reference and rows ordered by source order and MO.
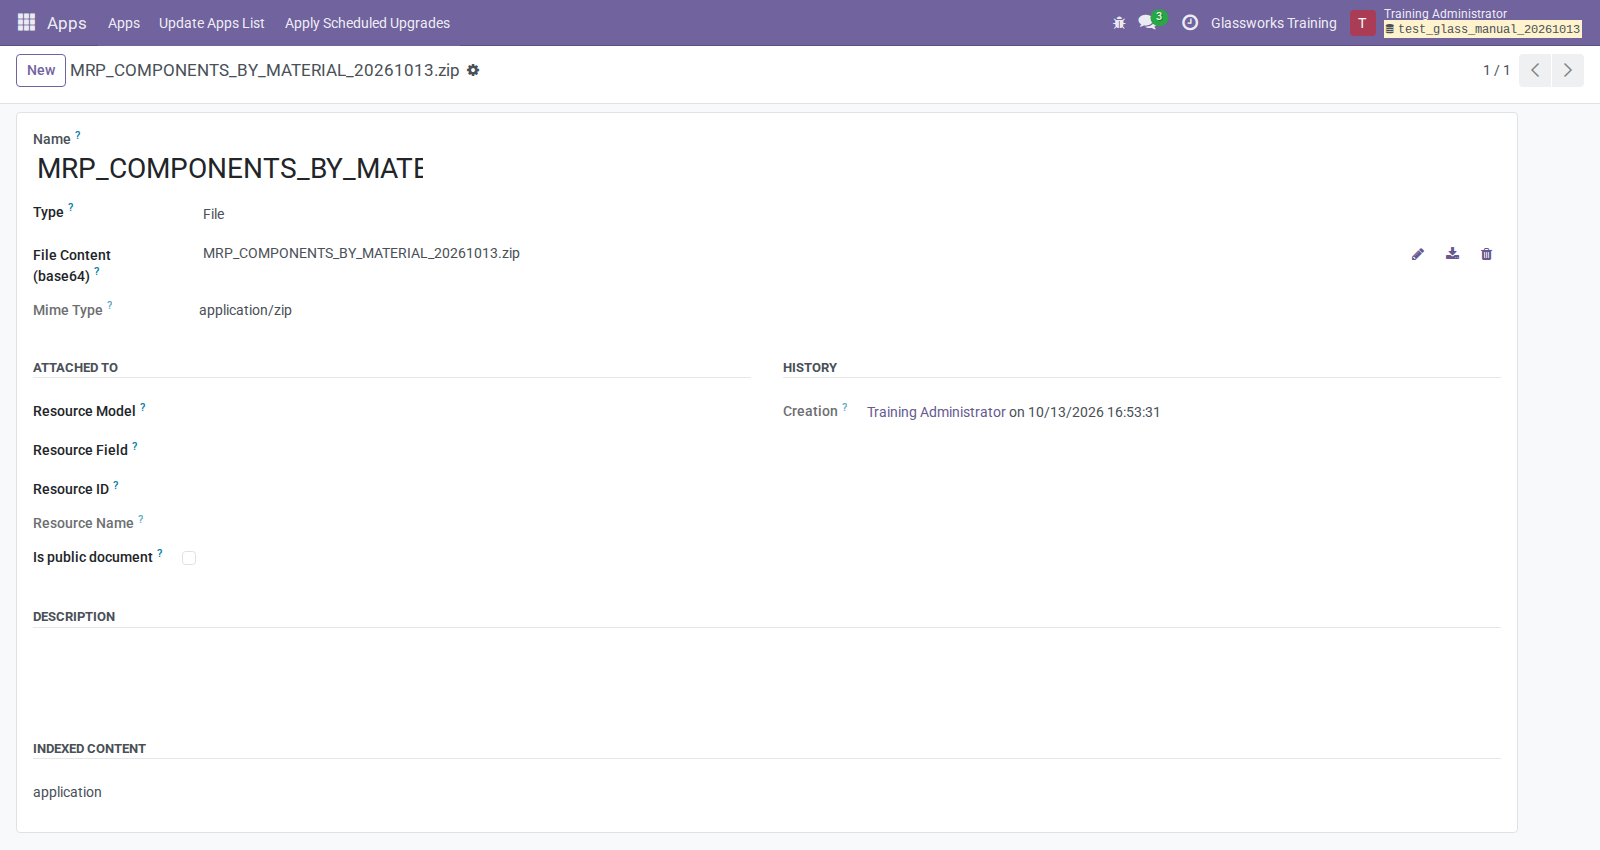
Figure A14. A generated export is a downloadable ZIP attachment.
ASC includes noncanceled raw moves with positive demand. When noncanceled move
lines exist, it uses them instead of the parent move. It prefers PMIS pieces.
The move-line fallback checks legacy qty_done and product_uom_qty, not Odoo 18
quantity; unmeasured operation lines may export zero. Without move lines, native
move demand is the final quantity fallback. Zero-count rows are retained.
| ASC columns, 1-based | Width | Content / limit |
|---|---|---|
| 1–16 | 16 | Uppercase component internal reference |
| 17–21 | 5 | Position within material file |
| 22–33 | 12 | Customer name, truncated |
| 34–45 | 12 | Origin or MO reference, truncated |
| 46–53 | 8 | SHAPE, empty |
| 54–61 | 8 | Fixed grinding value 2.0 |
| 62–64 | 3 | Priority 0 |
| 65 | 1 | Rotation Y |
| 66–73 | 8 | Rounded integer quantity |
| 74–81 | 8 | Fixed numeric value 0.0 |
| 82–89 | 8 | Component width + 2 mm |
| 90–97 | 8 | Component height + 2 mm |
| 98–105 | 8 | Blank spacer |
| 106–137 | 32 | MO note; optional first manufacturing tag sanitized to eight characters |
| 138–152 | 15 | Three five-character zero fields |
Files use ASCII replacement (? for non-ASCII characters), CRLF line endings,
a header containing print date, total pieces, and V4, followed by record count.
Numeric overflow can be truncated by the formatter; keep references, counts,
and dimensions within the receiving specification and inspect exported values.
The +2 mm, grinding value, rotation, and empty SHAPE are hard-coded. Missing width/height become 2.0 mm rather than preventing export. A configurator's curve, trapezoid, holes, notches, or slot are not encoded. Do not treat this output as approved nonrectangular machine instructions.
9.3 Component XLSX
Export Components (XLSX) is available on MOs and selected MOs/WOs. The workbook has one sheet per component, sorted by source/MO, with sanitized unique sheet names. The Product column names the finished product, while the sheet identifies the raw component. Quantity is PMIS pieces; zero remains zero.
MO export uses move deadline, expected date, then move date, and omits rows with no usable date. WO export retains such rows. Selected WOs each repeat the production's raw moves: sums across operations are not unique material demand.
9.4 Component PDFs
Use Print Components in the MO list header or Components (per component) in a WO's Print menu. MO printing requires related WOs. This report groups raw components with source/customer/product, pieces, dimensions, deadlines, work orders, work centers, and available tags. Each selected WO repeats its MO's components, so use the intended operation selection and interpret totals accordingly.
10. Records, revisions, and retention
Confirmation creates an immutable numbered approval snapshot and protected PDF with approver, time, reason, frozen customer/order/line identity, geometry, fabrications, specifications, finishes, areas, and weights. Reapproval increments the revision number; it does not replace old binaries.
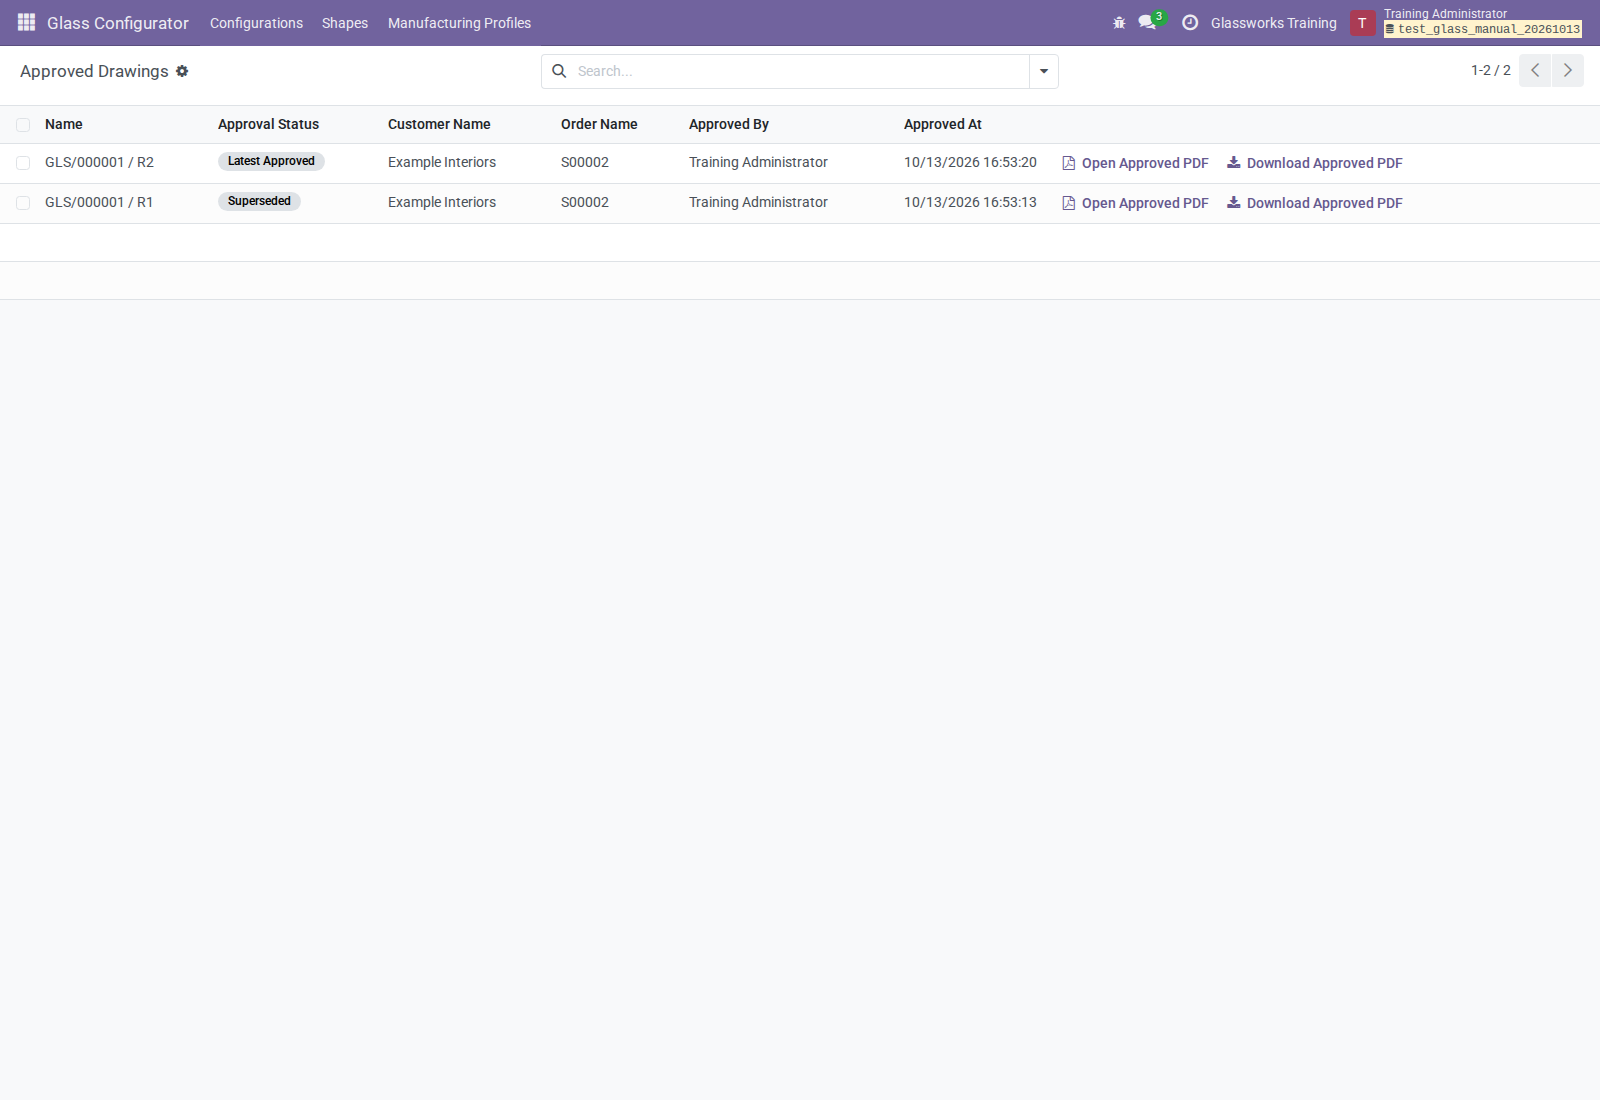
Figure A15. Reopening preserves the previous approval; reapproval produces R2.
- Valid draft prints carry DRAFT — NOT APPROVED FOR PRODUCTION and create no approval revision.
- A linked sale line retains its latest approved revision/PDF during draft editing.
- Approved Drawings lists all historical revisions; older approvals show Superseded after a newer approval.
- Reopen Design records the event and unlocks eligible drawings, preserving earlier evidence. In Production/Done designs cannot reopen.
- Splits/backorders retain the dispatched drawing/revision; a partially completed canceled batch uses Replace Cancelled Remainder under that same revision.
- The PDF remains owned by the configuration when attached to MO chatter.
- Standard quotation/line duplication does not copy its drawing. Use Copy Drawing.
- One sale line can own one drawing. Drawn lines cannot move between orders; an order containing drawings cannot change company.
- Only unapproved drafts without revision/manufacturing history can be deleted. History-bearing drawings cannot detach or change owning sale lines, even after reopening. Archived drawings still protect line/order deletion.
- Archiving neither cancels MOs nor releases sale ownership or removes evidence.
Back up PostgreSQL and the corresponding filestore together. Approved PDF files are part of the business record. Do not purge attachments or bypass revision guards to edit an approval. Restrict developer/import permissions to appropriate administrators and use workflow buttons for status changes.
11. Rollout and routine administration
11.1 Prepare the operating model
- Decide which products use measured m² workflows and which use direct Unit configurator manufacturing.
- Document stock UoMs, whole-piece rounding, and input-blank allowance conventions.
- Prepare products, BoMs, operations, raw availability, accounts, and routes.
- Set pricelist/attribute edge charges and explain that fees do not schedule work.
- Set company permissions and resolve planning-model access limitations.
- Prepare shapes, reusable templates, and company manufacturing profiles.
- Explain draft/approved/current/superseded evidence and physical sheet counts.
- Agree the process for manually reconciling drawing specifications, raw move data, BoMs, and machine exports.
11.2 Daily/periodic tasks
- Review unassigned component demand and incomplete cut specifications.
- Review group membership and work-center conflicts before applying plans.
- Monitor drawing warnings, canceled remainders, and deadlines.
- Check report quantities against their units and aggregation level.
- Review ASC files before import, particularly missing geometry and zero counts.
- Archive unused eligible configurations/templates without deleting approval history.
- Maintain backup/restore procedures for the database and filestore.
- On upgrades, review manifests, migration requirements, dependencies, assets, permissions, and report rendering through your approved release process.
12. Troubleshooting
| Symptom | Check / action |
|---|---|
| Addon is absent from Apps | Remove Apps-only filter, update list, and check addon paths and Odoo 18 dependency branches. |
| Missing Glass/MRP menus | Review installed addons, user app roles, Work Orders settings, and refreshed session. |
| Unit product has no measurement inputs | Open the variant and enable its Unit-category exception; other categories remain unsupported. |
| Whole-piece sale fails | Complete positive dimensions and review UoM category/ratios/rounding; do not force conversion factors. |
| Standalone Product is empty | Check allowed company and product visibility, then choose an accessible compatible product. |
| Confirm Design is missing | Correct invalid geometry, counts, or finishes; the form must be a draft. |
| Confirm/Print fails despite valid geometry | Review blocking profile limits and PDF renderer/report URL availability. |
| Production dispatch fails | Require Manufacturing access, stockable exact-Units product, approved non-template drawing, and resolved sales/profile warnings. |
| Report has no customer | Repair standard sale/procurement/customer links; inspect the report's commercial-customer grouping. |
| Report quantity is zero | Measurements is installed but the MO lacks valid piece metadata; Quantity does not fall back to native quantity. |
| Work-order details disappear | Enable Include Work Orders details; check label-only setting and work-center label flags. |
| Component Planning looks empty | Remove Without Planning Group and inspect MO/move states and company/product membership. |
| MO summary is blank despite assignments | Its components resolve to multiple planning groups. Inspect component moves. |
| Some work orders retain old dates | Check End window, duration, state, work center, group membership, and overlaps. |
| Planning pivot overstates pieces | Component totals repeat per work order. Use component moves for unique demand. |
| ASC omits a component | Check positive native demand, canceled state, and Internal Reference. |
| ASC has zero pieces or 2.0 mm dimensions | Inspect raw-move/move-line measurement data; missing values are not rejected by export. |
| XLSX omits MO rows | Check raw-move date candidates and canceled components. |
| Print Components fails | Ensure the selected MOs have work orders. |
| Production Order label fails with a Notes error | The replacement template requires an undeclared mrp.production.notes field; escalate the report defect or review the deployment's Notes extension. |
| Cannot delete a line/order/drawing | Retained drawing ownership or approval/manufacturing history is protected; archive/cancel appropriately. |
| Cannot reopen a canceled design | Check Completed Sheets. Partially completed batches need remainder replacement, not geometry revision. |
For module-specific reference material, see the five linked addon READMEs in the repository overview. When reporting a problem, include the addon/version, user role, record state, UoM, steps, and expected/actual result using synthetic or redacted evidence.