Digital Assets user manual
Digital Assets is an infrastructure inventory, not a deployment tool. Use it to record which host runs an Odoo instance, which databases that instance uses, and which website domains belong to each database.
Saving or registering an asset does not provision a server, create or move a physical database, configure an Odoo website, or change DNS. Perform those tasks separately with your infrastructure and Odoo administration tools.
Contents
- 1. Understand the inventory
- 2. Install and configure the module
- 3. Record a host
- 4. Add an Odoo instance
- 5. Add databases
- 6. Add website domains and aliases
- 7. Use guided registration
- 8. Complete and maintain registration
- 9. Move databases and instances
- 10. Find and maintain inventory
- 11. Archive and restore assets
- 12. Import and export
- 13. Troubleshooting
The screenshots show the actual Odoo 18 interface in English, captured in a disposable database with synthetic records. Names, reserved example domains, and documentation IP addresses are illustrative. Labels appear in the user's selected language, and available controls depend on access rights.
1. Understand the inventory
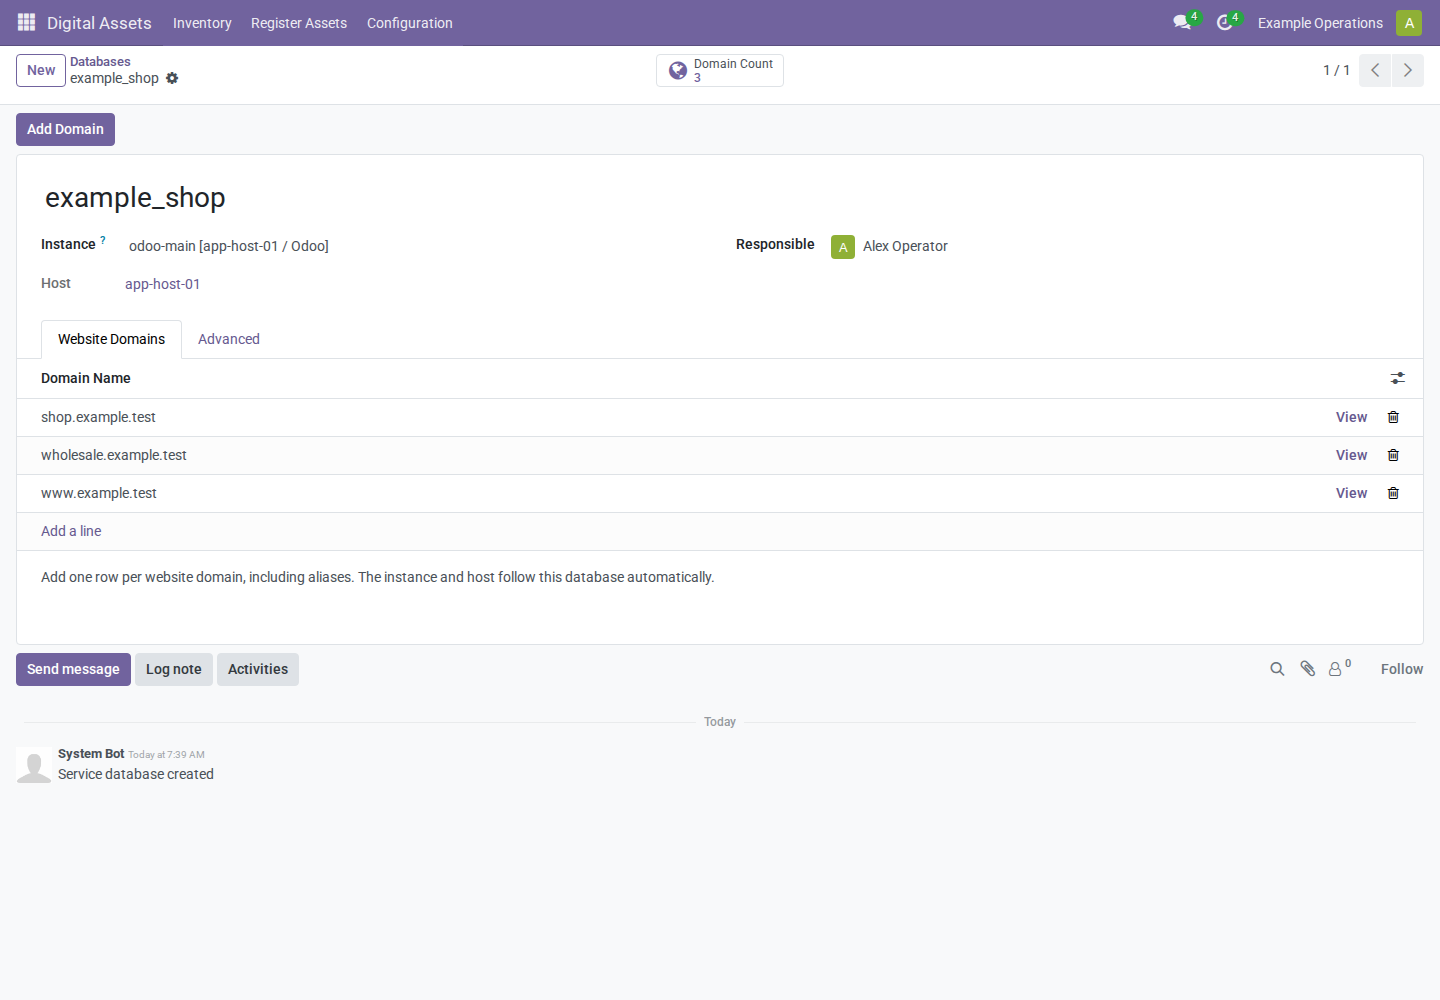
The everyday relationship is:
Host: app-host-01
└── Instance: odoo-main (application: Odoo)
    └── Database: example_shop
        ├── shop.example.test
        ├── wholesale.example.test
        └── www.example.test
| Record | What it represents | Main relationship |
|---|---|---|
| Host | A physical server, virtual machine, or container | Contains instances |
| Application | A software catalog entry, such as Odoo | Classifies instances; not a deployment |
| Instance | One deployed application service | Runs on one host; uses databases |
| Database | One logical database used by an instance | Belongs to one instance; has domains |
| Domain | One hostname, website domain, or alias | Usually belongs to one database |
An Odoo database can have several domains. Enter one record per hostname; do not create another database or instance just because a website has another domain. The database's Instance identifies its consuming Odoo service, not a separate PostgreSQL server. Its displayed Host is the application instance's host.
For a database-backed domain, Instance and Host follow the database automatically. A domain without a database can select an instance directly, or remain unlinked as a parked/reserved domain. An optional Web Server in Advanced details describes a separate serving/proxy service; it is not required for the normal Odoo workflow and does not replace database ownership.
2. Install and configure the module
Installation and prerequisites
- Have your Odoo administrator make
pmis_digital_assetsavailable in the configured addons path of an Odoo 18 Community installation. - In Apps, update the Apps List if necessary. Remove the default Apps filter if the technical module is not listed, then find PMIS Digital Assets and install it. Updating the Apps List requires administrator access and may require developer mode.
- Dependencies
sale_crm,account, andproductmust be available; Odoo installs required dependencies through its normal module installation process. - For an existing installation, have your administrator apply the module upgrade through the normal deployment process. Copying new source files alone does not update database schema or views. See the changelog for version-specific upgrade behavior.
- Grant the intended users an inventory role, then open Digital Assets from the application launcher.
User access
An administrator assigns roles under Settings > Users & Companies > Users, on the user's Access Rights tab. Use the Digital Assets roles in the PMIS Digital Assets category; the precise group presentation can vary with other installed modules.
| Role | Inventory | Applications and stages |
|---|---|---|
| Digital Assets User | Read, create, edit, archive, and restore | Read only |
| Digital Assets Manager | User permissions plus deletion | Create, edit, archive, restore, and delete |
The new inventory roles do not require Sales access. Existing Sales grants are additive and remain supported; they can confer additional permissions. Portal users are not the intended inventory operators.
Company is ownership metadata, not an access-isolation guarantee. This addon does not define company record rules. Company fields appear for users with multi-company access. Guided registration and completed registration require same-company relationships; select the correct active company before entry. Changing a parent does not silently rewrite existing child ownership.
Applications
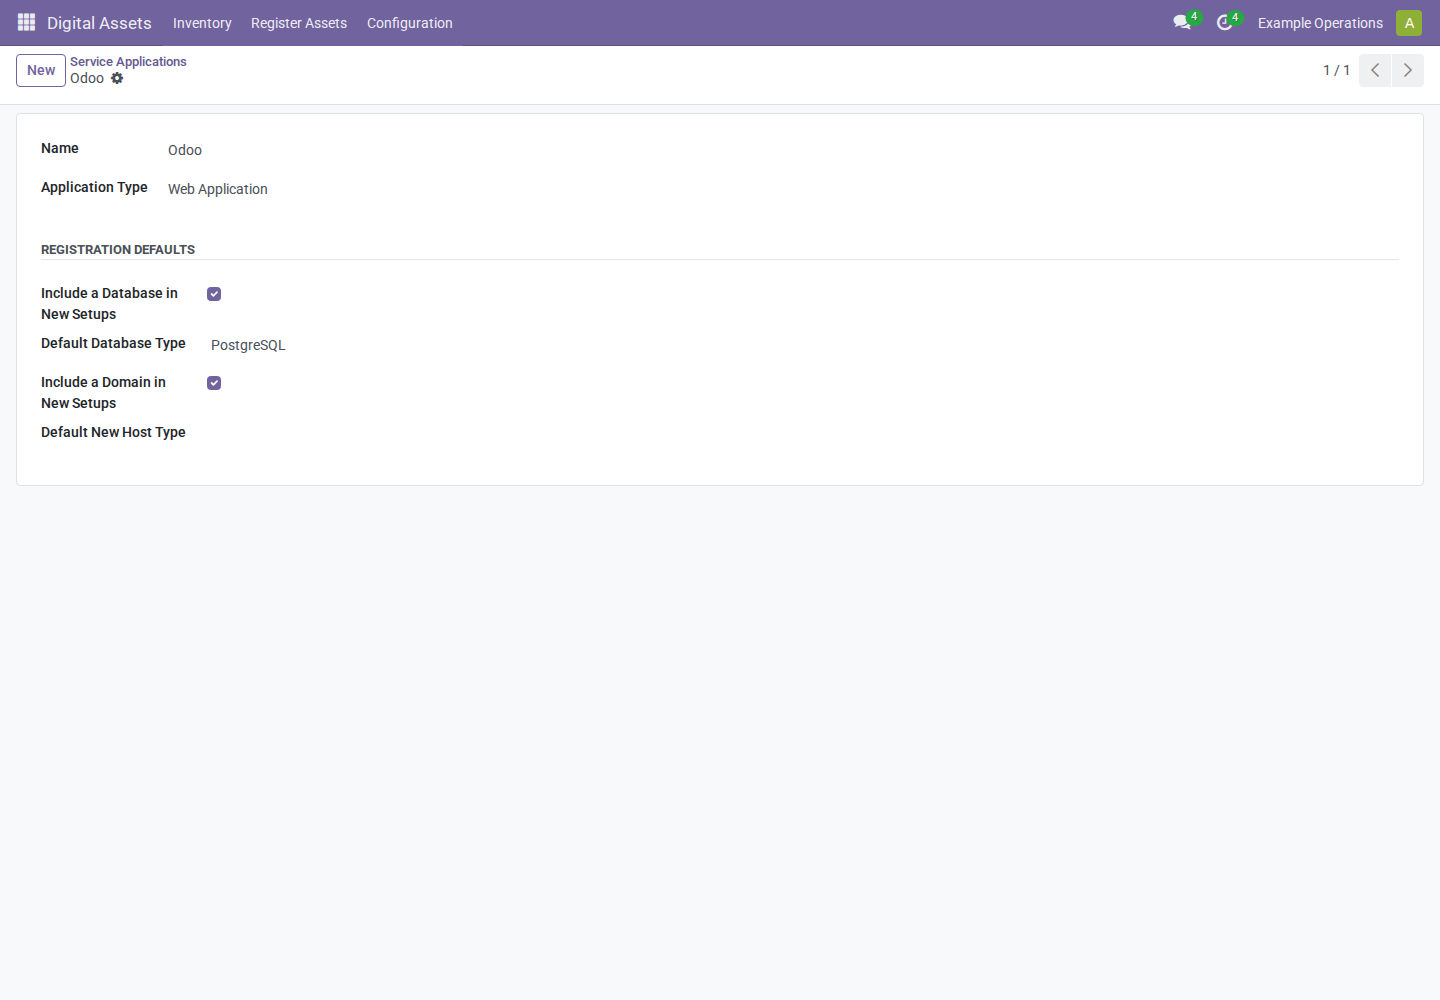
- As a manager, open Digital Assets > Configuration > Service Applications.
- Open Odoo, supplied by the module, or create a catalog entry for other software. When using the editable list, use the row's View control to open its full form.
- For Odoo, keep Application Type set to Web Application. This classification exposes database/domain options in guided setup.
- Under Registration Defaults, optionally enable Include a Database in New Setups and Include a Domain in New Setups. Set Default Database Type to PostgreSQL and, if useful, select a Default New Host Type.
- Save the form. These are wizard presets, not changes to existing deployments.
New instances default to the supplied Odoo catalog entry. Other classifications support web servers, database services, backups, synchronization, and updates. Do not reclassify applications used by registered records without checking the affected inventory; consistency validation can block incompatible changes.
Stages
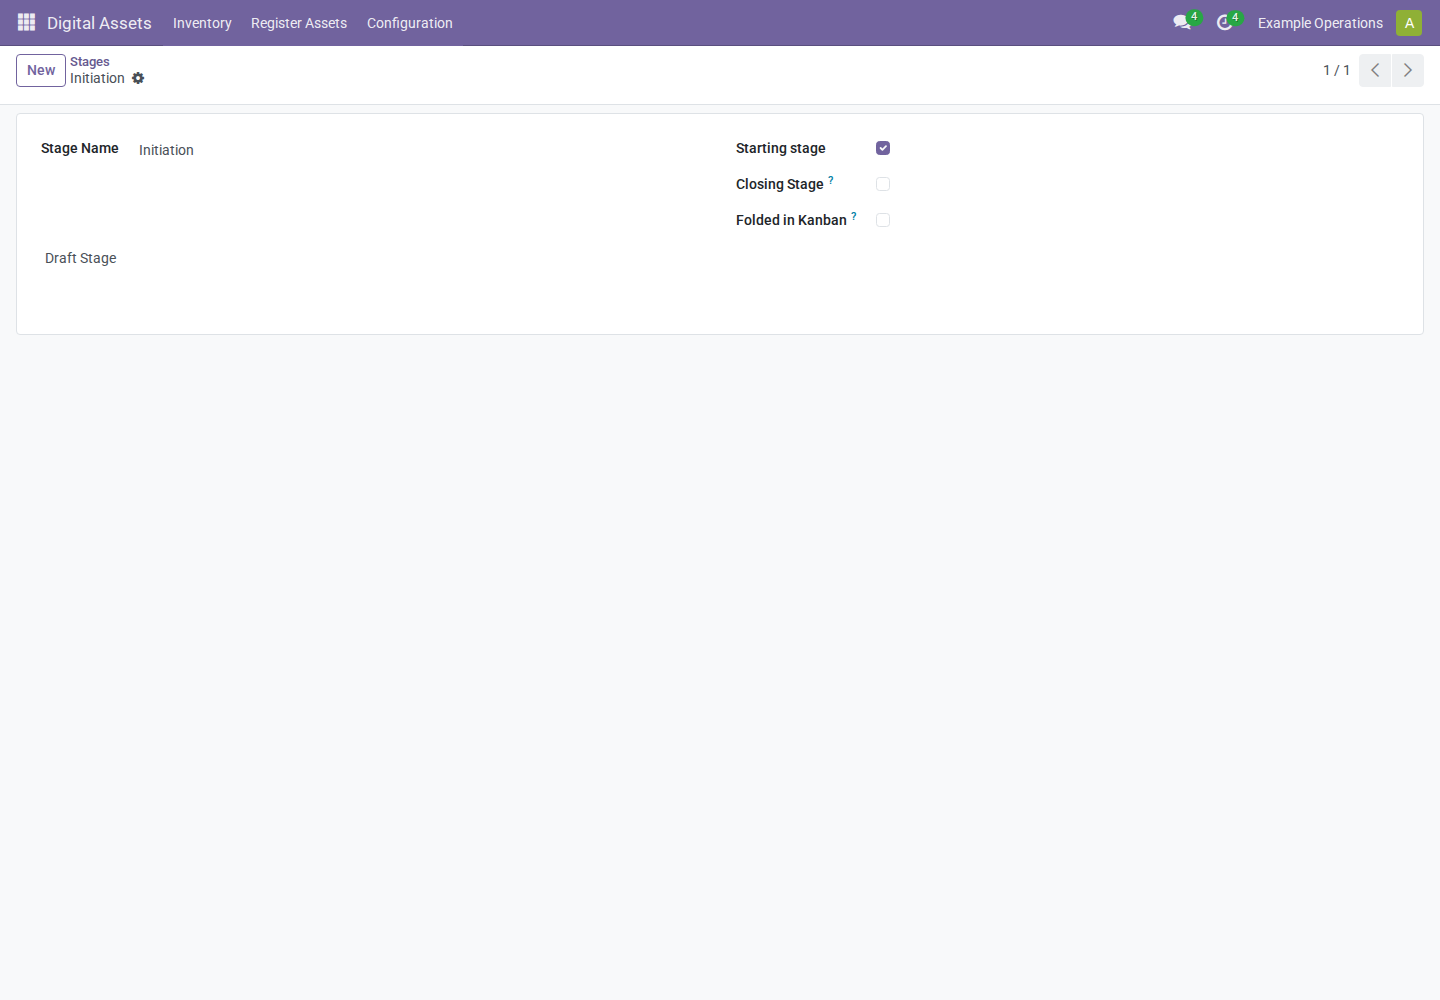
- Open Digital Assets > Configuration > Stages.
- Review the supplied stages, or create stages matching your inventory process.
- Set Starting stage on the stage used for new records. Keep a single intended starting stage to avoid ambiguity.
- Use Folded in Kanban for columns that should be collapsed. Closing Stage describes a process stage, not an infrastructure shutdown.
- Save. Stage configuration is shared across inventory asset types.
Stages, registration, lifecycle, and archive visibility are independent. Changing a stage does not automatically register, retire, or archive a record.
3. Record a host
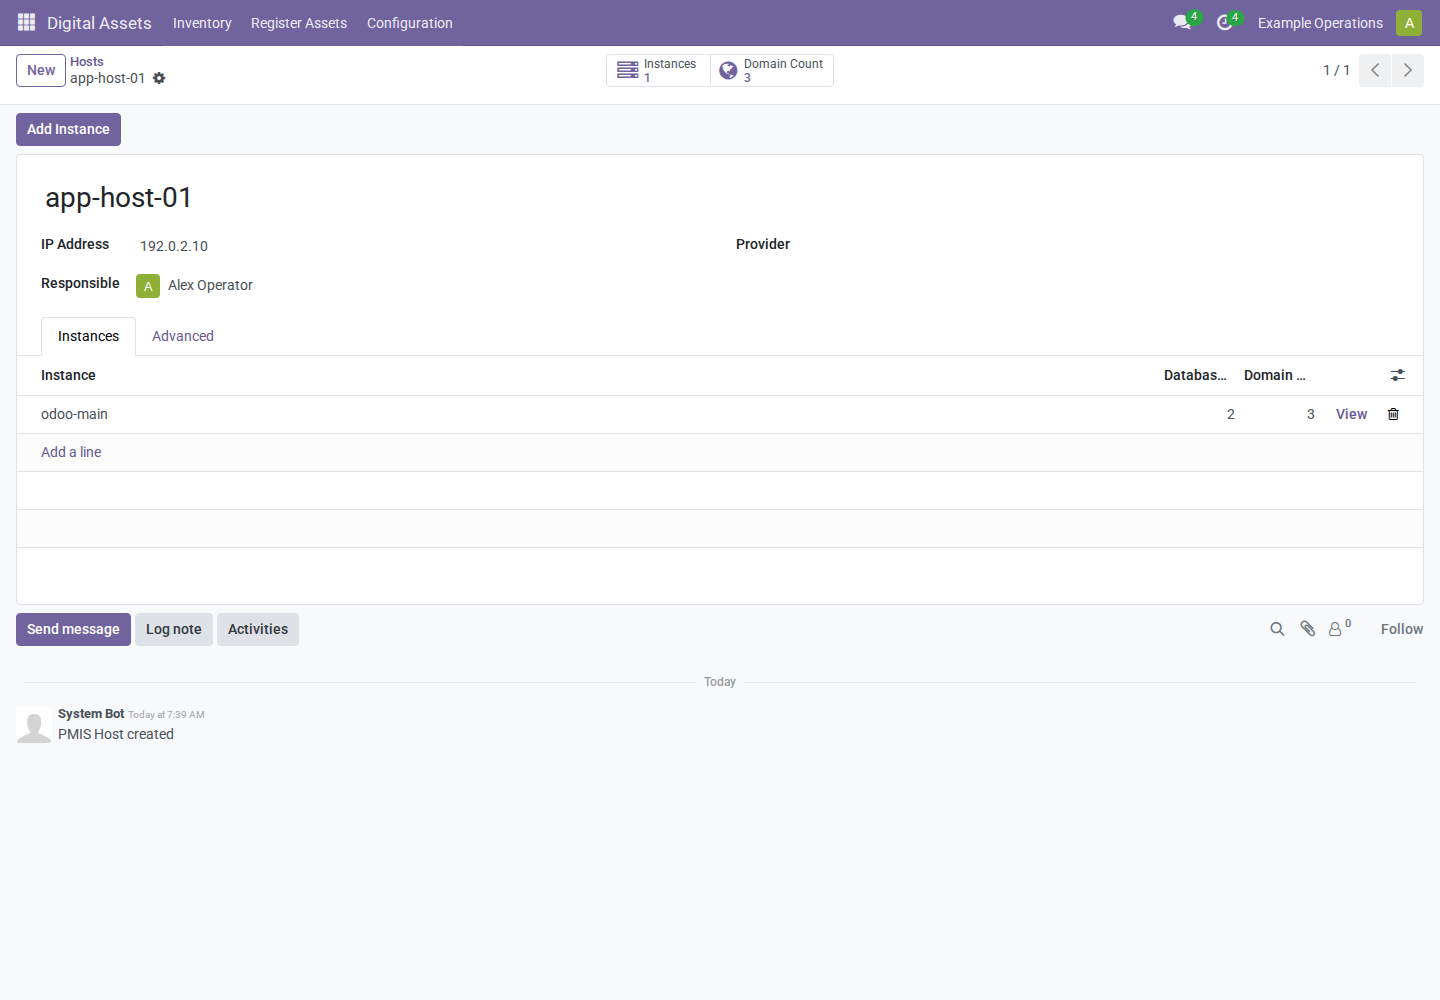
- Open Digital Assets > Inventory > Hosts and select New.
- Enter Host Name, for example
app-host-01. - Enter IP Address if known, for example
192.0.2.10. - Select Responsible and, where applicable, the owning Company and Provider.
- Save the form using the save control beside the record breadcrumb.
- In Advanced, optionally record Host Type (KVM, LXC, Docker, or Hardware), operating system, parent host, and control panel information.
Ordinary form entry saves a draft; the name is mandatory even for drafts. Host type and responsible person are required only when completing registration. Do not put passwords, API keys, or other credentials in fields or chatter.
The Instances tab lists services on this host. Add a line provides inline entry; Add Instance opens guided setup with this host preselected. Use View on an inline row to open its full form. Smart buttons open related instances and domains.
4. Add an Odoo instance
- Open the host's Instances tab and choose Add a line.
- Enter an instance name such as
odoo-main. The application defaults to Odoo; expose the optional Application column or open the instance to change it. - Save the parent form, then use the row's View control to open the instance.
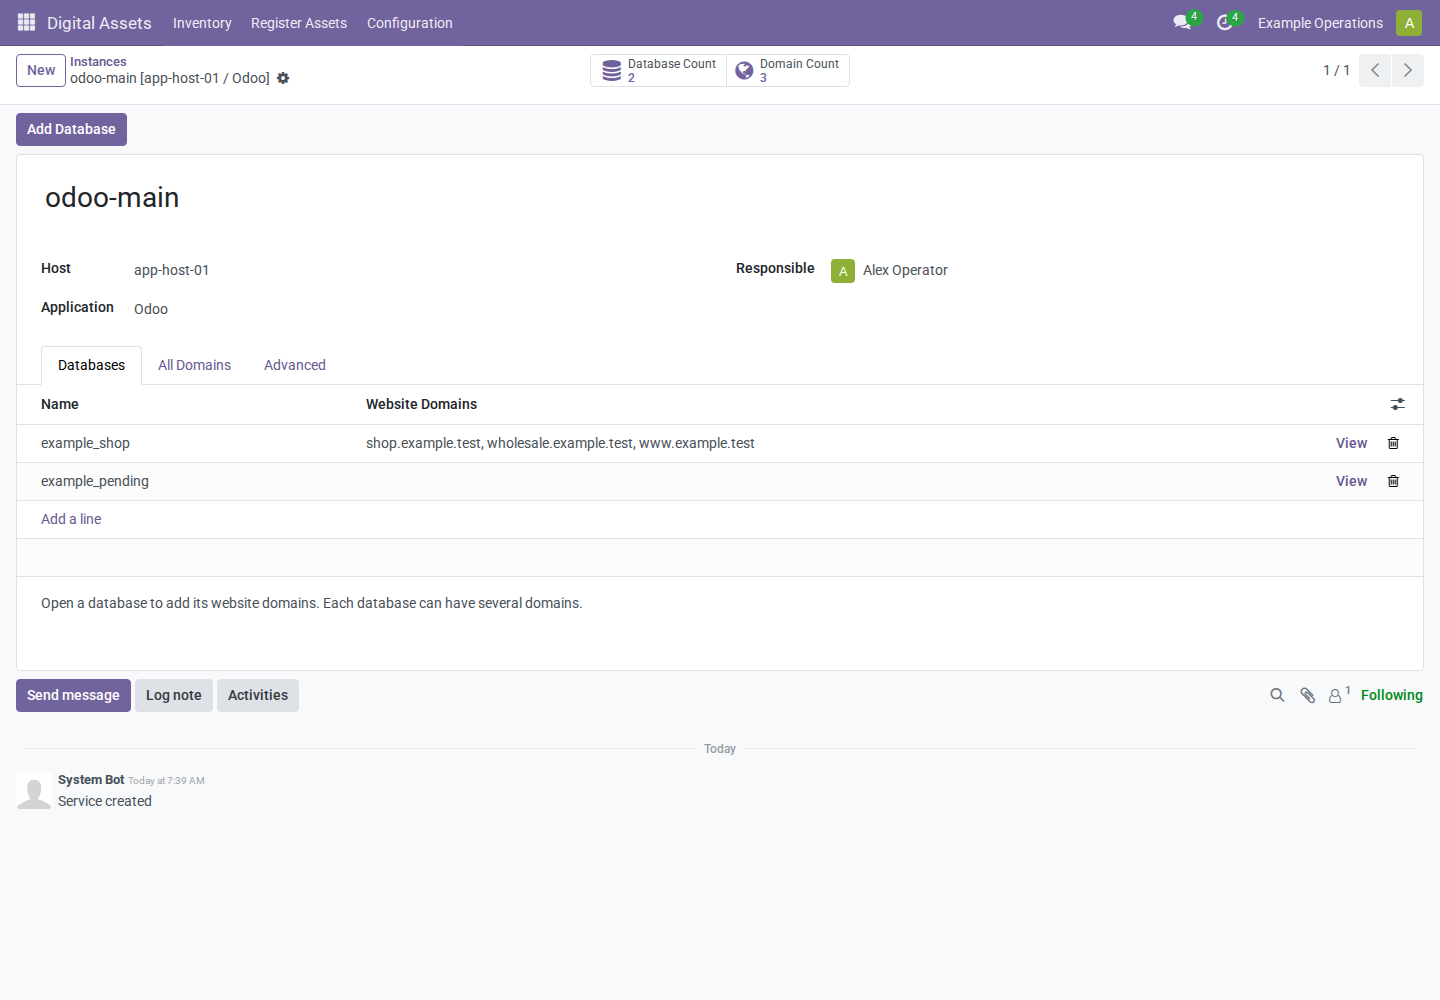
- Confirm Host, Application, and Responsible. The instance company follows its host.
- Save any changes.
Alternatively, choose Add Instance on the host and follow guided registration, or create the record from Inventory > Instances and select its host manually.
Instance display names include the instance, host, and application, such as
odoo-main [app-host-01 / Odoo]. Databases lists this instance's databases;
All Domains is a read-only overview of its application-linked domains.
Optional location and service file metadata are under Advanced.
5. Add databases
- On the instance, open Databases and choose Add a line.
- Enter the logical database name, for example
example_shop. - Save the parent form and open the database using View.
- Confirm Instance and Responsible. Host is derived from the instance and cannot be entered independently.
- Under Advanced, confirm Database Type when needed. PostgreSQL is the default for the Odoo workflow.
- Save the database.
Alternatively, choose Add Database on the instance, or use Inventory > Databases > New and select the instance manually. A draft can remain unassigned, but completing database registration requires an instance classified as a web application and a responsible person.
6. Add website domains and aliases
- Open the database and select Website Domains.
- Choose Add a line and enter a hostname, such as
shop.example.test. - Add one row for each additional website or alias, such as
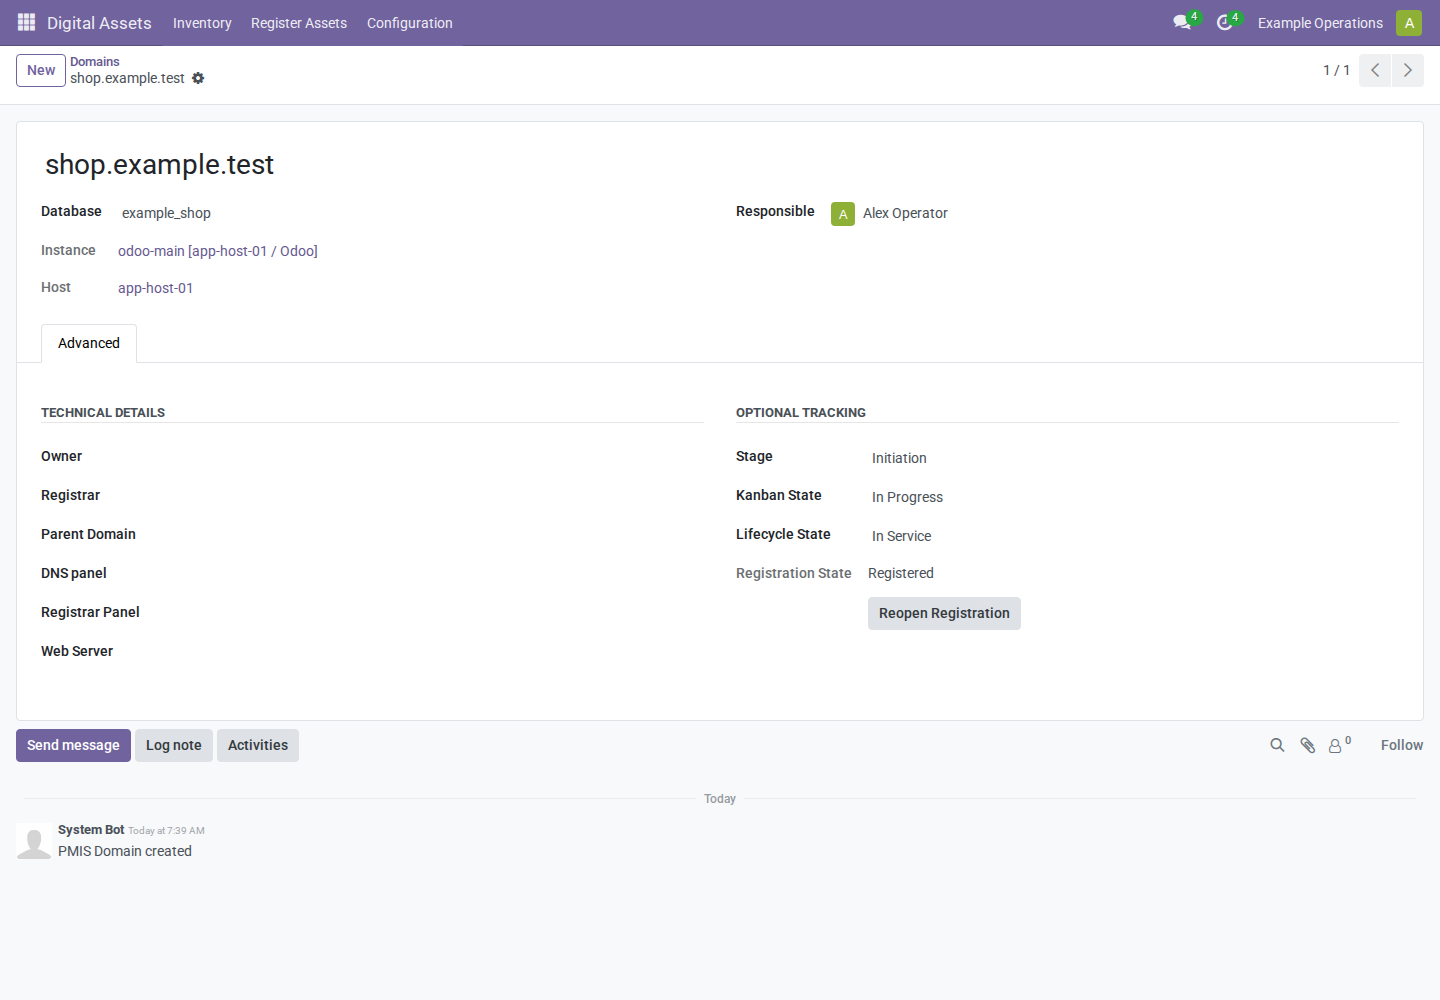
wholesale.example.testandwww.example.test. - Save the parent form. Use View on a row to inspect its domain record.
- Confirm that Database, Instance, and Host show the expected route. Do not select the instance again: it is read-only while a database is selected.
Enter hostnames, not full URLs: use shop.example.test, not
https://shop.example.test/store. Registration rejects malformed hostnames.
The module stores inventory relationships only; configure actual website
domains inside the Odoo database and DNS separately.
Guided domain entry
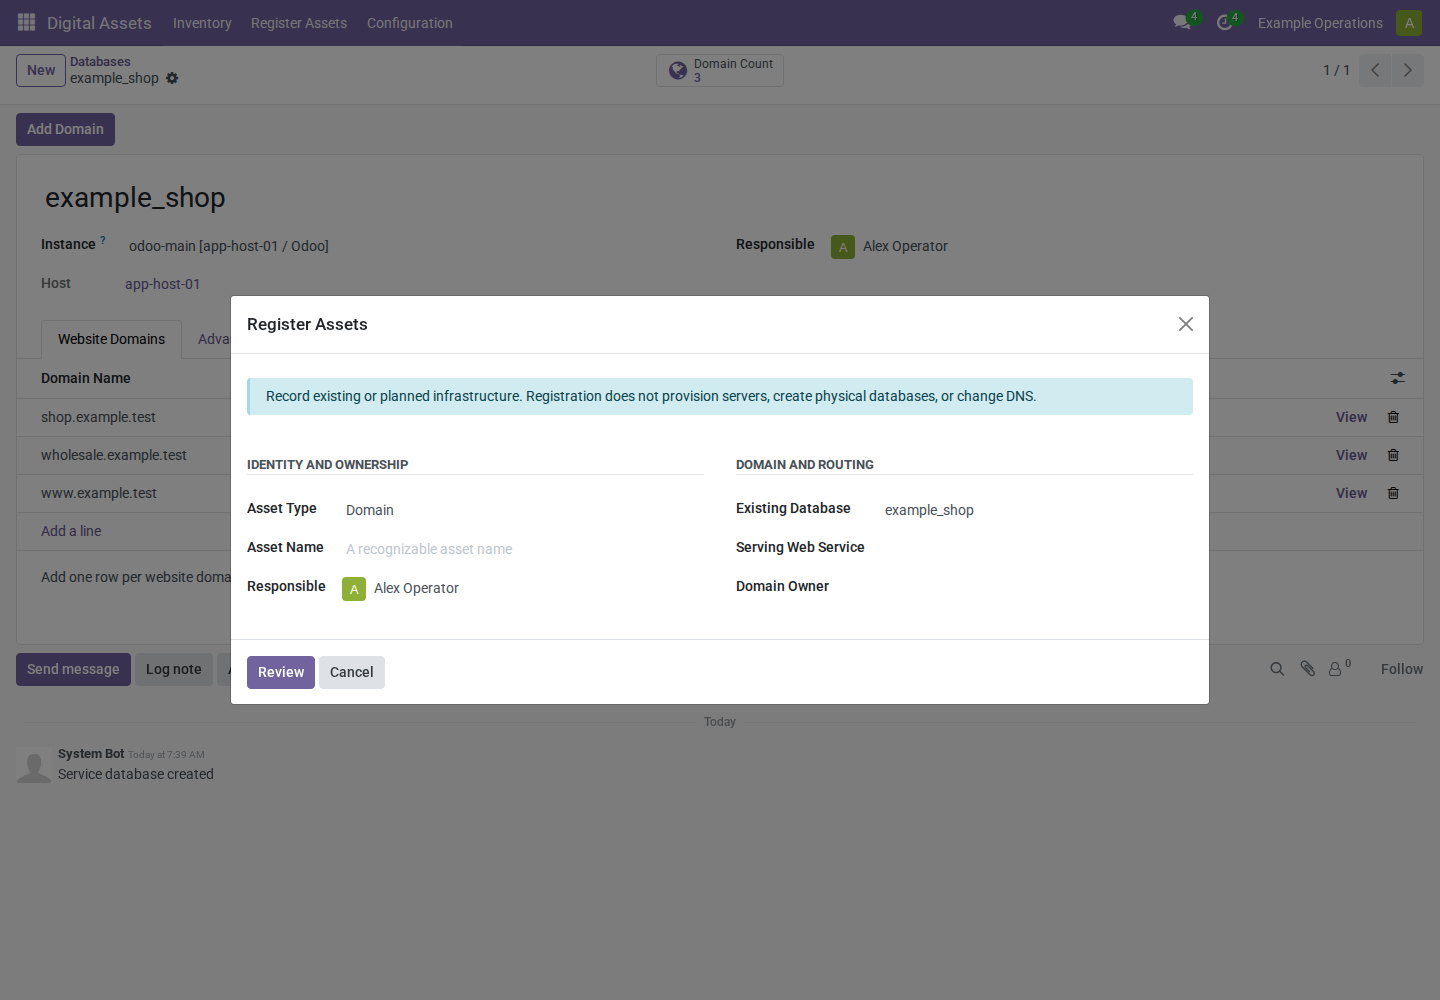
Choose Add Domain on the database to open guided entry with the database preselected. Enter Asset Name as the hostname and confirm Responsible. Optional domain owner and serving web service can remain empty for ordinary Odoo websites. Review, then choose Register or Save Draft.
Standalone and parked domains
From Inventory > Domains > New, enter a domain name and responsible person. Leave Database empty when it does not use an Odoo database. Select Instance directly for a database-less application, or leave both empty for a parked domain. A valid parked domain can still be registered.
Optional owner, registrar, parent domain, DNS panel, registrar panel, and web server are under Advanced. A parent domain is descriptive; it does not automatically assign a child's database or instance.
7. Use guided registration
Use Digital Assets > Register Assets when you want a details/review flow. Contextual Add Instance, Add Database, and Add Domain buttons prefill the relevant parent and company.
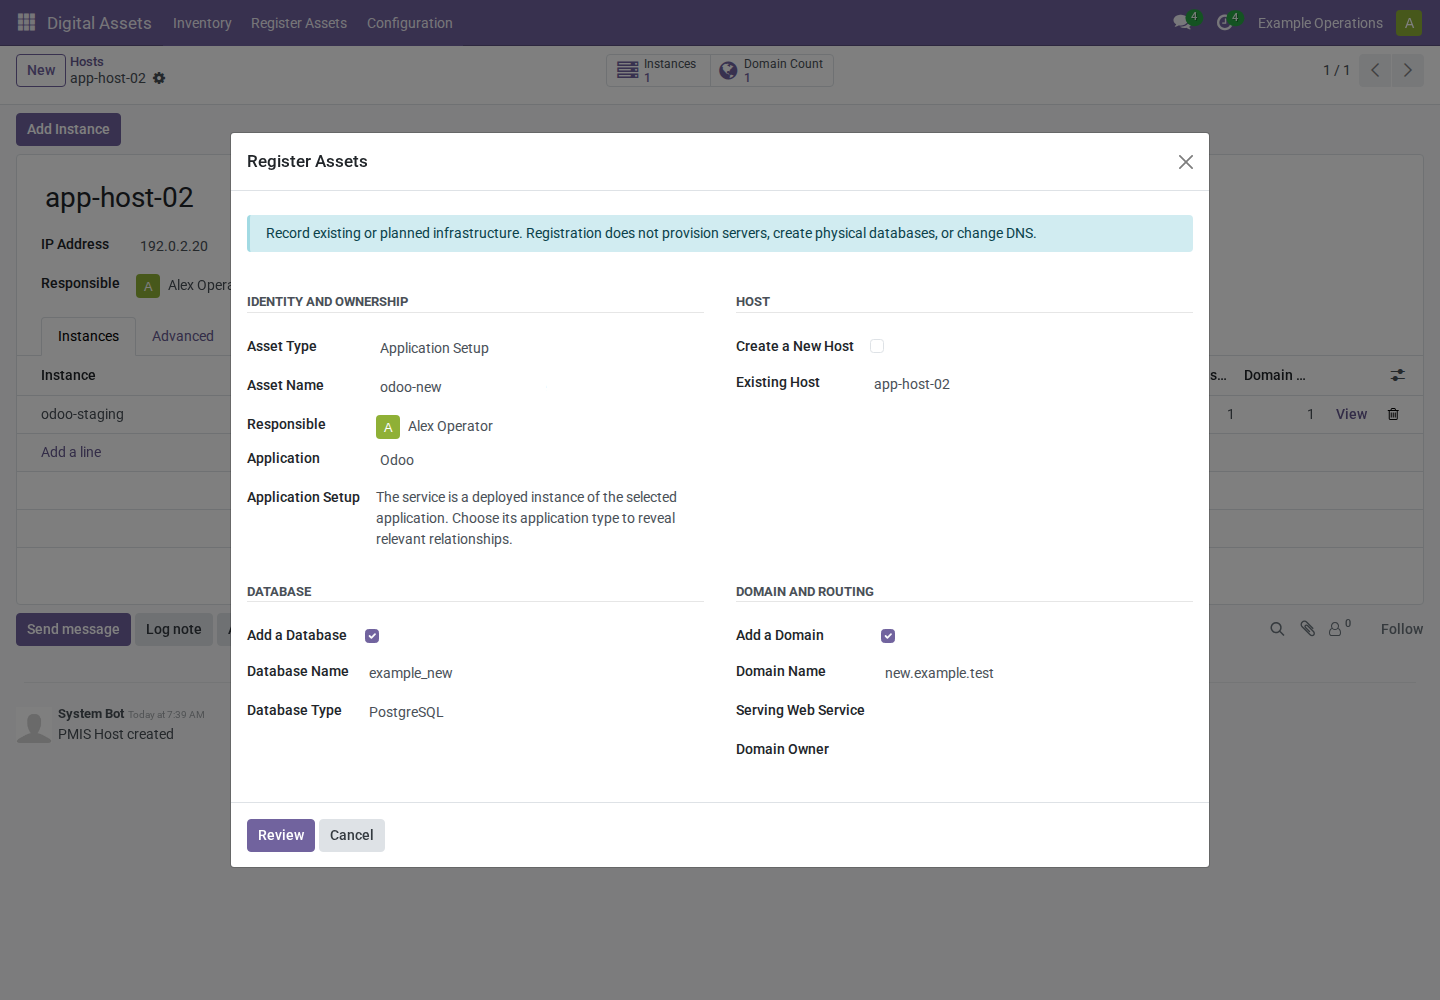
Create an application setup
- Select Asset Type > Application Setup.
- Enter Asset Name, for example
odoo-new, and select Responsible. - Select Application > Odoo.
- Select an Existing Host, or enable Create a New Host and enter its name and type. Supply its IP address if known.
- Enable Add a Database if required; enter
example_newand confirm its database type. - Enable Add a Domain if required; enter
new.example.test. Optional Serving Web Service and Domain Owner can remain empty. - Choose Review.
Review and finish
Review lists records to create, existing dependencies to reuse, company, and responsible person. Duplicate-name warnings include archived records and are advisory: inspect existing inventory before creating duplicates.
| Button | Result |
|---|---|
| Register | Creates the new records together, validates their registration, and opens the primary asset |
| Save Draft | Creates the new records as drafts for later completion |
| Back | Returns to details without creating inventory |
| Cancel | Closes the wizard without creating inventory |
Save Draft still requires valid wizard inputs, names, compatible active dependencies, and same-company relationships. It is not a way to bypass routing or access checks. If any creation/registration step fails, the new inventory selection is rolled back together; existing reused assets are not modified.
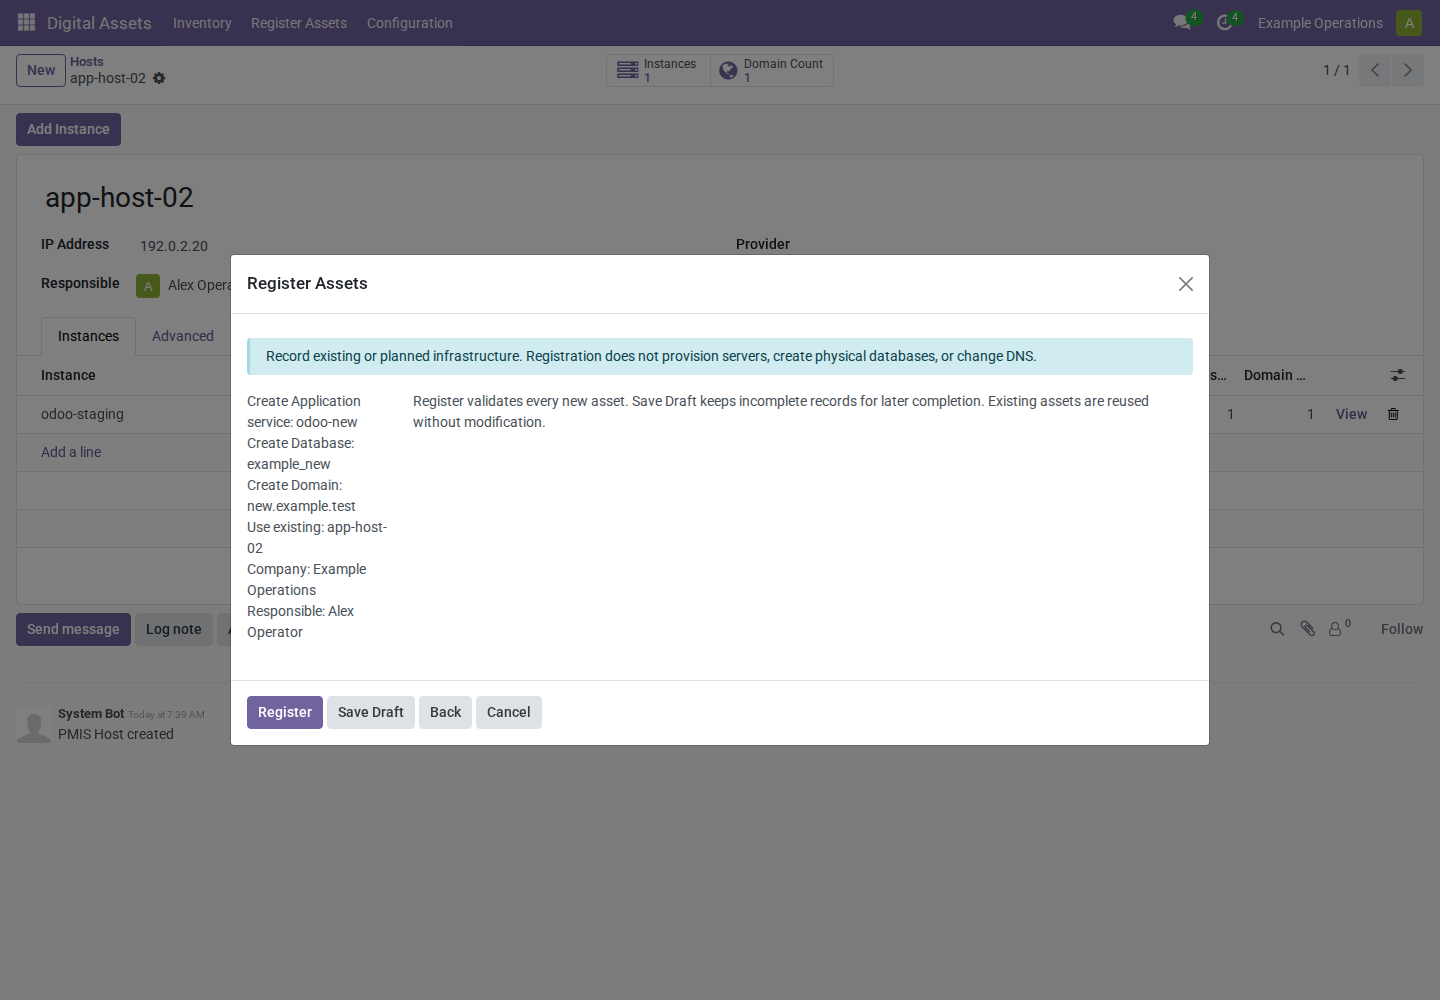
An application setup creates at most one instance, one optional database, one optional domain, and one optional host. Add further databases or domains from their parent forms. The wizard never silently moves an existing database.
For individual assets, select Host, Database, or Domain as Asset Type and enter the relevant details. Domain registration can reuse an existing database; selecting that database determines the instance.
8. Complete and maintain registration
Ordinary form/inline entry is intended for quick inventory capture. To certify completeness later:
- Open the asset's Advanced tab.
- Read its registration checklist, if missing information is displayed.
- Fill the required information and save.
- Select Complete Registration. The state becomes Registered only if all required checks pass.
| Asset | Additional requirements for registration |
|---|---|
| Host | Host type and responsible person |
| Instance | Classified application and responsible person |
| Database | Consuming web-application instance and responsible person |
| Domain | Valid hostname and responsible person; routing links may remain empty |
All assets need a name and company; linked assets must belong to the same company. These checks also apply to imports and API changes of registered records. Completing one existing record does not register its related records.
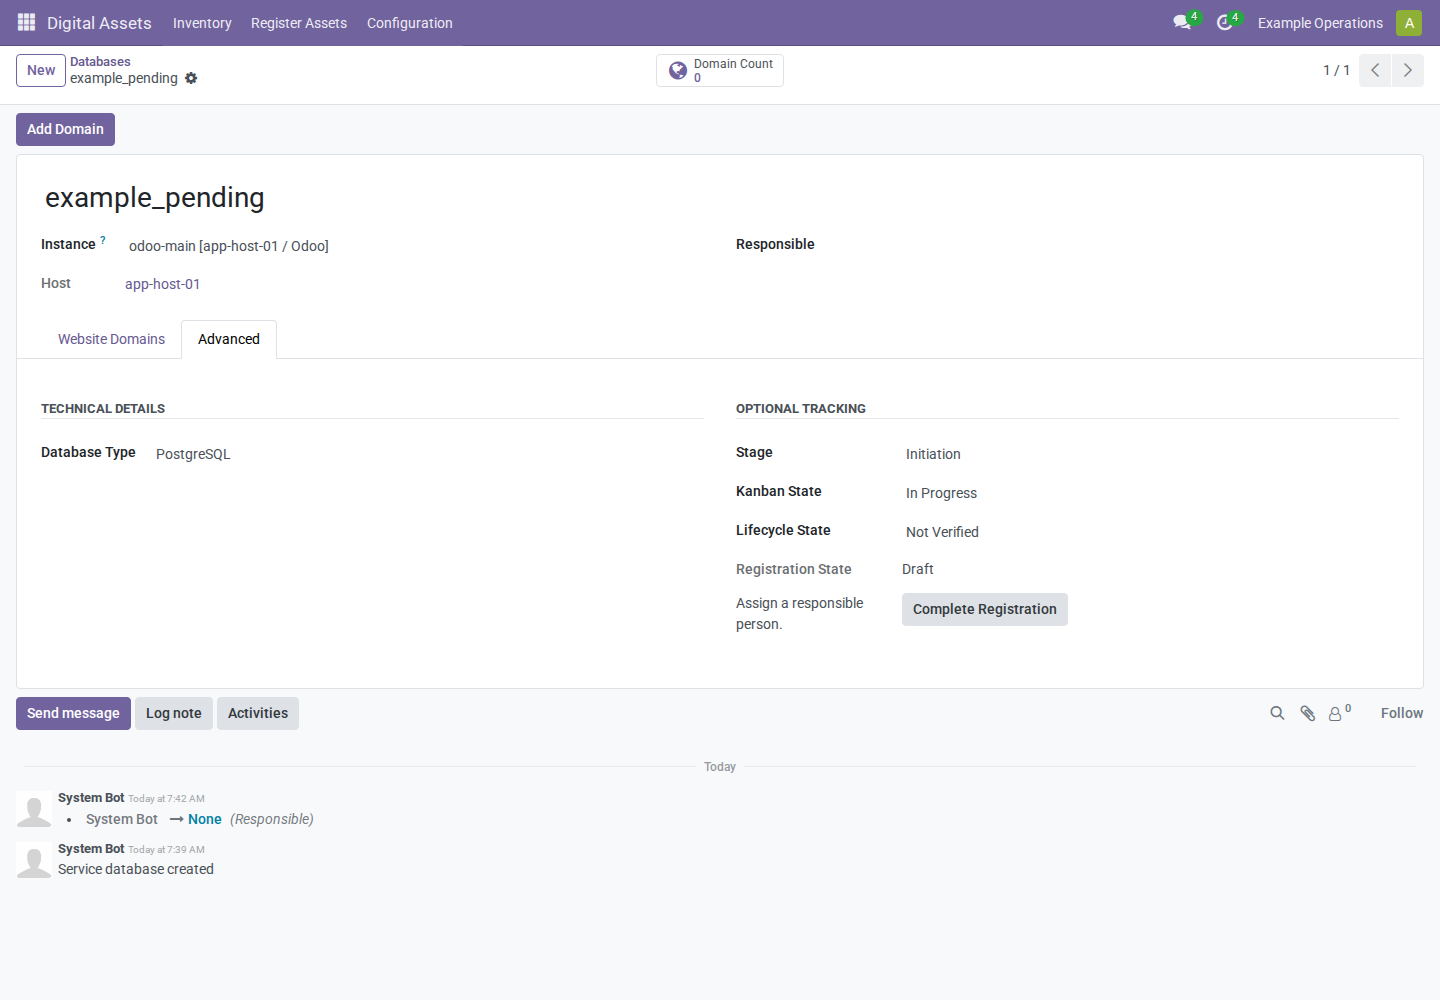
Use Reopen Registration before intentionally removing information required for a registered asset. Correct the draft and register it again when ready. Registration is a statement about inventory completeness, not a connectivity test or proof that the infrastructure exists.
Under Advanced, set Lifecycle State independently to Not Verified, Planned, In Service, Retiring, or Retired. Keep configurable Stage and Kanban State aligned with your own process; none of these controls runs infrastructure operations.
9. Move databases and instances
Move a database to another instance
Perform the actual infrastructure migration separately. To update inventory:
- Ensure the destination instance is active, belongs to the same company, and has the appropriate application classification for registered databases.
- Open Inventory > Databases and select the database.
- Change Instance to the destination, for example from
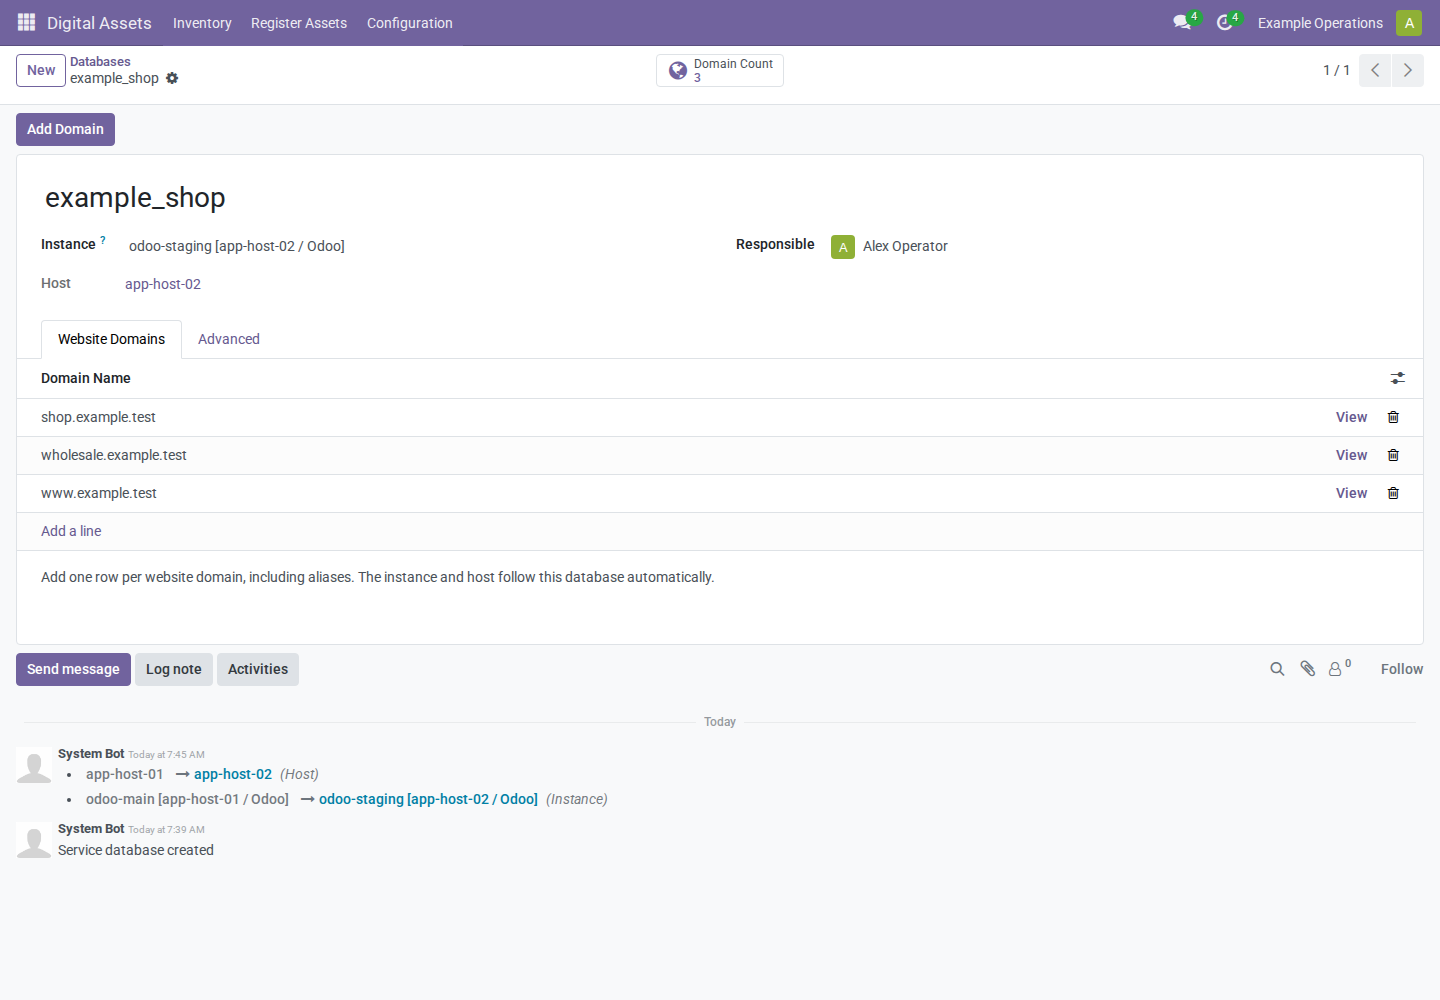
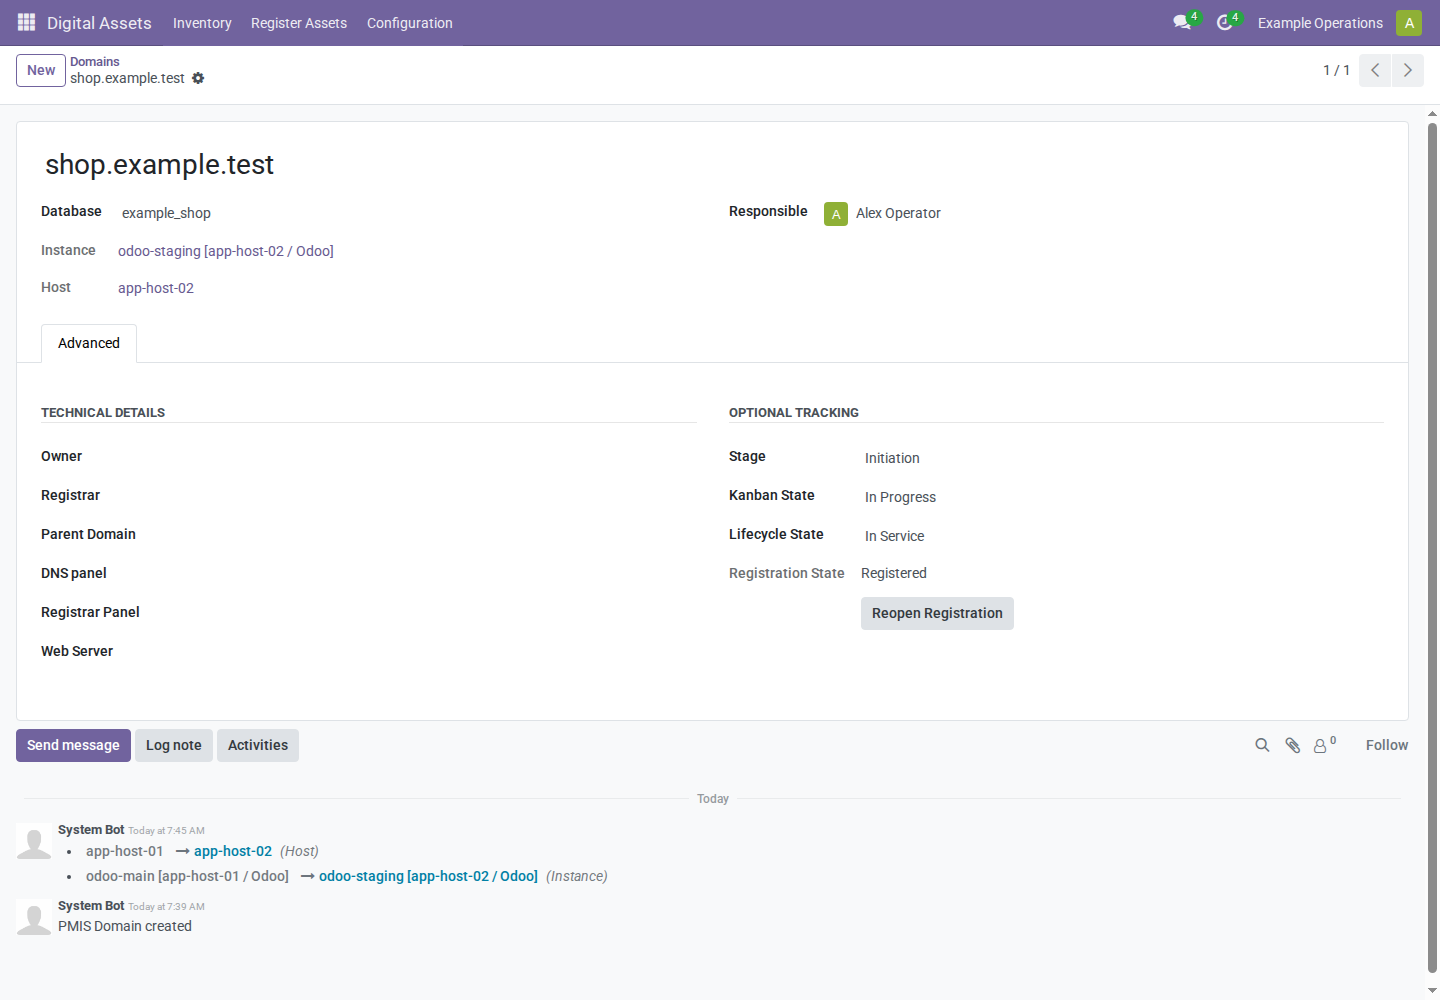
odoo-mainonapp-host-01toodoo-stagingonapp-host-02. - Save. Host updates from the destination instance.
- Open a connected domain, or inspect Inventory > Domains, to confirm the new instance and host.
All connected domains move with the database, including registered and archived domains. Their names, database links, registration state, and archive status are preserved. Do not edit each domain or create replacement records. The optional serving web server is independent and is not automatically moved.
Move an instance to another host
Open Inventory > Instances, change its Host, and save. Database and application-linked domain host displays follow automatically. The instance's company follows the new host; moving across companies can be blocked by registered dependents whose ownership would no longer match. Treat a cross-company ownership change as a separate reviewed operation.
Reassign one domain
Open the domain, select another Database, and save. Its instance and host follow the new database. If you clear the database, the derived instance is cleared; select an instance explicitly if a standalone route is still needed. Database-backed domains cannot override their instance independently.
10. Find and maintain inventory
Use Digital Assets > Inventory to open Hosts, Instances, Databases, or Domains. Smart buttons and View controls provide navigation through the hierarchy without re-entering relationships. Counts and normal searches exclude archived records, although archived links are retained.
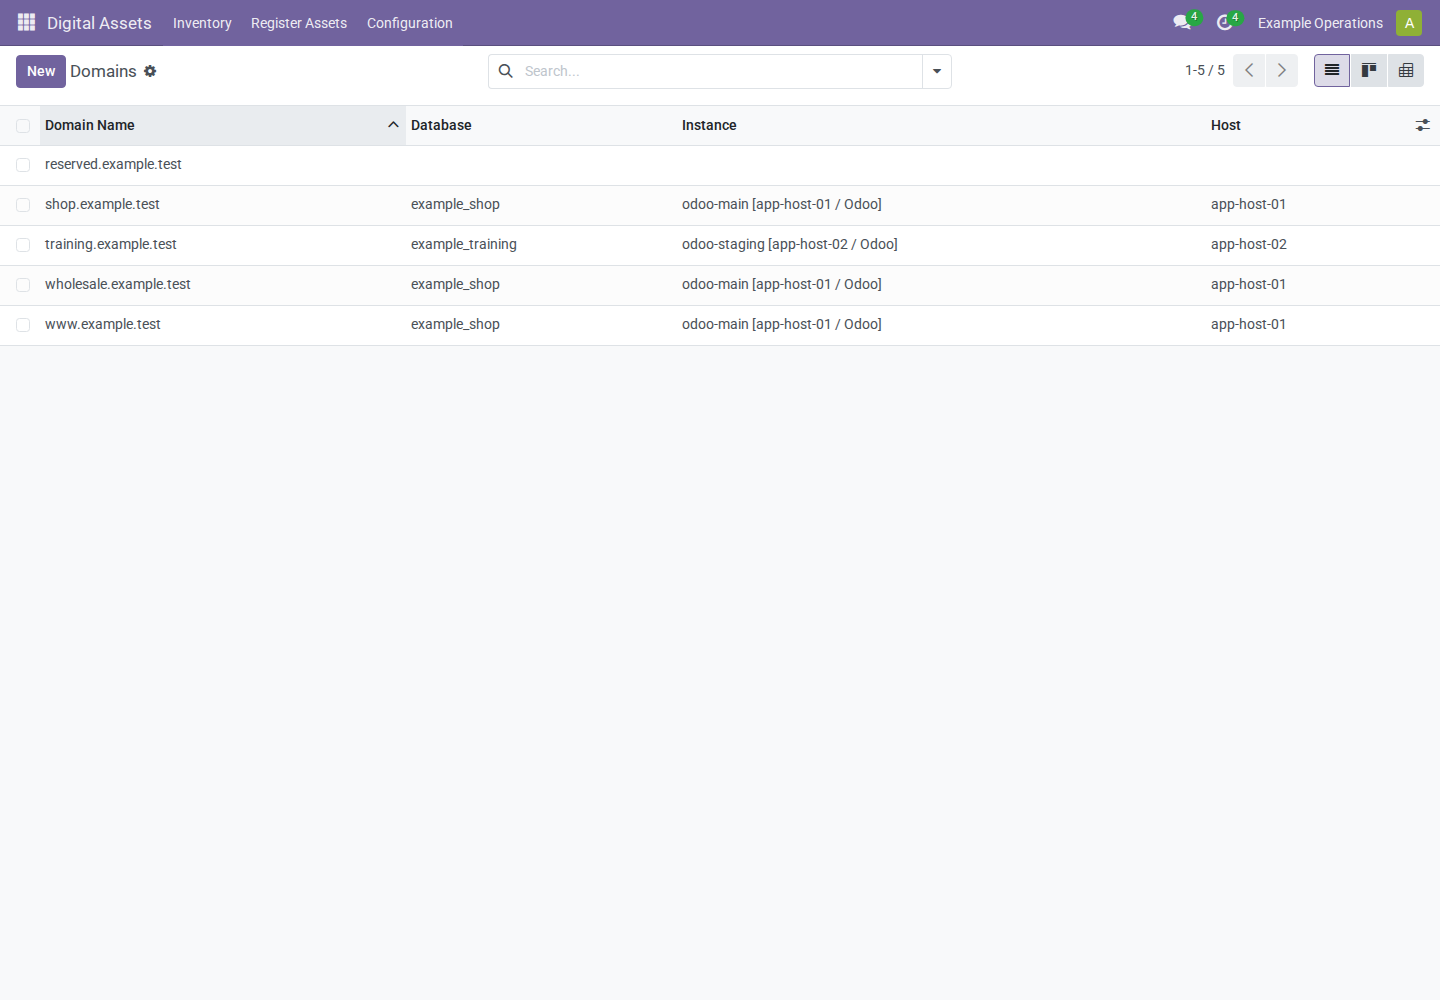
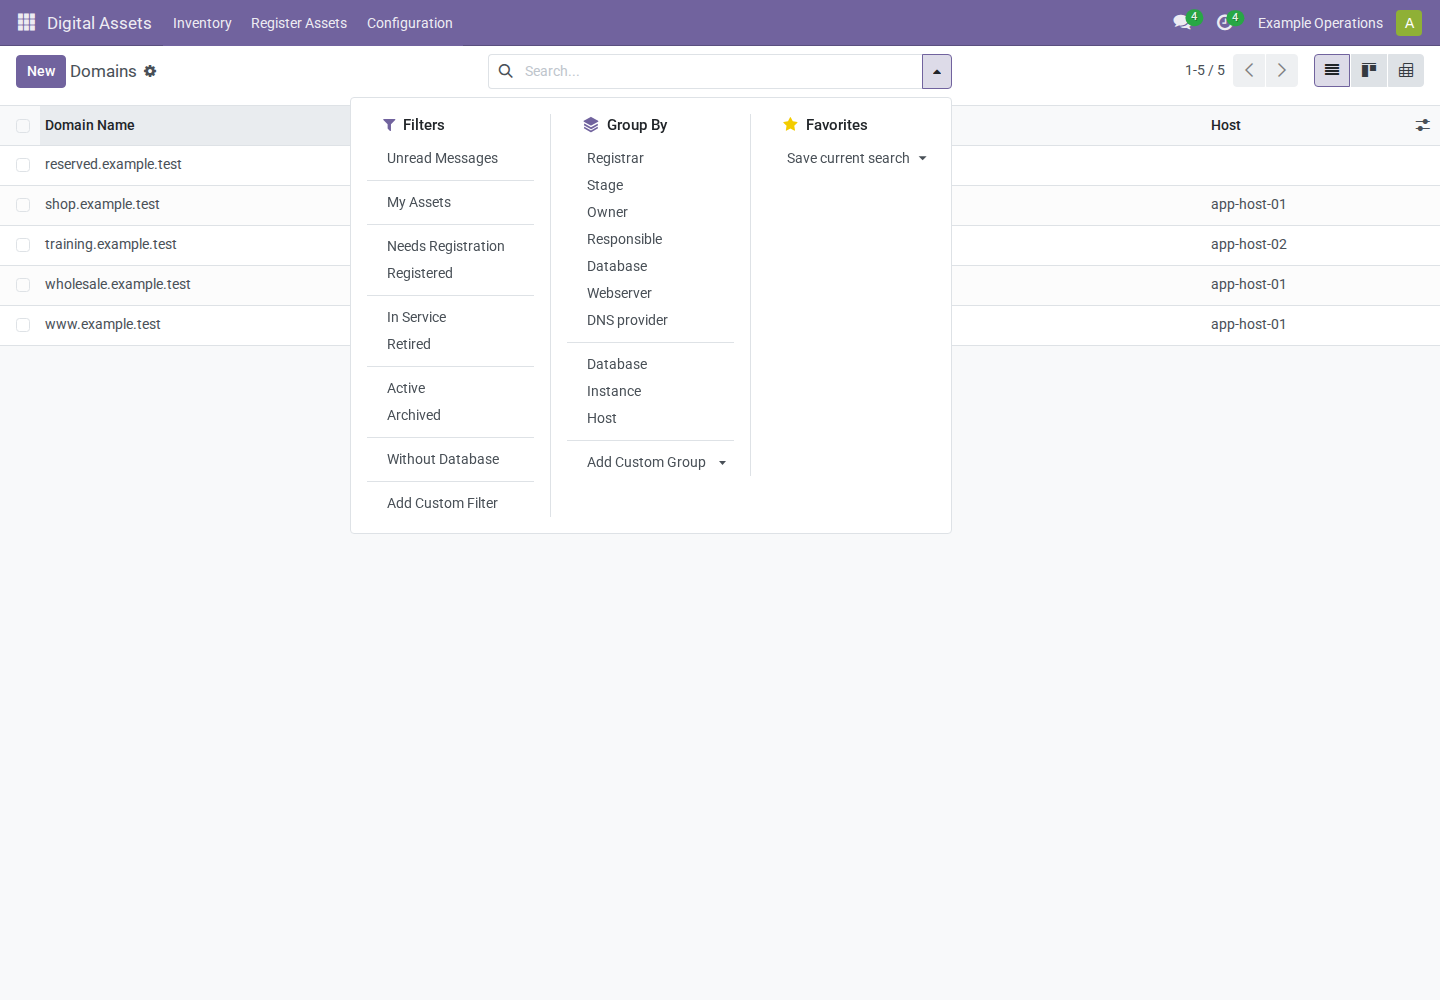
Use the search bar and its dropdown to combine filters and grouping:
- My Assets: assigned to the current responsible user.
- Needs Registration and Registered: registration completeness.
- In Service and Retired: lifecycle status.
- Active and Archived: current visibility.
- Unassigned on databases: databases without an instance.
- Without Database on domains: standalone or parked domains.
- Domain Group By > Database, Instance, or Host: hierarchy summaries.
- Database Group By > Host: overview of databases by application host.
Remove conflicting filters before searching for records that appear missing. Save frequently used combinations as Favorites. Use the optional-column control on lists to expose hidden metadata without crowding everyday views.
Update Responsible on an asset when ownership of maintenance changes. Instance assignment tracks the assignment time; Assign to Me, where exposed by the view, assigns the current user. Use chatter Log note for inventory decisions and Activities for follow-up work. Send message can notify followers; do not place credentials or sensitive customer information in chatter.
Copying a host follows the existing service/follower copy policy; do not assume it clones every database/domain or deploys a new machine. Review copied inventory before treating it as an accurate description of another host.
11. Archive and restore assets
Prefer archiving to deletion when history is still useful:
- Open the obsolete asset and use the record's action menu (gear icon in the screenshots), then Archive. Confirm when prompted.
- Alternatively, select records in a list and use Actions > Archive.
- To restore an asset, open its inventory list, apply Archived, select it, and choose Unarchive from the action menu.
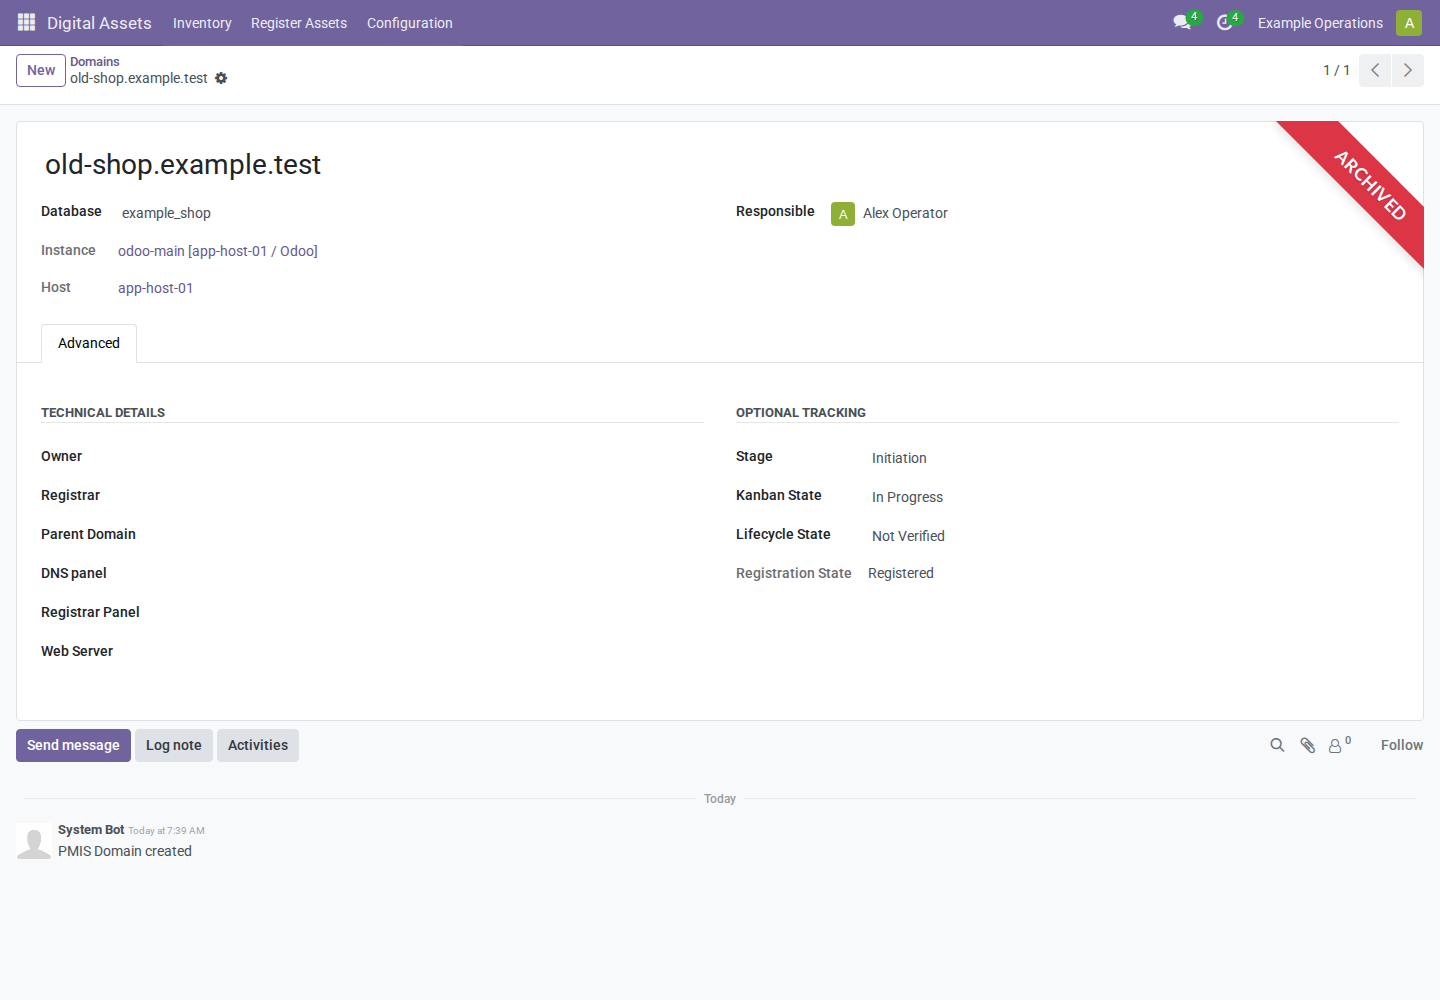
Archiving preserves relationships and history. It does not cascade: archiving a host does not archive its instances, databases, or domains. Review each dependent record separately. Archived dependencies cannot be selected in guided new setups.
Retired is an operational status; Archived controls normal visibility. Archiving and unarchiving do not change registration or lifecycle state and do not recertify historical records. Managers can archive configuration entries; inventory users can archive assets they can edit.
Deletion is restricted by access rights and may affect related inventory. Use it only for records that should not exist, after reviewing relationships; it is not a substitute for retiring or archiving infrastructure.
12. Import and export
For bulk entry, use Odoo's standard list import/export controls:
- Export a small import-compatible sample from the relevant inventory list to establish the available column names and relationship fields.
- Prepare imports in host > instance > database > domain order.
- Give records stable external IDs and use those IDs for parent relationships rather than ambiguous display names.
- Import incomplete records as drafts. For domains with a database, supply the database relationship and let instance/host derive automatically.
- Use Odoo's import Test step before Import, then inspect the resulting inventory and Needs Registration.
- Export selected records from list actions when an offline inventory report is needed. Exports describe recorded data, not a live infrastructure scan.
Names are required even for drafts. A conflicting database/instance route is rejected, and registered records must continue satisfying their completeness checks. Duplicate names are not automatically merged or universally prohibited.
13. Troubleshooting
| Symptom | What to check |
|---|---|
| Digital Assets is missing | Module installation, user inventory role, and a fresh login after access changes |
| Configuration is missing or read-only | Digital Assets Manager access; ordinary users only read configuration |
| Database or domain cannot be found | Archived/active filters, search terms, company domains, and access rights |
| Cannot complete registration | Advanced checklist, responsible person, host type or application classification, hostname validity, and company consistency |
| Cannot choose an existing dependency in the wizard | It must be active, accessible, and in the selected active company |
| Instance is read-only on a domain | The selected database owns that route; change the database or its instance |
| Wizard shows a duplicate-name warning | Inspect active and archived inventory; the warning does not merge records |
| Draft save still fails | A name and valid wizard details are still required; draft mode only defers completeness certification |
| Host or DNS did not physically change after an inventory edit | Expected: Digital Assets performs no infrastructure, website, database, or DNS operations |
| Old forms remain after source deployment | Ask the administrator to apply the module upgrade; refreshing the browser alone does not upgrade the module |
For technical extension and access details, see the developer guide. Release-specific changes are in the changelog.